
Some systems only accept data as an RSS-style XML feed, and a spreadsheet won’t do. You can’t pick that format on the Quick Export screen, so it’s easy to assume the plugin doesn’t offer it. Store Exporter Deluxe does, as RSS 2.0, through Scheduled Exports.
You’ll set the feed header, create a scheduled export in RSS 2.0, check what the file contains, and open it. One thing to know up front: the file is a structured data feed, not a blog-style feed. It holds one <item> per record, with one element per export field, and it isn’t built for subscribing to in a feed reader.
Prerequisites
| Requirement | Details |
|---|---|
| Plugin | Store Exporter Deluxe 5.4.4 or later, active and licensed |
| WooCommerce | Active, with at least one record of the type you want to export |
| Administrator access | You’ll need an account with access to the WordPress admin dashboard |
Step 1: Set the RSS feed header (optional)
Every RSS file starts with a header that describes the feed as a whole. You set it once, and it applies to every RSS export.
- Open WooCommerce → Store Export from the WordPress admin menu.
- In the sidebar, click Settings under the SYSTEM group.
- Open the Export Formats section.
- Find the RSS Format card, which holds the feed header fields.
- Type a name for the feed into Title Element, for example “Product export for My Store”.
- Type your website address into Link Element. It doesn’t have to be the location of the feed itself.
- Type a short summary into Description Element.
- Click Save Changes.
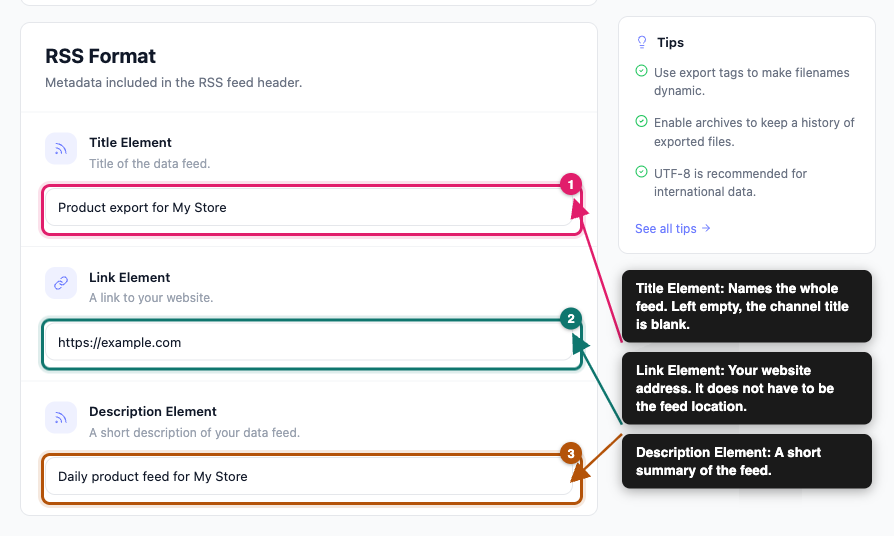
If you skip this step, the export still works. The header’s title, link, and description are just left empty. See the troubleshooting section below if a system you feed the file into rejects that.
Step 2: Create a scheduled export
- Open WooCommerce → Store Export, then click Scheduled Exports in the EXPORTS group of the sidebar.
- If the screen says scheduled exports are currently disabled, click Enable Scheduled Exports first.
- Click New Schedule.
- On the General step, enter a name in the Schedule Name field. This name only appears in your WordPress admin.
- Choose what to export from the Export Type dropdown. RSS 2.0 is available for any type in the list.
- Choose RSS 2.0 from the Export Format dropdown.
- Under Export Fields, choose All Fields, Use Template, or Saved Selection.
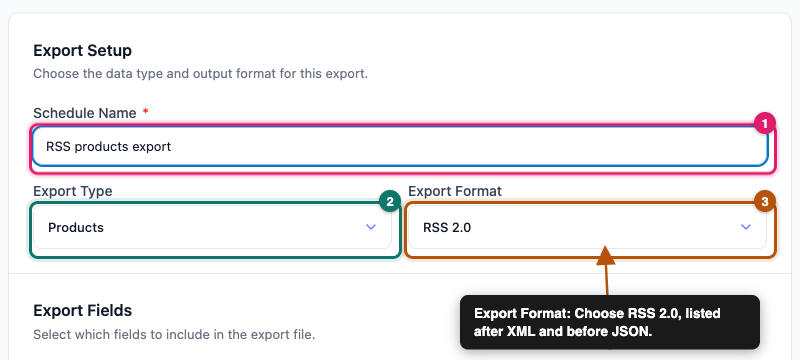
The rest of the wizard works the same as for any other format:
- Filters: narrows what’s exported. Skip it to export every record of the chosen type.
- Method: chooses where the file goes: Archive to Media, Save to Server, Send as Email, POST to URL, or FTP / SFTP. RSS isn’t tied to one delivery method. Pick Archive to Media for your first run, because it’s the easiest way to check the file.
- Scheduling: sets how often the export runs.
- Advanced: sets per-schedule options such as the log level.
Click Create Schedule to save it.
For detailed instructions on every step, see How to schedule exports in Store Exporter Deluxe.
Step 3: Run the export
- On the Scheduled Exports screen, find your schedule in the list.
- Click the three-dot menu in the Action column of its row.
- Click Execute Now.
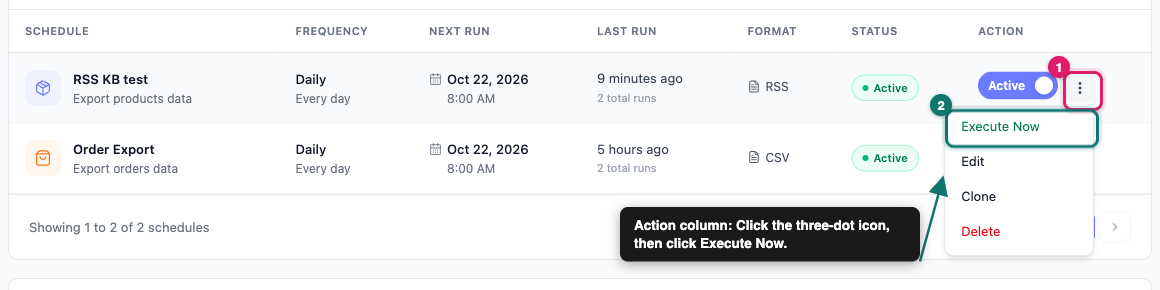
The export runs in the background. Once it finishes, click Archives in the EXPORTS group of the sidebar. Runs recorded in the audit log appear under Export History. An Execute Now run shows Manual Run as the trigger, with the schedule’s name below it. Any others appear under Legacy Archives, further down the page. Click Download on the row to save the file. It ends in .xml.

What the file looks like
The file is RSS 2.0 XML. A Products export looks like this, trimmed to a few fields:
<?xml version="1.0" encoding="UTF-8"?>
<rss xmlns:g="http://base.google.com/ns/1.0" version="2.0">
<channel>
<title>Product export for My Store</title>
<link>https://example.com</link>
<description>Daily product feed for My Store</description>
<item>
<productid>226</productid>
<productname>Yoga Studio Session</productname>
<slug>yoga-studio-session</slug>
<description><p>Book a 60-minute yoga session at our studio.</p></description>
<category><![CDATA[Uncategorized]]></category>
</item>
</channel>
</rss>Here’s how the file is put together:
- One item per record: each product, order, customer, or other record becomes its own
<item>. - One element per field: each field becomes a child element named after its column label, lowercased with spaces and most symbols removed. So Product Name becomes
productname. - Field names, not feed names: items don’t carry the standard RSS
<title>,<link>,<pubDate>, or<guid>elements. The<description>element holds the product’s Description field, not a feed summary. - Special characters are escaped: characters such as
<and&are escaped so the file stays valid XML. Product categories are written as CDATA. - The header comes from Step 1: the channel’s
<title>,<link>, and<description>hold what you typed under RSS Format in Settings → Export Formats. - The output is indented: the file uses indentation and line breaks, so it’s easy to read.
Format-specific options
RSS exports use fewer options than other formats. Here’s what applies and what doesn’t:
| Setting | Applies to RSS? | Details |
|---|---|---|
| Title Element, Link Element, Description Element | Yes | Set under Settings → Export Formats → RSS Format. They fill the channel header. |
| Character Encoding | Yes | Set under Settings → General. The plugin writes the choice into the file’s first line. The default is UTF-8, which is the safest choice for systems that read the file. |
| Grouped Product Formatting, Product Image Formatting, Product Gallery Formatting | Yes | Shown in the wizard’s File & Data Formatting section. They change how those product values are written inside each <item>. |
| Header Formatting | No | The wizard shows it, but RSS files have no header row. |
| Excel Formulas | No | The wizard shows it, but it only affects CSV, TSV, XLS and XLSX output. |
| Column Delimiter | No | A CSV setting. It doesn’t appear in the wizard once you choose RSS 2.0. |
| Field Delimiter and Line Ending Formatting (in Settings → Export Formats → CSV Format) | No | CSV and TSV only. |
Opening your RSS file
The file is saved with an .xml extension, so any tool that reads XML can open it.
- Web browser or code editor: open the file in a browser, VS Code, or any text editor. Most browsers show the XML as a collapsible tree.
- Excel: use Data → Get Data → From File → From XML to load the items as rows. If you mainly want a spreadsheet, a CSV or Excel export is simpler.
- Your own code or an integration tool: every mainstream language can parse XML, and most import tools accept an XML URL or file.
- Feed readers: a feed reader expects each item to have a title, a link, and a date. RSS items from Store Exporter Deluxe don’t have them, so a reader may load nothing useful.
Troubleshooting
<title>, <link>, and <pubDate>. Store Exporter Deluxe names item elements after your export fields, so a strict feed validator or a feed reader may reject it. In that case, the XML format is usually the better fit.Frequently asked questions
A new schedule is saved as active and runs daily, so it keeps making a file after your one-off run. If you only need one file, pause the schedule with its Active toggle, or delete it, after the run.
.xml extension. The content is still RSS 2.0, so you can rename the file to .rss if the system you’re feeding needs that.<store> node. RSS wraps the same records in an <rss> and <channel> structure with <item> nodes. Choose RSS only when the system you’re feeding expects that wrapper. Otherwise, XML is the simpler choice.Related articles
- How to schedule exports in Store Exporter Deluxe
- How to export WooCommerce data to XML
- Available hooks and filters for further customization
Need help?
If you’re using Store Exporter Deluxe and run into an issue this article doesn’t cover, open a support ticket and our team will help you get your RSS export working.
If you’re using the free Store Exporter plugin, ask on the WordPress.org support forum and our team will get back to you there.