When most people Google “WooCommerce export to Zapier,” they find Zapier’s own WooCommerce app and assume that’s the whole picture. It isn’t. Zapier’s native WooCommerce integration is designed for real-time, one-order-at-a-time events: a new order, a new customer, a status change. It’s brilliant for that. But if you need to export 2,000 historical orders, schedule a weekly bulk dump to your accountant, or pipe product catalogs into a spreadsheet, you need a different approach.
There are three honest ways to handle a WooCommerce export to Zapier, each solving a different problem, and most mature setups run two of them side by side.
One thing upfront: Visser Labs does not have a native Zapier app. Store Exporter Deluxe exports files on a schedule to email, FTP, or a URL, and Zapier picks them up and fans the data out anywhere you want. That’s more flexible than a native integration because the same export can feed Zapier, your accountant’s inbox, and your own server at the same time. In this article, we’ll walk through all three methods, when to use each, and example Zaps you can build today.
Table of Contents
Why Route Your WooCommerce Export To Zapier?
Zapier connects to more than 6,000 apps. That’s why it’s where store owners end up when they want WooCommerce order, customer, or product data to show up somewhere else: Google Sheets, Slack, Mailchimp, Xero, QuickBooks, HubSpot, Airtable, Notion, whatever your stack looks like.
The core value is simple: write one pipeline, send the data anywhere. Configure WooCommerce as the source once, and Zapier does the fan-out.
The question most guides skip is how WooCommerce actually gets the data into Zapier in the first place. The answer changes depending on whether you need real-time events or scheduled bulk data, so a WooCommerce export to Zapier is really a choice of pipe, not a single button. Zapier is the fan-out layer. Your job is picking the right pipe from WooCommerce to Zapier.
A quick vocabulary check before we get into the methods:
- Zap / task: A Zap is one workflow (trigger plus actions). A task is a single action Zapier runs, and Zapier bills per task.
- Webhook: A URL that accepts an HTTP POST when something happens. WooCommerce fires webhooks on events like “order created.”
- Email Parser: A Zapier service that reads emails, extracts the attachment or body, and fires a Zap.
- FTP/SFTP: File transfer protocols. SFTP is the secure version most hosts support by default.
Here are the three methods.
Method 1: Store Exporter Deluxe Plus Zapier Email Parser
This is the method to reach for first. No server config, no FTP credentials, no developer setup. If you have a Zapier account and a WooCommerce store, you can wire this up today.
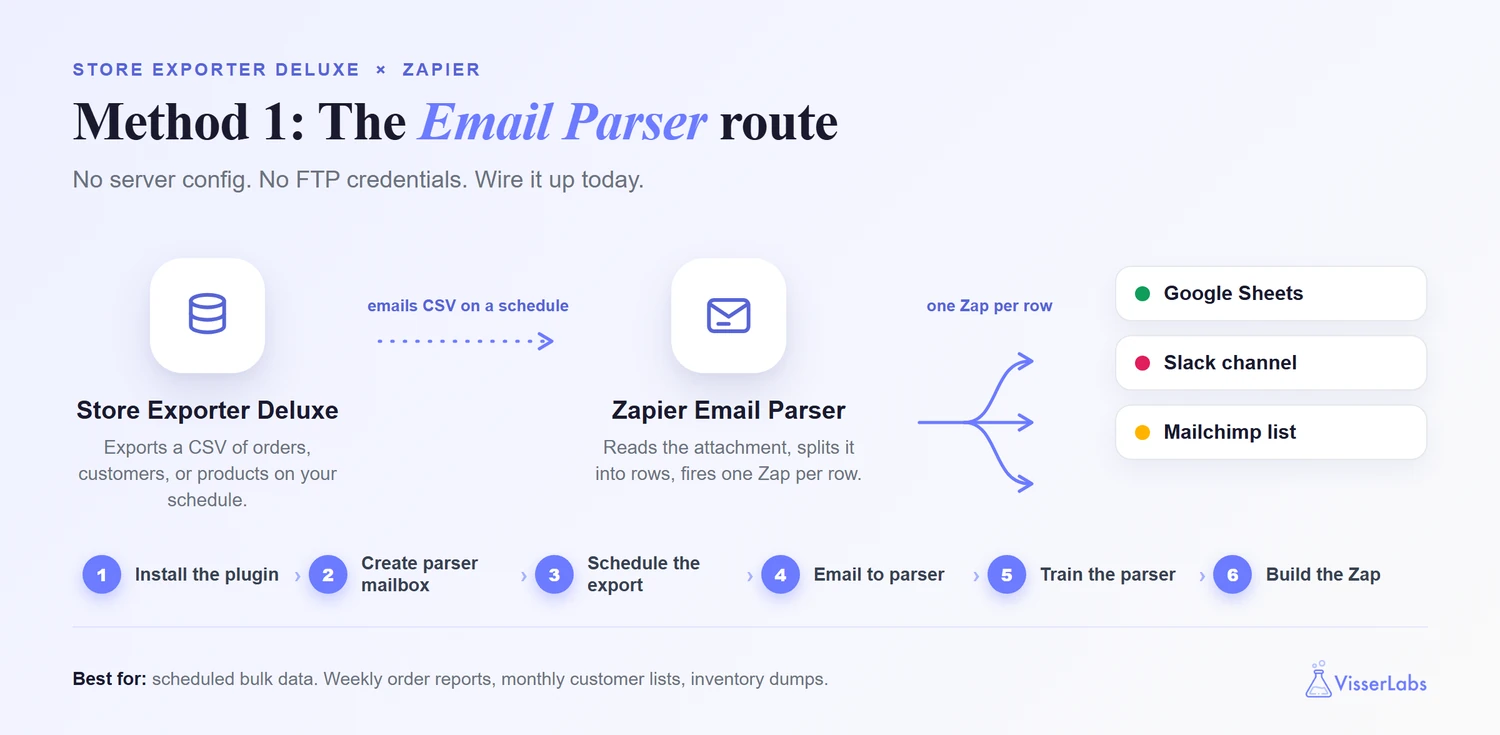
Best for: Scheduled bulk data. Weekly completed-orders reports, monthly new-customer lists, quarterly product inventory dumps.
How it works: Store Exporter Deluxe emails a CSV to a special Zapier mailbox on a schedule. Zapier’s Email Parser reads the attachment, splits it into rows, and fires a Zap for each row. The Zap sends each row wherever you want: a Google Sheet, a Slack channel, a Mailchimp list.
Step 1: Install and activate Store Exporter Deluxe
Install Store Exporter Deluxe from your WordPress admin. Once activated, you’ll find it at WooCommerce, Store Export.
Step 2: Set up a Zapier Email Parser mailbox
Go to parser.zapier.com and create a new mailbox. Zapier assigns you a unique address that looks like [email protected]. Save that address. You’ll paste it into Store Exporter Deluxe in the next step.
Step 3: Configure a scheduled export
In Store Exporter Deluxe, pick the data type (orders, customers, products, whatever you need), choose CSV as the format, and select the fields to include. Then head to the Scheduled Exports tab and create an export schedule on your chosen cadence: daily, weekly, monthly, or a custom WP-Cron interval.
Step 4: Set email delivery to your parser mailbox
In the scheduled export’s delivery settings, choose email as the delivery method and paste the Zapier parser address from Step 2 as the recipient. The CSV will land in that mailbox every time the schedule fires.
Step 5: Train the parser on your file structure
Run the scheduled export manually once to send a real CSV to the parser mailbox. In Zapier’s Email Parser, open the received email, highlight sample values in the attachment (order number, customer email, total, and so on), and name each field. This tells Zapier how to split future CSVs into structured data.
Step 6: Build the Zap
Create a new Zap in Zapier. The trigger is “New Email in Parser by Zapier,” pointed at your mailbox. The action can be anything in Zapier’s 6,000-app library. Most store owners start with “Create Row in Google Sheets” so new exported orders append to a running report sheet, but the same setup works for Slack messages, Mailchimp subscribers, Airtable rows, or anything else.
What this looks like in practice
A common setup is a weekly completed-orders export delivered every Monday morning to a Zapier parser mailbox. The Zap picks up the CSV, parses the rows, and appends each new order to a Google Sheet the ops team already lives in.
Once it’s wired up, it runs on the schedule without anyone touching WooCommerce, and the sheet is current before the team sits down. This is the flow store owners tell us kills the weekly manual-CSV chore.
Method 2: Store Exporter Deluxe Plus FTP Plus Zapier Transfer
Method 2 is the same idea as Method 1, but the transport is FTP instead of email. This matters when your files get big.
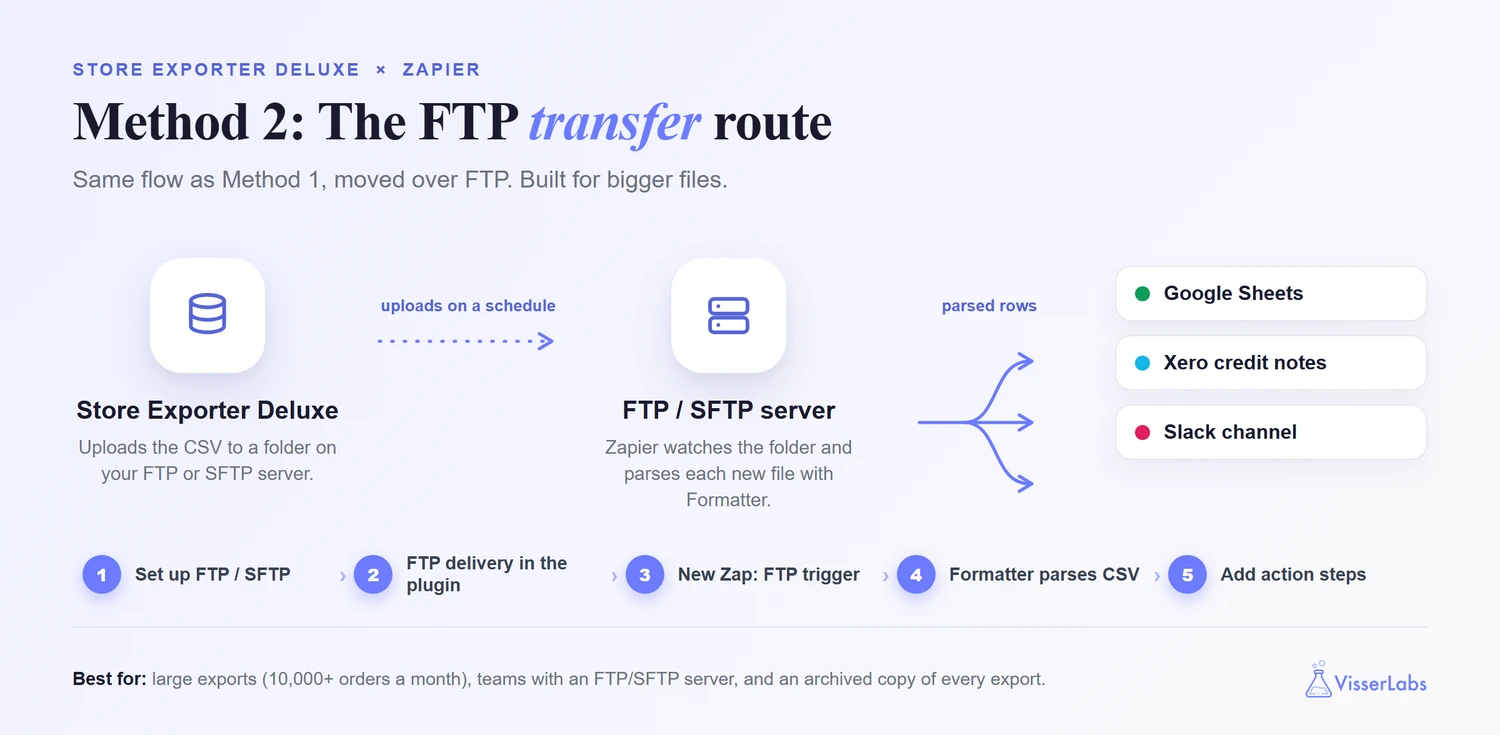
Best for: Larger files (think thousands of rows), teams that already have an FTP or SFTP server available, stores that want an archived copy of every export saved somewhere.
How it works: Store Exporter Deluxe uploads the CSV to a folder on your FTP or SFTP server. Zapier’s Transfer product (or the FTP/SFTP trigger) watches that folder and fires a Zap whenever a new file lands.
Step 1: Configure an FTP or SFTP destination
Most hosts include SFTP access. If yours doesn’t, a dedicated service like DreamObjects or AWS S3 with SFTP works fine. You’ll need the host, port, username, password (or key), and a target folder path.
Step 2: Configure FTP delivery in Store Exporter Deluxe
In your scheduled export’s delivery settings, switch from email to FTP or SFTP. Paste in the host, port, credentials, and the target folder. Run the export manually once to confirm the file lands in the right place.
For a deeper walkthrough of scheduled delivery options, see our automated export system guide.
Step 3: Build a new Zap with the FTP/SFTP trigger
In Zapier, create a new Zap with “FTP/SFTP” (or “FTP” depending on your Zapier plan) as the trigger app, and “New File in Folder” as the event. Connect the same server and point it at the folder Store Exporter Deluxe delivers to.
Step 4: Parse the CSV with Formatter by Zapier
Add a Formatter by Zapier step set to “Utilities, Import CSV File.” Point it at the file from the trigger step. Zapier parses each row into structured fields you can map into downstream actions.
Step 5: Add your action steps
From here, it’s identical to Method 1. Google Sheets, Slack, Mailchimp, Xero, whatever you need. The difference is all upstream of the action: bigger files, no mailbox size caps, and a file server archive of every export.
When to move to FTP
Once a store runs past roughly 10,000 orders a month, the email parser gets slow and can bump against attachment size limits. FTP delivery handles those files in seconds, which is the point where it’s worth switching.
A typical advanced setup is a daily refunds CSV delivered to SFTP, where a Zap picks it up overnight and creates credit notes in Xero. Flows like that run untouched once they’re set, which is the highest compliment an integration can earn.
Method 3: Zapier’s Native WooCommerce Trigger
This is the method most guides stop at, and it’s worth using, just not for everything.
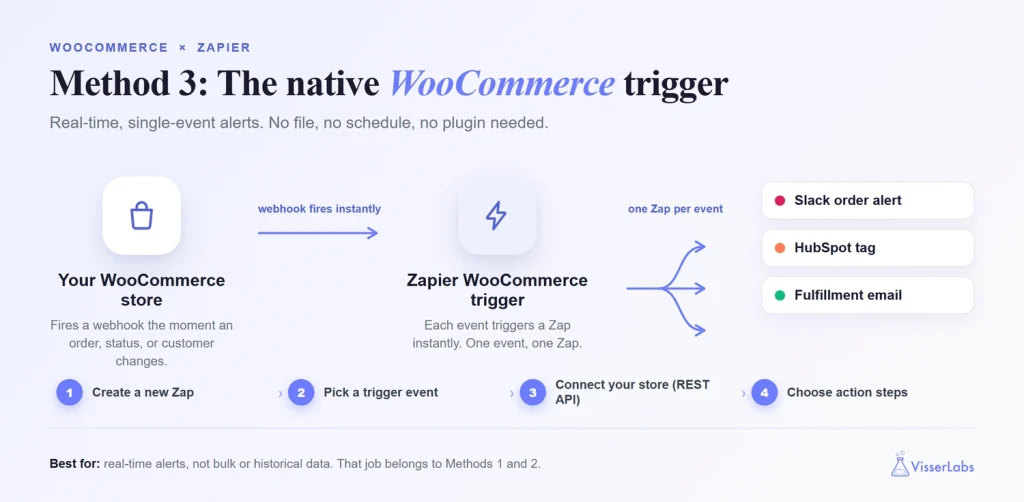
Best for: Real-time, single-event workflows. A new order fires a Slack alert. A new customer triggers a HubSpot tag. An order status change emails the fulfillment team. One event, one Zap, one notification.
How it works: Zapier’s WooCommerce app subscribes to the webhook events your store already fires. No file involved, no Store Exporter Deluxe needed, no schedule. Each event becomes a Zap trigger as it happens.
Step 1: Create a new Zap
In Zapier, create a new Zap and choose WooCommerce as the trigger app.
Step 2: Pick a trigger event
Options include New Order, Order Status Changed, New Customer, New Line Item in Order, and a few others. Each maps to a WooCommerce webhook under the hood.
Step 3: Connect your WooCommerce store
Zapier walks you through generating a REST API key inside WooCommerce (WooCommerce, Settings, Advanced, REST API). Paste the key and secret back into Zapier, and the connection is live.
Step 4: Choose action steps
Action steps work the same as any Zap. Slack message, HubSpot contact, Google Sheets row, anything Zapier supports.
Honest assessment
The native trigger is genuinely good at what it does. For real-time alerts, it’s the right tool. A new order hits your store, Slack fires a notification within seconds, done. But it can’t do historical data (it only fires for events that happen after the Zap is live), it can’t do bulk exports, and it can’t do scheduled reports. Those need Method 1 or Method 2.
There’s also a task cost question that trips store owners up. The native trigger fires per event. If you do 500 orders a day and want a daily digest, the native trigger burns 500 Zapier tasks per day to do what one scheduled CSV export could do in a single Zap run. That gets expensive fast on high-volume stores.
When To Use Each Method
Here’s how the choice of WooCommerce export to Zapier method usually breaks down:
- Use Method 1 (Email Parser) for weekly or monthly reports under about 5,000 rows, teams without technical infrastructure, and one-off periodic data pushes. Start here unless you have a reason not to.
- Use Method 2 (FTP) for large exports, stores doing 10,000+ orders a month, teams with existing file storage infrastructure, or archival workflows where you want every export saved.
- Use Method 3 (Native Trigger) for real-time alerts (Slack notifications for new orders), single-event workflows (tag a new customer in HubSpot when their first order lands), and low-volume stores where per-event tasks don’t blow your Zapier plan.
- Combine them. Most mature setups use Method 3 for real-time event alerts and Method 1 or 2 for scheduled bulk reporting. They solve different problems.
What We’ve Seen: A pattern that comes up over and over: store owners start with Zapier’s native WooCommerce trigger, assume they’ve got automation covered, and then panic three months later when their Zapier task count has exploded and their reporting workflows are running thousands of micro-tasks for something a single scheduled bulk export could handle. Real-time triggers are for alerts and single-event workflows. Scheduled bulk flows are for reporting, analytics, and data warehousing. Most stores need both, but use each for what it’s designed for. Burning 10,000 Zapier tasks per month to do what one scheduled CSV export could do is an expensive mistake that’s completely avoidable.
Example Zaps You Can Build Today
Four flows worth building. Pick the one matching your biggest pain point and start there.
Zap A: WooCommerce orders to Google Sheets (weekly digest)
Store Exporter Deluxe emails a weekly completed-orders CSV to a Zapier parser mailbox. The Zap parses rows and appends them to a Sheets tab. The accountant opens the Sheet on Monday morning, sees the week. Nobody touches WooCommerce. This is the same workflow covered in our guide on how to export orders to Google Sheets automatically, and it’s the first flow worth building for most stores.
Zap B: New order Slack alert
Zapier native WooCommerce trigger fires on New Order. A Formatter step builds the message: “New order from Jane Smith, $247 AUD, ships to Melbourne.” Posts to #orders in Slack. The whole team sees every sale land in real time. Great for morale, great for ops, costs one task per order.
Zap C: Monthly new-customer list to Mailchimp
Store Exporter Deluxe emails a monthly new-customers CSV to the parser. The Zap parses rows and creates or updates Mailchimp subscribers with the right audience tags. Marketing campaigns stay fresh without anyone manually exporting a customer list.
Zap D: Daily refunded orders to Xero (advanced)
Store Exporter Deluxe schedules a daily refunds CSV, delivers it to SFTP. Zapier’s FTP trigger picks up the file, Formatter parses rows, and a Xero action creates a Credit Note for each refund. Accounting reconciliation runs overnight. This one requires more setup, but for any store with meaningful refund volume it’s the most valuable flow in this list.
Where to start
If you’re not sure which to build, start with the Google Sheets digest (Zap A). It unblocks reporting for teams who don’t want to touch WooCommerce directly, and it pays back the Store Exporter Deluxe cost almost immediately by killing the weekly CSV chore.
Frequently Asked Questions
Does Store Exporter Deluxe have a native Zapier integration?
No. There’s no one-click WooCommerce export to Zapier button, and no sense pretending otherwise. Store Exporter Deluxe exports files on a schedule to email, FTP, or a URL, and Zapier picks those files up (via its Email Parser or FTP trigger) and fans the data out. That’s actually more flexible than a native integration, because the same export can feed Zapier, your accountant’s inbox, and your own server at the same time, with zero extra config.
Can Zapier handle large WooCommerce exports?
Yes, but use FTP delivery (Method 2) for files over roughly 10 MB. Zapier’s Email Parser has attachment size limits that large stores will hit regularly. FTP and SFTP triggers handle big files without complaint.
How many Zapier tasks will this use?
Methods 1 and 2 use approximately one task per row processed by the Zap. Method 3 uses one task per WooCommerce event. For high-volume stores, scheduled bulk methods are dramatically cheaper per row than firing the native trigger on every order.
What does Store Exporter Deluxe cost?
Store Exporter Deluxe is $39.50 per year for the first year, then $79 per year, with a 14-day money-back guarantee. The plugin bundle (includes Product Importer Deluxe) is $79 per year introductory. The Agency plan covers unlimited sites at $199 per year.
Do I need a paid Zapier plan?
Zapier’s free tier works for simple Zaps with a handful of tasks per month. Once you’re running weekly bulk exports or real-time triggers across multiple flows, you’ll want a paid plan. Zapier publishes current pricing on their site.
What happens if a scheduled export fails?
Store Exporter Deluxe logs scheduled export runs and flags mail-delivery failures in the admin, so a failed run doesn’t pass silently. On the Zapier side, every Zap keeps a task history you can replay. Most failures show up on the file-delivery side (a full mailbox, or FTP credentials rotated without updating the export), and both are quick to fix.
Wiring WooCommerce To Anywhere, Honestly
Three methods, each solving a different problem:
- Method 1: Email Parser for scheduled bulk data with zero server setup.
- Method 2: FTP trigger for large exports and archival workflows.
- Method 3: Native trigger for real-time, single-event alerts.
- When to use each and why most mature setups run both a scheduled flow and a real-time flow side by side.
Store Exporter Deluxe handles Methods 1 and 2 cleanly through scheduled exports and email or FTP delivery. Pair it with Zapier’s native trigger for real-time alerts and you’ve got every WooCommerce-to-anywhere workflow covered, with one-year pricing that’s a fraction of what dedicated WooCommerce connectors charge.
Ready to stop hand-exporting CSVs every Monday morning? Get Store Exporter Deluxe for $39.50 per year and set up your WooCommerce export to Zapier the honest way.