
Your bookkeeper just sent another email: “Can you send me last month’s orders in Excel?” You open WooCommerce, click around, and realize the built-in export only gives you a CSV. You open the CSV in Excel and half the columns are mangled. Phone numbers turned into scientific notation, dates rearranged, special characters replaced with gibberish. It’s a common support pattern we see, and the good news is there’s a much cleaner way to export WooCommerce orders to Excel than wrestling with CSV conversions every month.
This guide covers both approaches: direct XLSX export using Store Exporter Deluxe, and the CSV-then-convert fallback if you’re not ready for a paid plugin yet.
In this article, we’ll cover both methods, the field and filter choices that make the file genuinely usable, and how to schedule recurring exports so you never touch it manually again.
Table Of Contents
- Why Export Orders To Excel?
- Method 1: Export Directly To XLS/XLSX With Store Exporter Deluxe
- Method 2: Export CSV And Convert To Excel
- Choosing The Right Fields For Your Excel Export
- Filtering Orders For Targeted Exports
- Formatting Tips For Clean Excel Files
- Automating Your Excel Exports
Why Export Orders To Excel?
Excel is the single most requested format for order exports from bookkeepers, accountants, and non-technical team members. There are three main use cases to plan around.
Accounting and bookkeeping
Accountants and bookkeepers work in Excel. When they ask for an order export, they want a .xlsx file they can open, filter, and drop straight into their workflow. A raw CSV forces them to deal with import settings, encoding, and data types before they can start. Store owners who send XLSX get fewer follow-up questions.
Reporting and analysis
Pivot tables, charts, and formulas like VLOOKUP or SUMIFS work best in native Excel format. CSV strips everything down to text, which means every analysis session starts with reformatting. If you or your team run monthly reporting on order data, exporting to XLSX saves the setup time every time.
Sharing with non-technical team members
Excel is universal. Everyone knows how to open a spreadsheet. CSV causes confusion, especially for team members who don’t realise Excel’s default behaviour can mangle the data. Sending a clean XLSX avoids a round of “it’s showing weird numbers” messages.
Excel also preserves formatting, data types, and multi-line fields in ways that CSV cannot. Date columns stay as dates, currency columns stay as currency, and text columns with leading zeros (like postal codes or SKUs) don’t get auto-converted into numbers.
For a broader look at WooCommerce export formats, see Visser Labs’ WooCommerce export formats guide.
Method 1: Export Directly To XLS/XLSX With Store Exporter Deluxe
This is the recommended approach for any store that exports orders more than occasionally. No conversion step, no encoding headaches, and no formatting loss when the file opens in Excel.
Step 1: Install and activate Store Exporter Deluxe
Purchase Store Exporter Deluxe from the Visser Labs plugin page and upload the ZIP through WordPress admin, Plugins, Add New, Upload Plugin. Activate the plugin and enter your licence key on the plugin settings screen.
Step 2: Navigate to the export screen
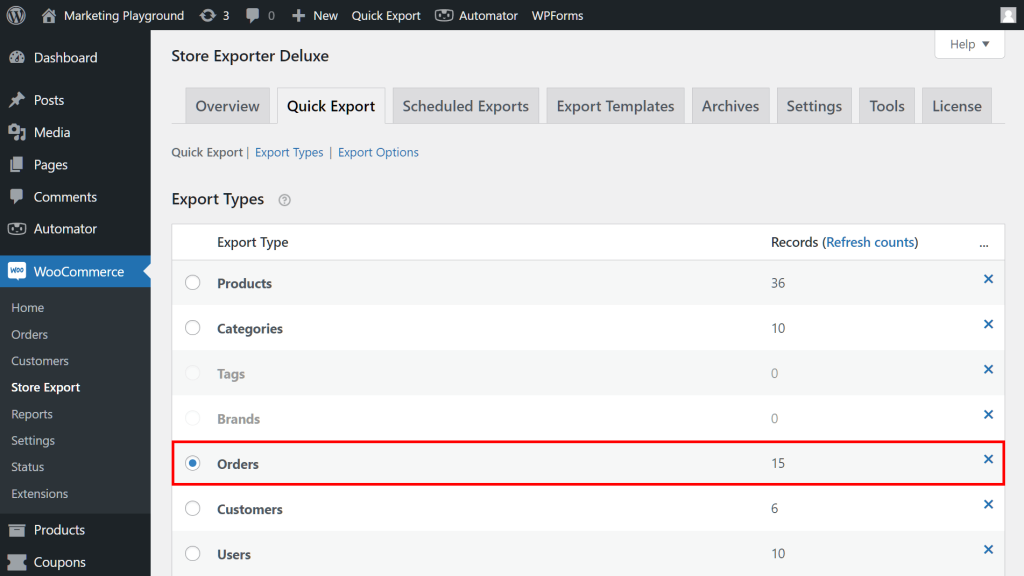
Go to WooCommerce, Store Export in the admin menu. Store Exporter Deluxe opens to a multi-tab screen. Select the Orders tab.
Step 3: Select XLS or XLSX as the export format
In the format dropdown, choose XLSX (Excel 2007-2013) for the modern Excel format, or XLS (Excel 97-2003) if you need legacy compatibility. XLSX supports larger files and is the right choice for most stores.
Step 4: Choose your fields
Store Exporter Deluxe presents every available order field as a checkbox. Tick the fields you need (order number, order date, status, customer billing and shipping, line items, totals, tax, shipping, coupons, payment method). You can also reorder columns and set custom labels if your accountant expects specific column headers.
Step 5: Set your filters
Choose a date range (today, yesterday, this week, last month, custom dates) and optionally filter by order status (completed, processing, refunded, and so on). If you only want orders containing specific products or from specific customers, those filters are in the same panel.
Step 6: Click Export and open your file
Click Export. Store Exporter Deluxe generates the XLSX file and offers it as a download. We tested this on a staging WooCommerce install with a 1,200-order dataset and the file opened cleanly in Excel. Dates rendered as dates, phone numbers stayed as text, and currency values showed with the right decimal precision. No cleanup needed.

For additional context on the full ordering workflow, see Visser Labs’ complete guide to exporting WooCommerce orders.
Method 2: Export CSV And Convert To Excel
If you’re using WooCommerce’s built-in export or the free Store Exporter, direct XLSX isn’t available. You can still get orders into Excel, but the conversion needs a bit of care.
Step 1: Export orders as CSV
From WooCommerce core, go to WooCommerce, Orders, and use the Export option as described in the WooCommerce managing orders documentation. Save the CSV file to your computer.
Step 2: Open Excel and use File, Open
Resist the urge to double-click the CSV file. Double-clicking opens the file with Excel’s default settings, which silently converts columns in ways you don’t want.
Instead, open Excel first, then use File, Open (or Data, Get External Data on older versions) to open the CSV. This triggers the Text Import Wizard, where you can control how each column is interpreted.
Step 3: Set column data types in the Text Import Wizard
In the wizard, choose Delimited, select the comma delimiter, and then (this is the key step) click each column preview and set its data type.
- Phone numbers: Set to Text. Otherwise Excel converts them to numbers and shows scientific notation (4.12E+09 instead of 412000000).
- Postal codes: Set to Text. Protects leading zeros that Excel would otherwise strip.
- SKUs with leading zeros: Set to Text for the same reason.
- Dates: Set to Date, and pick the correct MDY or DMY format for your locale.
This one step prevents the majority of “why are my numbers weird” complaints from the person opening the file.
Honest assessment
This method works fine for occasional exports. If you’re doing it regularly, the time spent fixing column types on every import adds up fast. That’s when direct XLSX export becomes the cost-effective path.
Choosing The Right Fields For Your Excel Export
Store Exporter Deluxe lets you pick exactly which fields appear in the export. Here’s a starting template for common use cases.
- For accounting: Order number, order date, billing name and address, payment method, line item totals, tax, shipping, coupons, order total.
- For fulfillment: Order number, shipping name and address, line items with SKU, quantities, shipping method, order status.
- For marketing analysis: Customer email, order date, product categories, coupon codes used, order total, customer note.
Once you’ve configured a field set that works, save it as a reusable export template. Visser Labs’ guide on using export templates in WooCommerce covers the template workflow in detail. A saved template means you don’t re-select fields every time you run the same export.
Filtering Orders For Targeted Exports
Raw exports of every order in the store are rarely what you want. Filtering keeps files manageable and relevant.
- By date range: Monthly, quarterly, custom periods. Store Exporter Deluxe offers preset periods (today, this week, last month) or custom start and end dates.
- By order status: Completed, processing, on-hold, refunded. Filter to only completed orders for accounting; include processing for fulfillment dashboards.
- By product or category: Export only orders containing products in a given category, or specific SKUs.
- By customer: Export orders for a specific customer for support or reconciliation.
A common warehouse-team setup we see: completed orders from the last 30 days, filtered to products in a single category like “Wholesale”. The resulting XLSX is roughly a tenth of the size of an unfiltered export and skips all the irrelevant retail orders the warehouse team doesn’t need to see.
Formatting Tips For Clean Excel Files
Even with direct XLSX export, a few conventions make the file easier to work with downstream.
- Dates: Use a consistent format, ideally YYYY-MM-DD, because it sorts correctly as text and parses correctly across Excel locales.
- Currency: Format as number with two decimal places, not as text. Store Exporter Deluxe preserves numeric types in XLSX output, so Excel treats them as numbers by default.
- Multi-line addresses: Store Exporter Deluxe outputs address fields as a single cell with line breaks preserved. If your template needs separate columns for street, city, postcode, you can split the address in Store Exporter Deluxe’s field selection instead of post-processing in Excel.
- Large order volumes: Microsoft’s Excel specifications put the XLSX row limit at 1,048,576 per sheet, which covers almost any store. If you’re exporting over a million orders, split the export by year or quarter to keep file sizes manageable.
What We’ve Seen: One thing we see regularly is store owners exporting orders to CSV, opening the CSV in Excel, and then spending 15 to 20 minutes fixing columns before the data is usable. Phone numbers show as scientific notation. Dates flip between MM/DD and DD/MM depending on the Excel locale. Any field with a comma gets split across multiple columns. Exporting directly to XLSX avoids all of these problems because the file carries proper data type information that Excel can read natively. The time savings compound every time you run the export.
Automating Your Excel Exports
If you need the same export weekly or monthly, the manual run is a time sink. Store Exporter Deluxe’s scheduled export feature turns it into a one-time setup.
Why automate
The bigger gain is the time you stop losing to missed exports, late sends, and follow-up emails asking “where’s last week’s file?” Scheduled exports run on their own and land in the right place without anyone touching WooCommerce.
How to set up a scheduled XLSX export
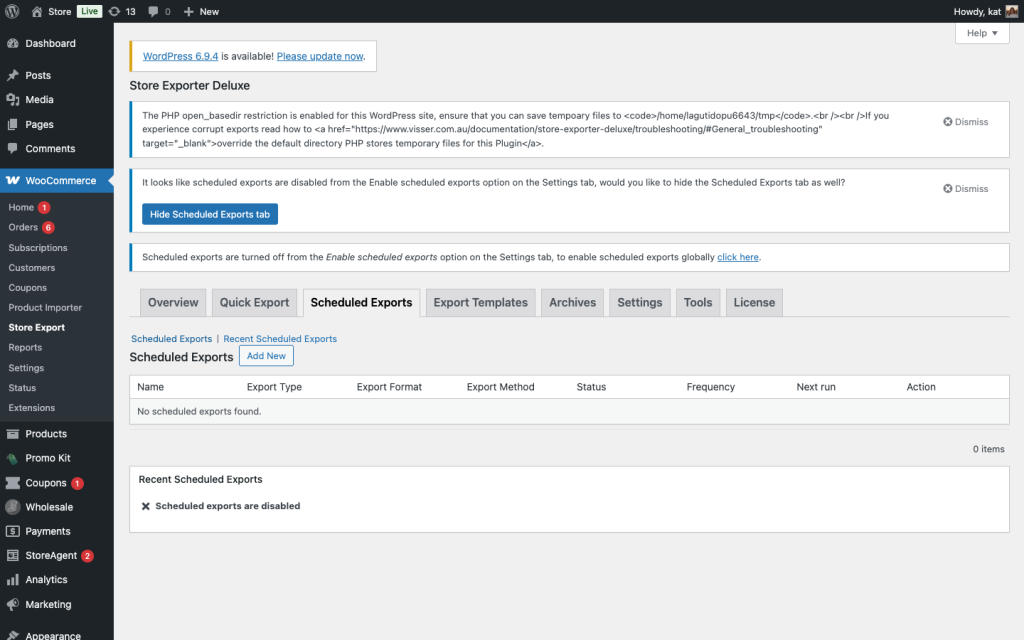
In Store Exporter Deluxe, open the Scheduled Exports tab and create a new schedule. Configure four things:
- Frequency: Daily, weekly, monthly, or custom via WP-Cron.
- Export template: The template you saved earlier with the right fields and filters.
- Format: XLSX for modern Excel compatibility.
- Delivery: Choose email (to the recipient directly), FTP/SFTP (for fulfillment systems), or save to the WordPress media library.
💡 For detailed configuration guidance, see Visser Labs’ guide on setting up an automated export system and the how-to guide on creating an export schedule.
A pattern we see often: store owners replace the weekly “can you send me the orders file?” email with a scheduled weekly XLSX export of completed orders, delivered to the accountant every Monday morning. One configuration step, no more recurring manual runs.
Set up your automated Excel export with Store Exporter Deluxe →
Start Exporting WooCommerce Orders To Excel
The cleanest way to export WooCommerce orders to Excel is direct XLSX output through Store Exporter Deluxe. It skips the CSV conversion step, preserves formatting and data types, and works with scheduled delivery for recurring reports.
If you’re doing occasional exports and can’t justify a paid plugin yet, the CSV-to-Excel Text Import Wizard method works. Just be deliberate about column data types to avoid the phone-number-as-scientific-notation trap.
Here’s how to act on this guide:
- Start with Method 1 if you need clean Excel files without post-processing.
- Use Method 2 for occasional one-off conversions.
- Save an export template matching your accountant’s preferred format.
- Set up a scheduled export to eliminate recurring manual runs.
Ready to export WooCommerce orders to Excel without the cleanup? Get Store Exporter Deluxe for $39.50/year with a 14-day money-back guarantee.
Frequently Asked Questions
Can I export WooCommerce orders to Excel for free?
WooCommerce’s built-in export supports CSV only. You can convert CSV to Excel manually using the Text Import Wizard method above, which works fine for one-off exports. For direct XLS or XLSX export without the conversion step, Store Exporter Deluxe is the fastest path.
What’s the difference between XLS and XLSX?
XLS is the older Excel format, used in Excel 97 through 2003. XLSX is the modern format introduced in Excel 2007 and used by every current version. XLSX supports larger files, better compression, and more modern features. Use XLSX unless you specifically need to support someone running a very old Excel version.
Can I export specific order fields to Excel?
Yes. Store Exporter Deluxe lets you select exactly which fields appear in your export, reorder columns, and set custom labels for column headers. You can save these selections as reusable export templates so recurring exports don’t require reconfiguring the field list.
How many orders can I export at once?
Store Exporter Deluxe handles thousands of orders per export. For very large stores with 50,000+ orders, consider filtering by date range (monthly or quarterly) to keep individual files manageable and within Excel’s performance sweet spot. XLSX technically supports over a million rows per sheet.
Does Store Exporter Deluxe work with WooCommerce Subscriptions orders?
Yes. Store Exporter Deluxe advertises native support for WooCommerce Subscriptions, including subscription renewal orders, which appear in the orders export alongside regular one-time orders with appropriate status fields.
Can I schedule exports to land in my accountant’s inbox directly?
Yes. The scheduled exports feature supports email delivery, so you can configure a recurring export to land in any inbox (your accountant’s, your fulfillment centre’s, your own) on your chosen schedule.