
If you’re testing updates on a staging copy of your store before pushing them live, you don’t need a second license. Every Visser Labs license for Store Exporter Deluxe lets you activate up to 3 staging sites alongside your live site, at no extra cost. This guide shows which staging domains count and how to activate one.
Prerequisites
| Requirement | Details |
|---|---|
| Active Visser Labs license | Available under the Downloads tab of your account |
| Staging site domain | Must match one of the recognized staging patterns listed below |
| Plugin installed on the staging site | The same Visser Labs plugin (for example, Store Exporter Deluxe) must already be installed and active on the staging site |
Eligible staging domains
Our license server recognizes a staging site automatically if its domain matches one of these patterns. The match is made from the start of the address, so the shape of the address matters.
localhost127.0.0.1*.dev*.local*.test*.staging*.example*.invaliddev.*(for example, dev.domain.com)local.*(for example, local.domain.com)test.*(for example, test.domain.com)staging.*(for example, staging.domain.com)stage.*(for example, stage.domain.com)preprod.*(for example, preprod.domain.com)*staging.wpengine.com(WP Engine)*stg.wpengine.com(WP Engine)*dev.wpengine.com(WP Engine)dev-*.pantheonsite.io(Pantheon)test-*.pantheonsite.io(Pantheon)staging-*.kinsta.com(Kinsta)staging-*.kinsta.cloud(Kinsta)env-*.kinsta.cloud(Kinsta)*.cloudwaysapps.com(Cloudways)*.sg-host.com(SiteGround)*.myftpupload.com(GoDaddy)*.instawp.xyz(InstaWP)*.preload.site*.tempurl.host*-staging.wpdns.site*-staging.onrocket.site*staging.astahosting.com.au*staging.leserviceweb.com*-dev.ksysweb.com*-stg.ksysweb.com*.ngrok.io
The dev, local, test, staging and stage prefixes each allow one optional digit, so domains like dev2.domain.com and staging1.domain.com also count as staging.
Step 1: Find your license key and activation email
- Copy your license key from the Downloads tab of your account.
- Open the order confirmation email you received when you bought the license.
- Find the License Keys table and copy the address in the Activation Email column.
The activation email belongs to your license, so it can be different from the email you use to log in to WordPress. If you can’t find the order confirmation email, open a support ticket and we’ll confirm the activation email on your key.
Step 2: Activate the license on your staging site
- Log in to the staging site’s wp-admin.
- Go to WooCommerce → Store Export.
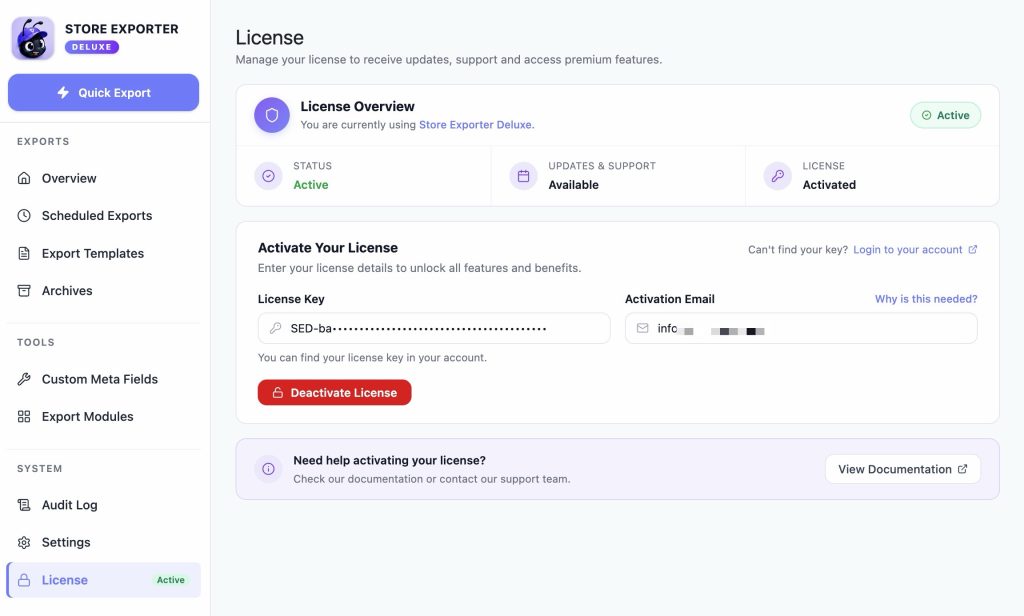
- In the plugin’s sidebar, click License under the System group.
- Enter your key in the License Key field.
- Enter the address from your order confirmation email in the Activation Email field.
- Click Activate License.
A confirmation message appears, and the license status badge changes to Active.
Remove a staging site from your license
- Log in to your account.
- Open the Downloads tab.
- Click View Sites next to the license. The window lists your activated sites and your staging sites.
- Click the red cross beside the staging site you no longer need.
For more detail, see how to remove an activated site from your license.
Troubleshooting
Frequently Asked Questions
Need more help?
If you’re on a premium Visser Labs plugin like Store Exporter Deluxe, open a support ticket, and our team can check your license and staging site activations directly.
If you’re using the free Store Exporter plugin, post your question on the WordPress.org support forum, and a team member will follow up.
