
If you’ve just installed Checkout Guard, you’ll notice a banner at the top of your WordPress admin asking you to activate your license. Until you do, the plugin keeps blocking orders as normal, but it won’t receive updates or qualify for support. Activating takes less than a minute once you have your license key and the email you used to purchase it.
This article covers where to find your license key, how to activate it, what happens if activation succeeds or fails, and what that activation banner means.
Prerequisites
| Requirement | Details |
|---|---|
| Checkout Guard plugin | Installed and active on your site |
| WooCommerce | Active. Checkout Guard’s admin screen lives under the WooCommerce menu |
| License key and activation email | Available under the Downloads tab of your account |
| Administrator access | You’ll need an account with access to the WordPress admin dashboard |
Step 1: Find your license key and activation email
Log in to your Visser Labs account and open the Downloads tab. Copy your Checkout Guard license key from there.
Also note the email address you used to purchase Checkout Guard. You’ll need both the key and this email to activate.
Step 2: Open the Checkout Guard settings screen
Go to WooCommerce → Checkout Guard, then click the Settings tab. The License section sits at the top of this tab, above the checkout denial message settings.
Step 3: Enter your license key and email
- Paste your license key into the License Key field.
- Enter your purchase email into the Activation Email field.
- Click Activate License.
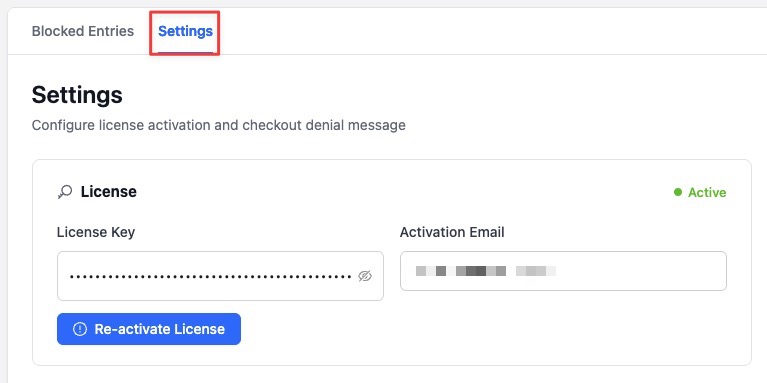
That’s it. You don’t need to save any other settings for the activation to take effect. Once you’ve activated once, this same button reads Re-activate License if you ever need to reactivate, for example after changing your license key.
What happens after you activate
Checkout Guard sends your key and email to the Visser Labs license server to confirm they’re valid, then updates the License status shown at the top of the section:
| Status | What it means |
|---|---|
| Active (green) | Your license is valid. You’ll get plugin updates and can contact support. |
| Inactive (red) | Your license hasn’t been activated yet, or your last activation attempt failed. |
| Expired (orange) | Your license was active but has since expired. Renew it to keep getting updates and support. |
On success, you’ll see a confirmation message and the status changes to Active immediately. You don’t need to reload the page.
If activation doesn’t go through, here’s what you’ll see:
- The Activate License button is greyed out and won’t respond to clicks. This means one or both of the License Key and Activation Email fields are still empty. The button only becomes clickable once you’ve entered a value in each.
- “License activation was not successful. Please check your details.” Your key and email were sent to the server, but they didn’t match an active license. Double-check both for typos, and confirm you’re using the email tied to your Checkout Guard purchase.
- “Could not connect to license server. Please try again later.” Your site couldn’t reach the Visser Labs license server. This is usually temporary. Wait a few minutes and try again.
The activation notice banner
Until your license is active, Checkout Guard shows a dismissible notice across your WordPress admin screens, reading: “Checkout Guard requires a license key to receive updates and support. Activate your license to get started.”
This banner appears for any user who can manage WooCommerce, on every admin screen, not just the Checkout Guard settings screen. Clicking Activate your license in the notice takes you straight to the Settings tab described above.
You can dismiss the banner using its close icon if you’d rather activate later. Once dismissed, it stays hidden for you specifically. It comes back automatically the next time you log in unless your license is active by then. Activating your license removes the banner for good.
Troubleshooting
FAQ
Need more help?
Checkout Guard is a licensed plugin, so if you run into trouble activating it, open a support ticket and our team will help you get set up.
