
Your shoppers save products to wishlists every day, but those lists stay locked inside your store. If you want to see which products are in demand, build a remarketing list, or check who has shared a list, there’s no easy way to get that data out.
Store Exporter Deluxe fixes that. It adds a Wishlists export type that reads the wishlists saved by SaveTo Wishlist and writes them to a file. Each row is one wishlist, with its owner, the products inside it, and who can see it.
This guide covers a one-off Quick Export first, then shows how to run the same export on a schedule.
Prerequisites
| Requirement | Details |
|---|---|
| Plugin | Store Exporter Deluxe 5.4.4 or later, installed and active |
| Wishlist plugin | SaveTo Wishlist Lite, installed and active. SaveTo Wishlist Pro is optional and runs on top of Lite. Without Lite, the Wishlists tile doesn’t appear. |
| Wishlist data | At least one saved wishlist that doesn’t have the Draft status |
| Admin access | An account that can manage WooCommerce exports. Administrators and Shop Managers have this by default. |
Install SaveTo Wishlist
SaveTo Wishlist is the plugin that creates and stores the wishlists. Store Exporter Deluxe only reads them, so you need SaveTo Wishlist active before the export type shows up.
Store Exporter Deluxe can set it up for you. On the WordPress Plugins screen, the WooCommerce screens, and the Store Exporter Deluxe screens, a Boost Your Sales with SaveTo Wishlist notice offers a button that reads Install & Activate. If SaveTo Wishlist Lite is already installed but switched off, the button reads Activate instead. Click the dismiss icon in the corner if you don’t want it.
If you don’t see the notice, install SaveTo Wishlist Lite from the WordPress.org plugin directory in the usual way.
Where to find Quick Export
- Go to WooCommerce → Store Export in the WordPress admin menu.
- Click Quick Export in the sidebar, above the EXPORTS group.
For wishlists, the wizard has three steps: Select Export Type, Export Fields, and Export Options. There’s no Filters & Sorting step for this export type.
Step 1: Choose the Wishlists export type
- Click the Wishlists tile on the Select Export Type step.
The tile shows how many wishlists you have, for example 7 Records.
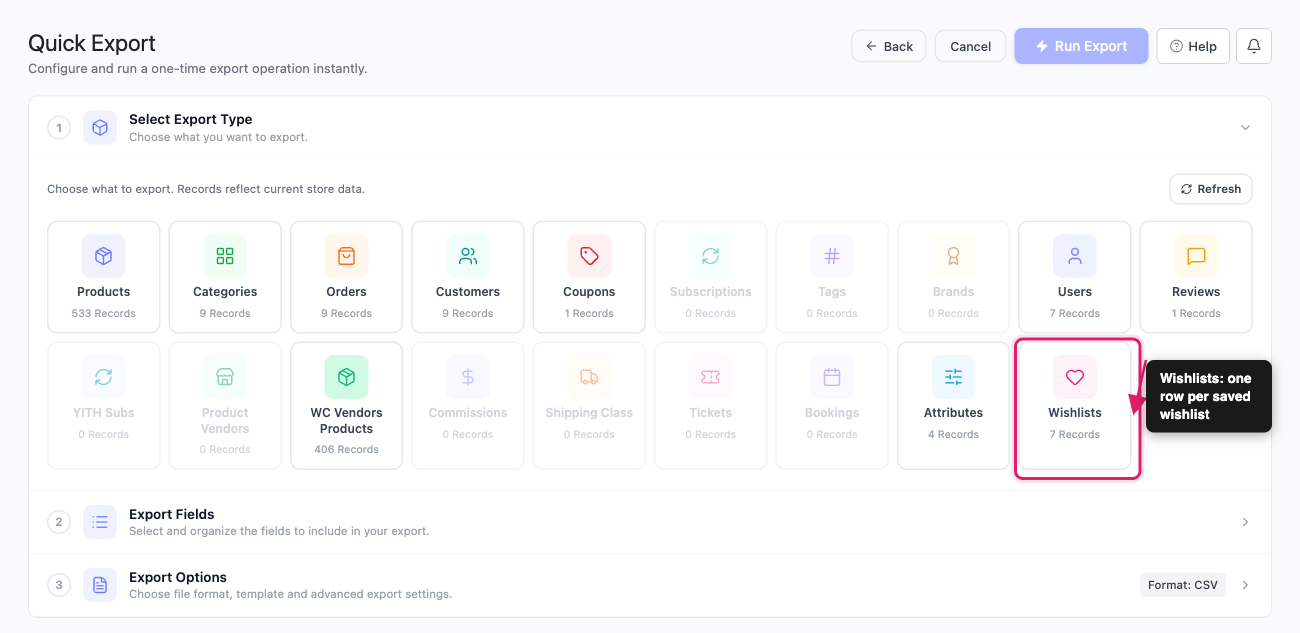
The count and the export both leave out wishlists with the Draft status, even when they hold products. So your count can be lower than the total in SaveTo Wishlist’s own admin screen.
Step 2: Pick your wishlist fields
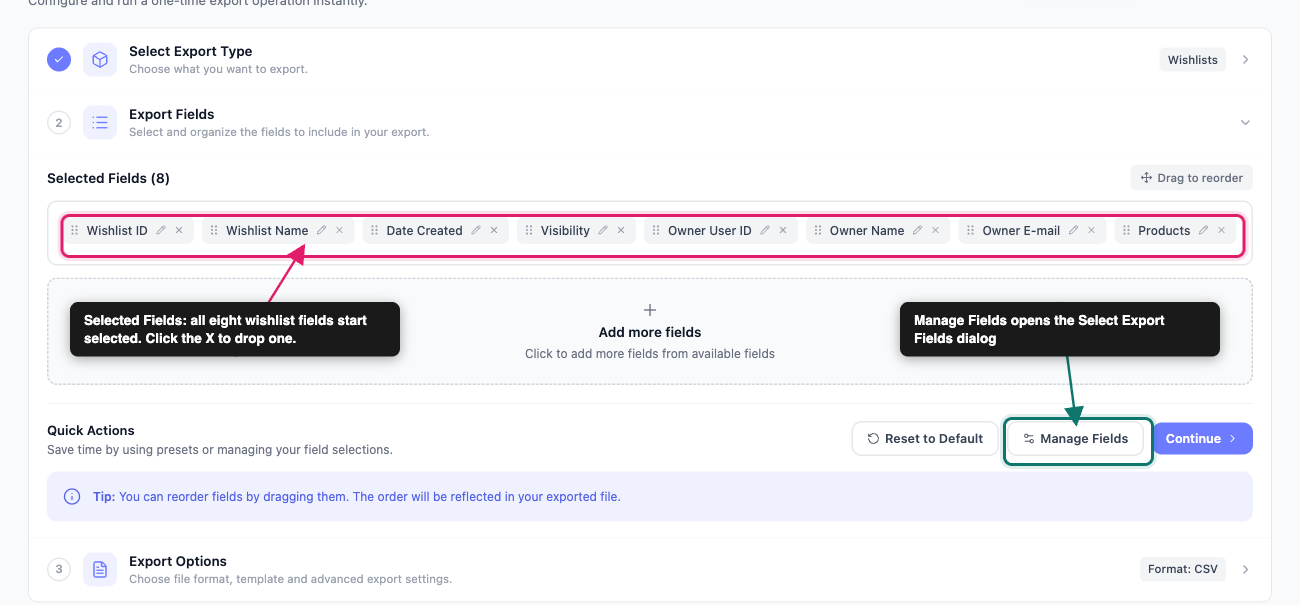
On the Export Fields step, the columns you’re about to export appear under Selected Fields. Wishlists start with all eight fields selected, in this order:
- Wishlist ID
- Wishlist Name
- Date Created
- Visibility
- Owner User ID
- Owner Name
- Owner E-mail
- Products
From there you can shape the column list:
- Click Add more fields or Manage Fields to open the Select Export Fields dialog.
- Drag a field to change the column order in your file.
- Click the pencil icon on a field to rename that column heading.
- Click the X on a field to drop that column.
- Use Reset to Default to go back to all eight fields.
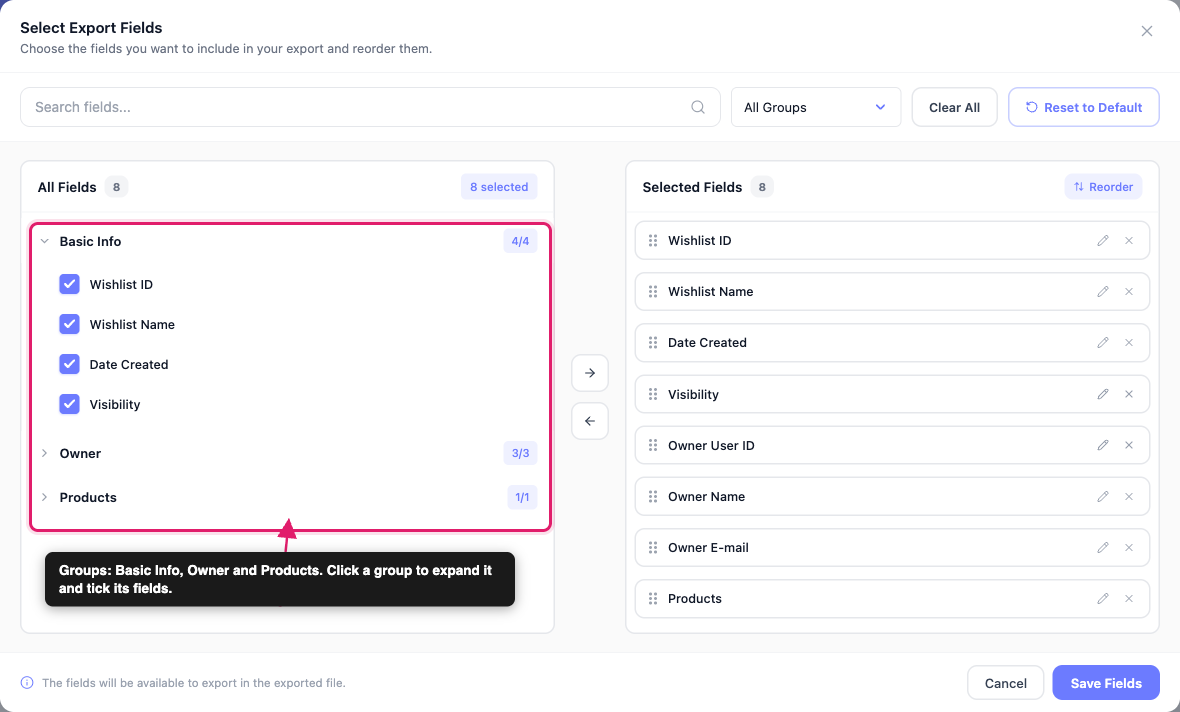
In the Select Export Fields dialog, the wishlist fields sit in three groups: Basic Info, Owner, and Products. The All Groups dropdown narrows the list to one group, and it also lists Custom Meta Fields. Clear All removes every selection. Click Save Fields when you’re done.
What each field contains
| Field | Group | What it contains |
|---|---|---|
| Wishlist ID | Basic Info | The wishlist’s internal ID in SaveTo Wishlist |
| Wishlist Name | Basic Info | The name the shopper gave the wishlist |
| Date Created | Basic Info | The date the wishlist was created |
| Visibility | Basic Info | Shared, Public, or Private (see below) |
| Owner User ID | Owner | The WordPress user ID of the shopper who owns the wishlist |
| Owner Name | Owner | The owner’s display name |
| Owner E-mail | Owner | The owner’s email address |
| Products | Products | Every product on the wishlist in one cell (see below) |
For the fields of other export types, see Available export fields in Store Exporter Deluxe.
How the Products field looks
Each product on a wishlist becomes a short label, and all the labels sit in one cell, separated by a pipe character (|). A label shows the product ID, the product name, the SKU when the product has one, and the quantity:
#101 Blue Mug x 1|#102 Tea Towel (SKU: TT-02) x 2Here, 101 and 102 are the WooCommerce product IDs. They let you match each row back to your catalogue. For a variation, the ID is the variation’s own ID. If a product has since been deleted from your store, the label keeps the ID and quantity but shows no name.
To use a different separator between products, open Settings in the SYSTEM group of the sidebar and change Category Separator under Export Formats → CSV Format. The same setting also separates categories in other export types. Type LF there to put each product on its own line inside the cell.
How Visibility is decided
The Visibility column shows one value per wishlist:
- Shared: the wishlist has been shared with other people. SaveTo Wishlist Pro records these shares, so on a store running only SaveTo Wishlist Lite no wishlist reads as Shared.
- Public: the wishlist is public but hasn’t been shared.
- Private: everything else.
A wishlist that is both public and shared shows Shared, because that is the more specific fact when you’re auditing who can see a list.
Step 3: Set your format and run the export
On the Export Options step:
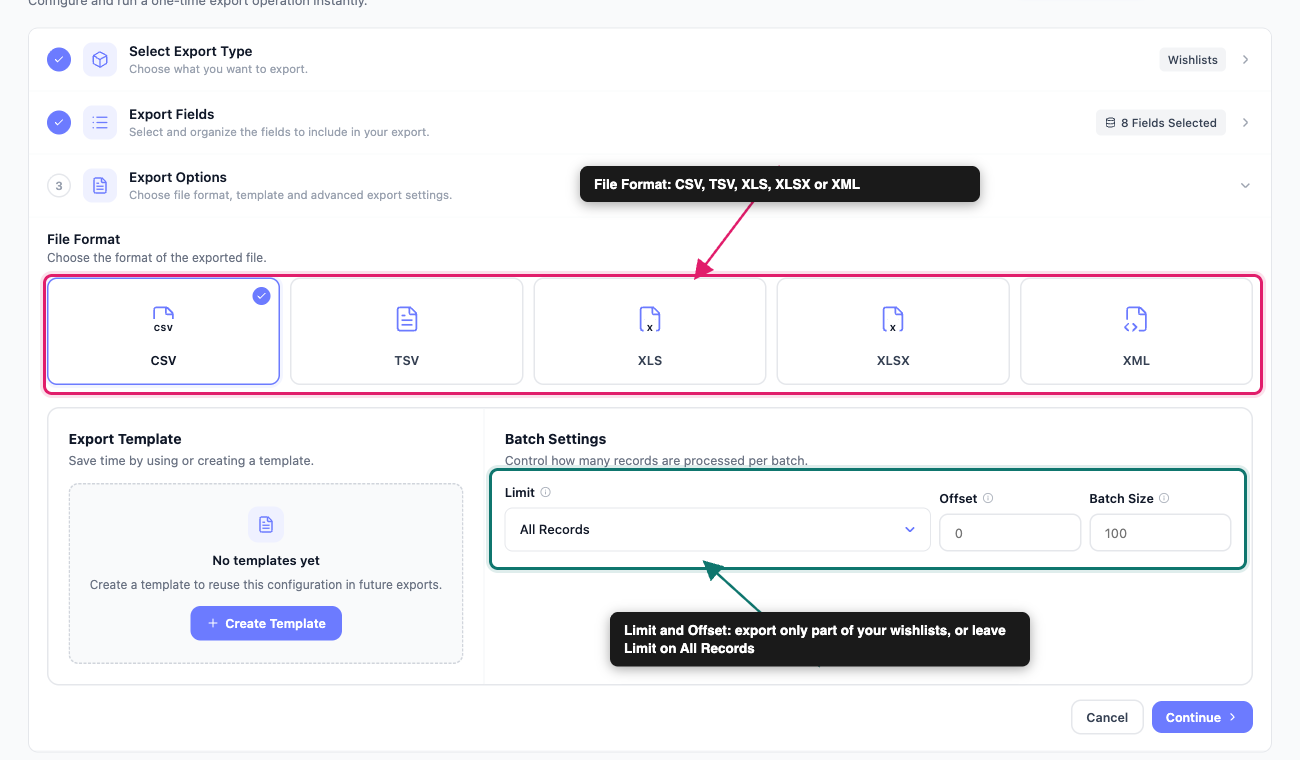
- Pick a File Format.
- (Optional) If you’ve saved one already, pick a template from Export Template.
- (Optional) Set Limit and Offset.
- Click Run Export.
- Click Download File.
CSV suits most jobs, since nearly every spreadsheet and marketing tool reads it. The other options are TSV, XLS, XLSX, and XML.
If you’ve saved a setup on the Export Templates screen, apply it from the Export Template dropdown instead of rebuilding your field list. For detailed instructions, see How to use Export Templates in Store Exporter Deluxe.
Under Batch Settings, Limit lets you cap how many wishlists export, and Offset lets you skip the first few. Leave Limit on All Records to export everything. Wishlists export in order of wishlist ID, from lowest to highest, and you can’t change that order.
The Run Export button is in the top right. The summary bar shows EXPORT TYPE, FIELDS, FILTERS, FORMAT, and ESTIMATED ROWS. FILTERS reads 0 for wishlists, because this export type has no filters.
When the run finishes, click Download File to save the file.
For a deeper look at the wizard, see How to use Quick Export in Store Exporter Deluxe.
Exporting wishlists on a schedule
If you want a fresh wishlist file every week, build it as a scheduled export instead of running Quick Export by hand. That suits a recurring remarketing feed or a regular demand report.
Go to Scheduled Exports in the EXPORTS group, then click New Schedule. A schedule has five steps: General, Filters, Method, Scheduling, and Advanced.
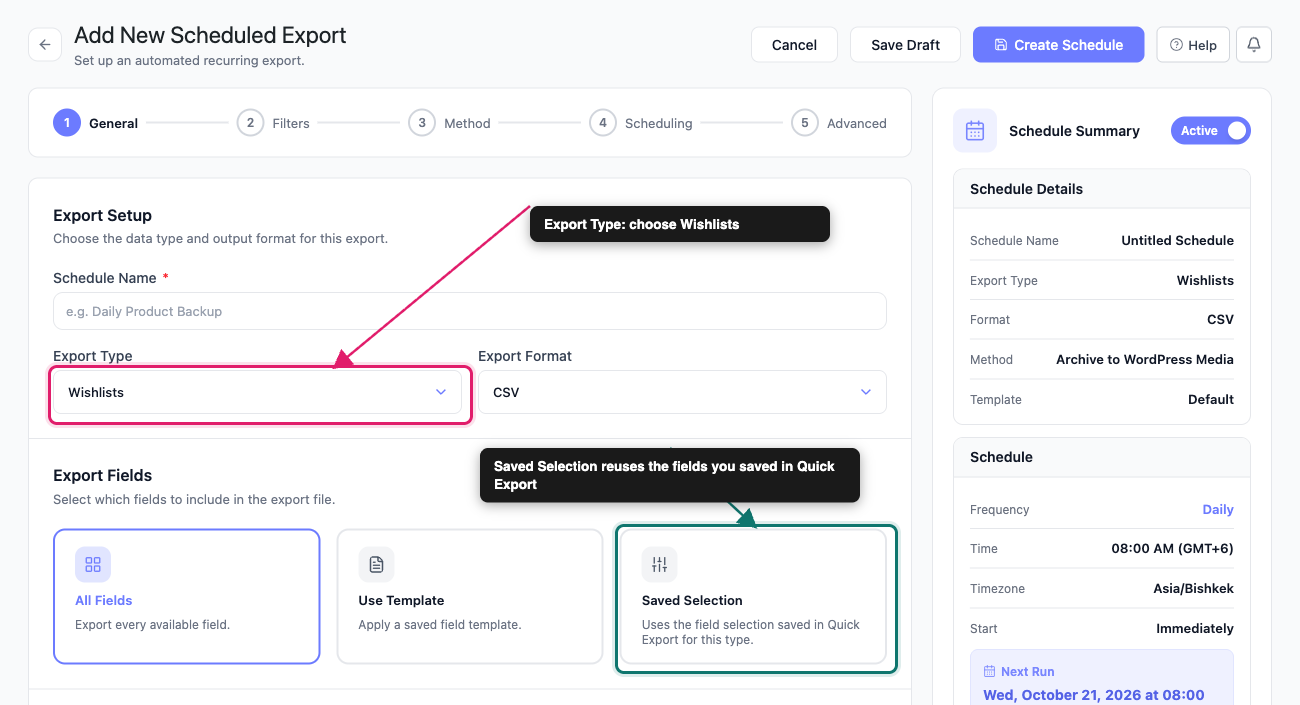
- On the General step, enter a Schedule Name.
- Set Export Type to Wishlists.
- Choose an Export Format.
- Under Export Fields, pick All Fields, Use Template, or Saved Selection. Saved Selection reuses the field choices you saved in Quick Export for wishlists.
- Click Next: Filters.
- Continue through the Method, Scheduling, and Advanced steps.
- Click Create Schedule.
For delivery options, frequency, and the Advanced settings, see How to schedule exports in Store Exporter Deluxe.
Troubleshooting
Frequently asked questions
Related articles
- How to export WooCommerce products with Store Exporter Deluxe
- How to export WooCommerce customers with Store Exporter Deluxe
- Available export fields in Store Exporter Deluxe
- How to schedule exports in Store Exporter Deluxe
Need help?
If you’re using Store Exporter Deluxe, open a support ticket and our team will help you get your wishlist export working.
If you’re using the free Store Exporter plugin, ask on the WordPress.org support forum and our team will get back to you there.