
Planning a store migration, or handing a category list to your SEO team? WooCommerce has no built-in way to export product categories, so you end up copying rows by hand from Products → Categories.
Store Exporter Deluxe exports every product category to one file, with the columns and format you pick. This article covers a one-off Quick Export first, then how to run the same export on a schedule.
Prerequisites
| Requirement | Details |
|---|---|
| Plugin | Store Exporter Deluxe is installed and active |
| Category data | At least one product category exists. WooCommerce creates Uncategorized by default, so a new store always has one. |
| Admin access | An account that can manage WooCommerce exports. Administrators have this by default. |
Where to find Quick Export
Open WooCommerce → Store Export from the WordPress admin menu. That opens the Store Exporter Deluxe dashboard.
In the sidebar, Quick Export is its own button near the top, above the EXPORTS group. Click it to start a new export.
Step 1: Choose the Categories export type
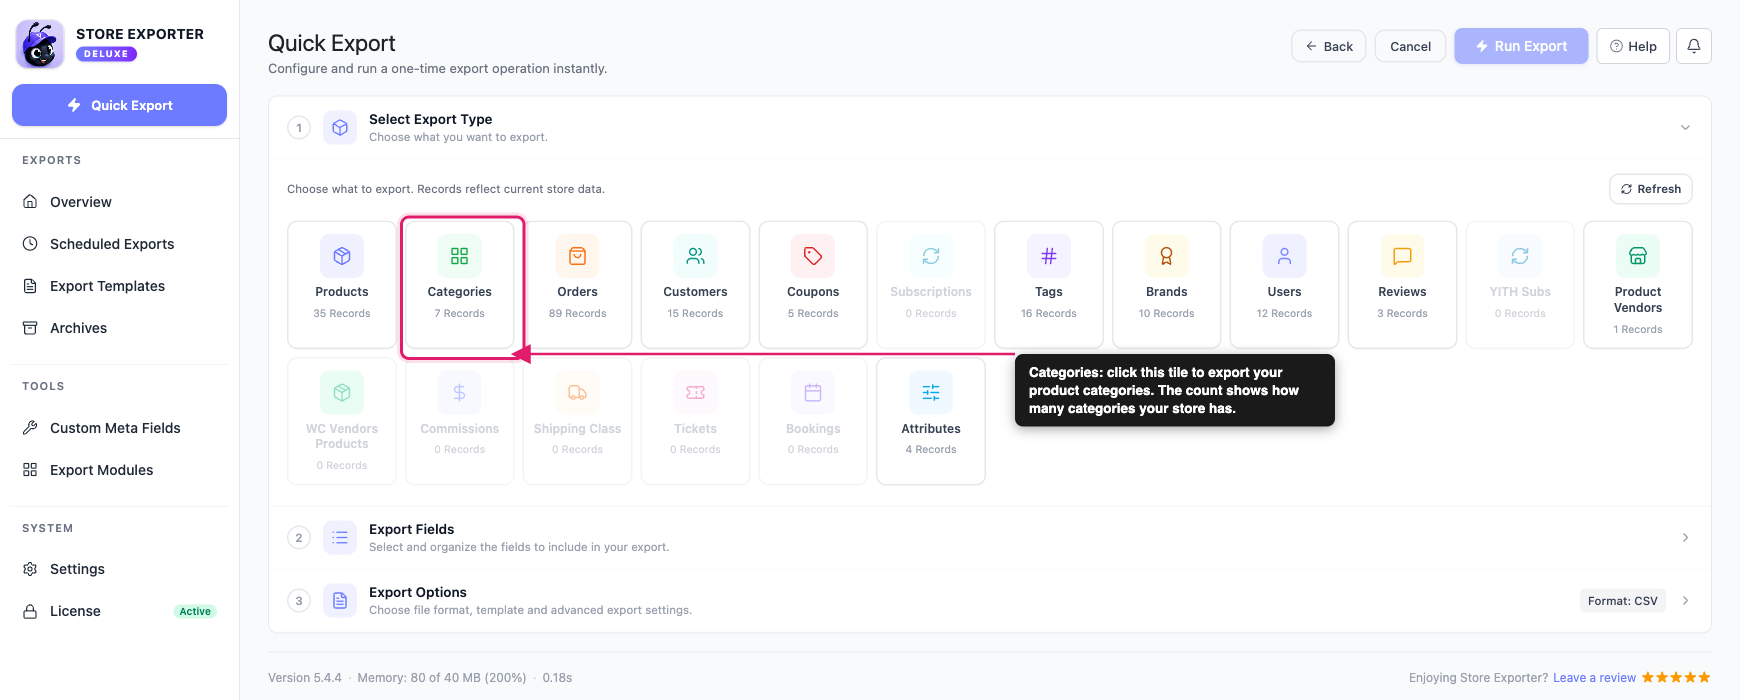
On the Select Export Type step, click the Categories tile. The tile also shows how many categories your store has, so you know roughly how big the file will be.
Step 2: Pick your category fields
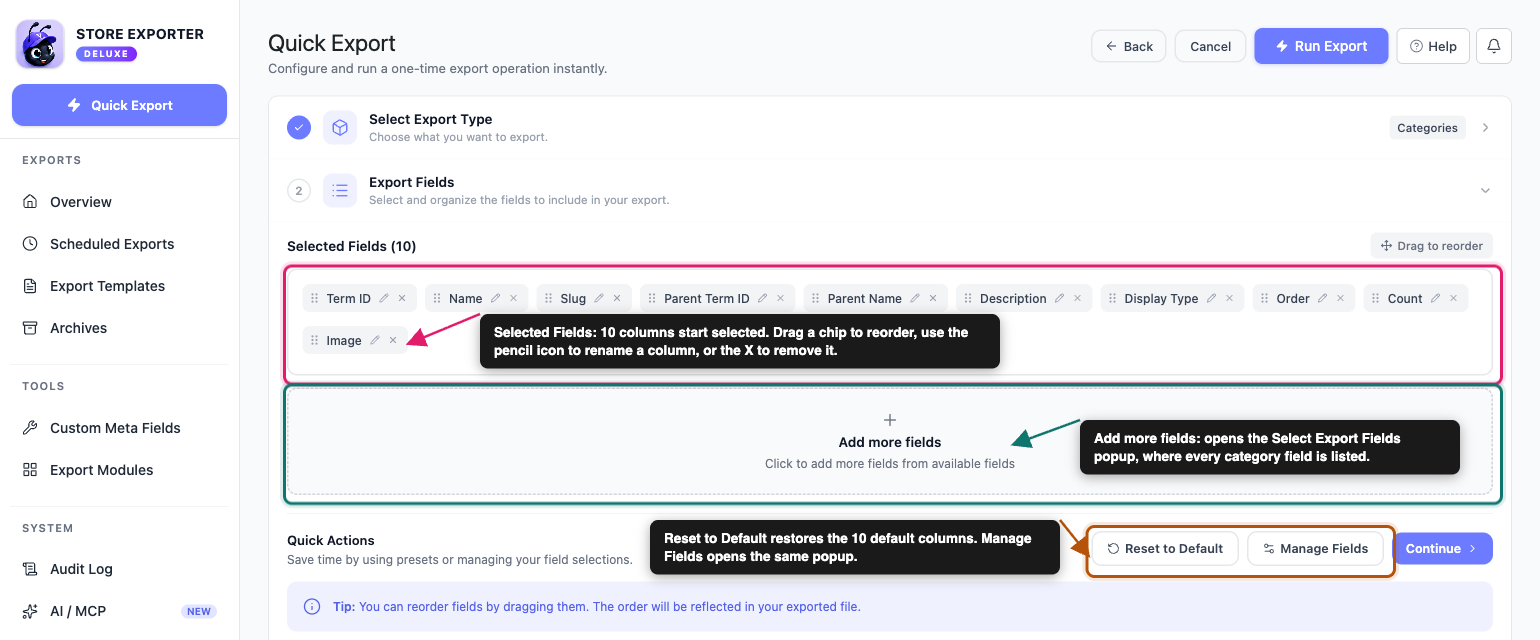
On the Export Fields step, the columns you’re about to export appear as chips under Selected Fields. Categories start with ten of them:
- Term ID
- Name
- Slug
- Parent Term ID
- Parent Name
- Description
- Display Type
- Order
- Count
- Image
From there you can shape the column list:
- Click Add more fields to open the Select Export Fields popup and add anything that isn’t already a chip.
- Click Manage Fields to open the same popup.
- Drag a chip to change the column order in your file.
- Click the pencil icon on a chip to rename that column heading. The underlying data stays the same.
- Click the X on a chip to drop that column.
- Use Reset to Default to go back to the starting ten.
The popup groups fields under Basic Info, Hierarchy, and Media. Use the search box or the group dropdown to find a field quickly. Clear All empties your selection so you can build the column list from scratch. When you finish, click Save Fields.
Available category fields:
| Group | Field | What it is |
|---|---|---|
| Basic Info | Term ID | The category’s internal WordPress ID |
| Basic Info | Name | The category’s display name |
| Basic Info | Slug | The URL-friendly version of the name |
| Basic Info | Term URI | The full web address of the category’s page on your store |
| Basic Info | Parent Term ID | The term ID of the parent category. Empty for a top-level category. |
| Basic Info | Parent Name | The name of the parent category. Empty for a top-level category. |
| Basic Info | Description | The description text entered on the category’s edit screen |
| Basic Info | Display Type | How the category page shows its content, such as Products, Subcategories, or Both. Empty when the category uses your store’s default. |
| Basic Info | Order | The category’s position number in WooCommerce’s custom category order |
| Basic Info | Count | How many products are assigned to that category |
| Hierarchy | Category: Level 1 to Category: Level 7 | One column per level of the category’s path, from the top-level parent down to the category itself. See “Understanding the hierarchy columns” below. |
| Hierarchy | Hierarchy | The whole path in one cell, with each level separated by > |
| Media | Image | The URL of the category’s full-size image |
| Media | Image (Embed) | Embeds the category’s image directly into the file. This works for the XLSX format only. |
For the full list across every export type, see Available export fields in Store Exporter Deluxe.
Step 3: Sort your categories
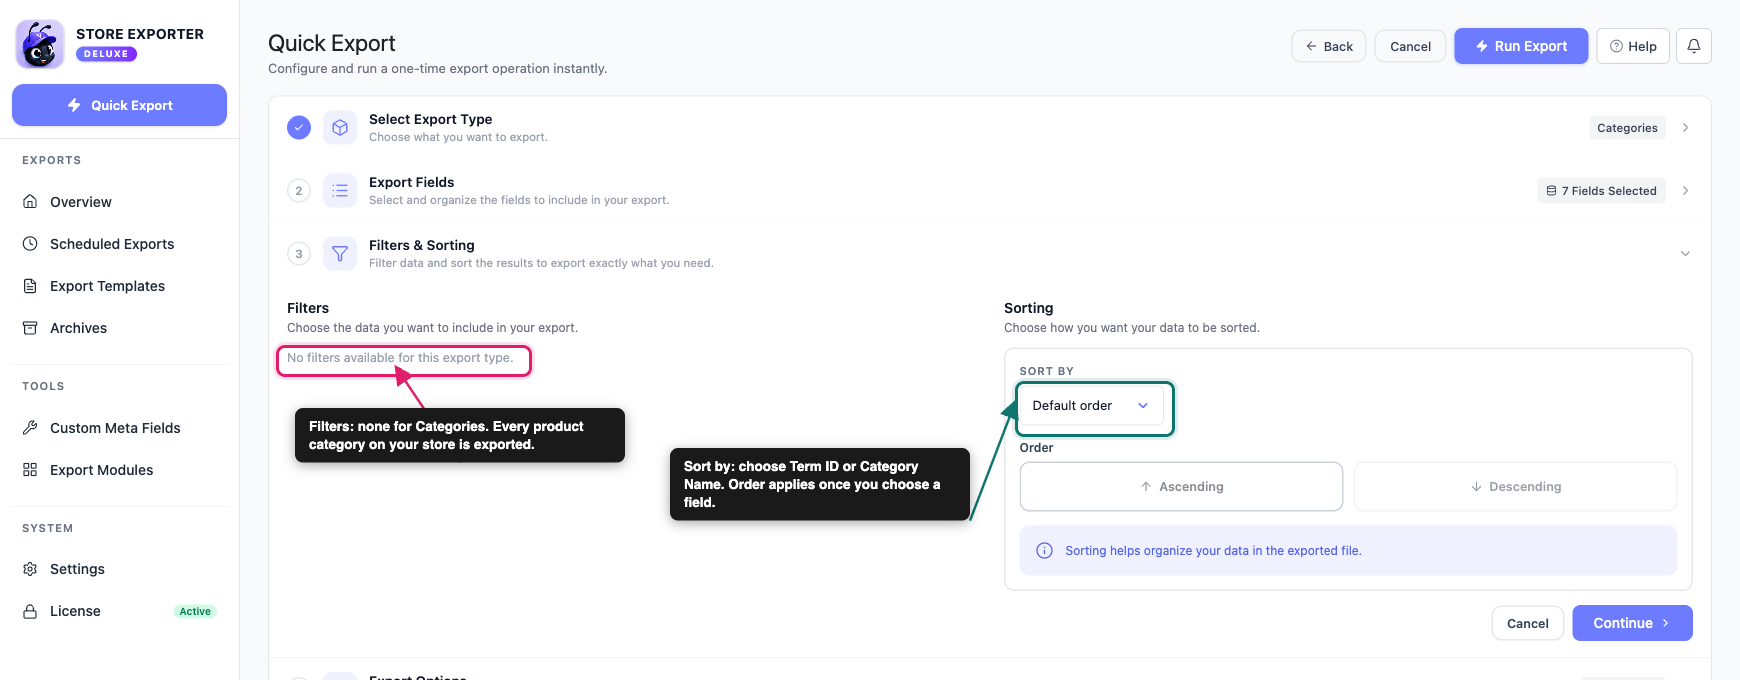
Open the Filters & Sorting step. On most stores, the Filters panel shows “No filters available for this export type.”
Sorting does work. In the Sorting panel on the right:
- Pick a field in Sort by. Your options are Term ID and Category Name, or leave it on Default order.
- Under Order, click Ascending or Descending. Both buttons stay greyed out until you’ve chosen a Sort by value.
Step 4: Set your format and options
On the Export Options step, you can set up how the file is built.
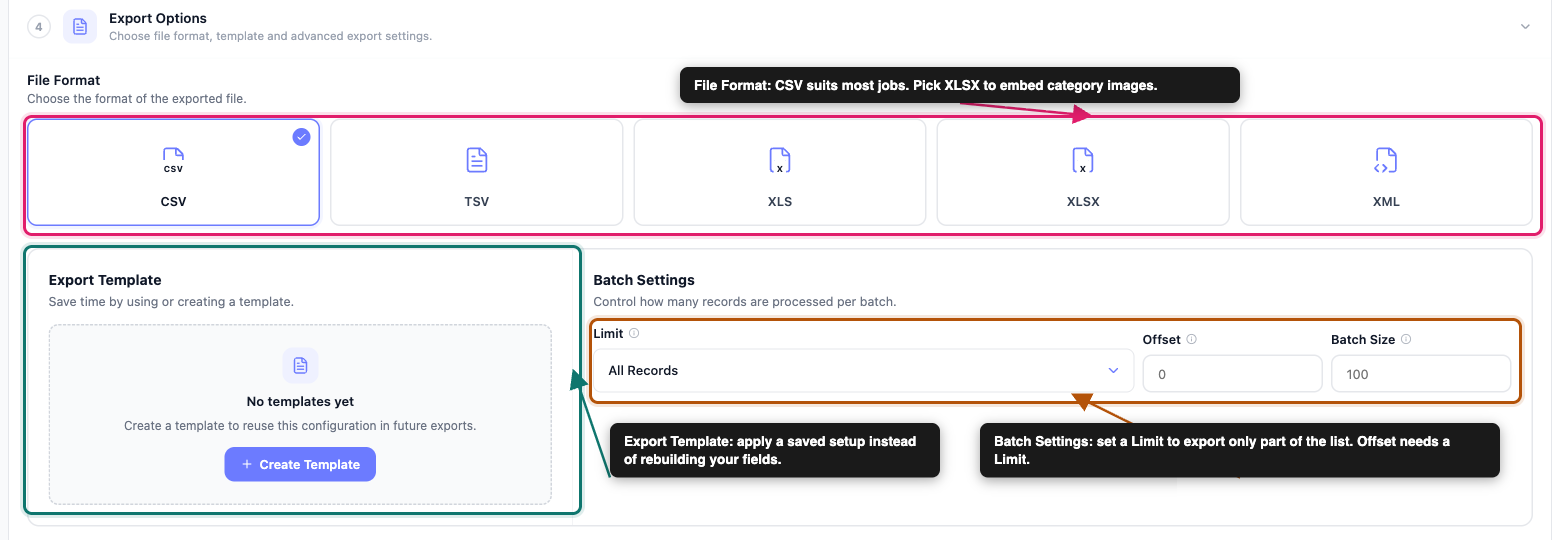
File Format: Pick CSV, TSV, XLS, XLSX, or XML. CSV suits most jobs, since nearly every spreadsheet and import tool reads it. Choose XLSX if you want category images embedded in the file.
Export Template: If you’ve already saved a setup on the Export Templates screen, apply it from the Export Template dropdown instead of rebuilding your field list by hand. For detailed instructions, see How to use Export Templates in Store Exporter Deluxe.
Description/Excerpt formatting: Category descriptions can contain HTML, such as bold text or links. Choose Leave HTML tags from Description/Excerpt intact to export the description exactly as saved, or Strip HTML tags from Description/Excerpt to export plain text only.
Batch Settings: Leave Limit on All Records to export every category. To export only part of the list, pick a number in Limit, such as 100.
Offset skips that many categories before the export starts. It only works when you also set a Limit.
Batch Size sets how many categories the export processes in each step. It doesn’t change what ends up in the file. It starts at 100, which suits most stores.
Step 5: Run the export and download the file
When you’re ready, click Run Export in the top right. The summary bar above it shows EXPORT TYPE, FIELDS, FILTERS, FORMAT, and ESTIMATED ROWS, so it’s worth a glance first.

A progress window runs through each stage of the export. Once it reads “Your export is complete and ready to download.”, click Download File. You can also find the file later under Archives in the sidebar.
Exporting categories on a schedule
If you need a fresh category list every week for a sync tool or a report, build it as a scheduled export instead of running Quick Export by hand each time.
Go to Scheduled Exports in the EXPORTS group, then click New Schedule. The setup form has five steps: General, Filters, Method, Scheduling, and Advanced. For a category export, two steps need your attention.
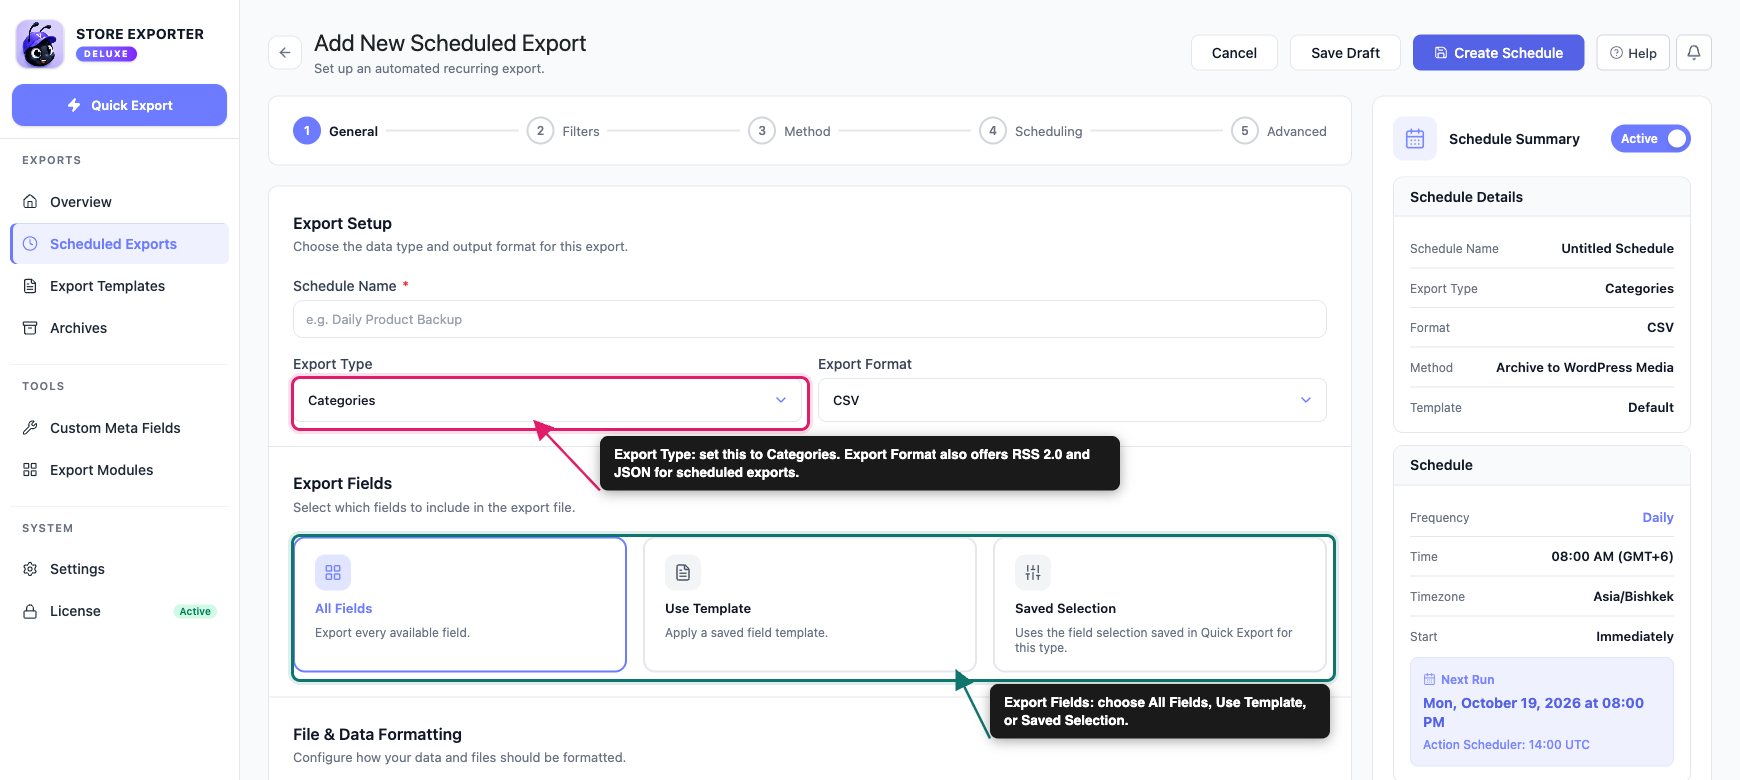
General: Set Export Type to Categories, then choose an Export Format. Scheduled exports also offer RSS 2.0 and JSON on top of the Quick Export formats.
Under Export Fields, choose All Fields, Use Template, or Saved Selection. Saved Selection reuses the fields and column order from the last Categories export you ran in Quick Export. Clicking Save Fields alone doesn’t update it. The sort comes from the schedule’s own Filters step.
Filters: This step holds the sorting rule. Pick Term ID or Category Name in Sort by, then pick a Direction.
The remaining steps work the same as for any other export type. They cover how the file is delivered (email, FTP/SFTP, and more) and how often it runs. For detailed instructions, see How to schedule exports in Store Exporter Deluxe.
Understanding the hierarchy columns
If you sell in nested categories, the Hierarchy fields show where each category sits in the tree. They’re not in the default selection, so add them from the Select Export Fields popup.
Here’s how a category called Zip-up, stored under Hoodies, which sits under Clothing, appears in the file:
| Field | Value |
|---|---|
| Name | Zip-up |
| Parent Name | Hoodies |
| Category: Level 1 | Clothing |
| Category: Level 2 | Hoodies |
| Category: Level 3 | Zip-up |
| Hierarchy | Clothing>Hoodies>Zip-up |
A top-level category has no parent, so its own name fills Category: Level 1 and the other level columns stay empty. Each subcategory gets its own row in the file, so a nested tree exports as a flat list.
Troubleshooting
Frequently asked questions
Related articles
- How to export WooCommerce products with Store Exporter Deluxe
- How to export WooCommerce brands with Store Exporter Deluxe
- Available export fields in Store Exporter Deluxe
- How to use Export Templates in Store Exporter Deluxe
- How to schedule exports in Store Exporter Deluxe
Need help?
If you have a question or run into any issues, we’re here to help.
- Premium users: Open a support ticket
- Free users: Visit our community forum