
A login page that says “Email Address” when your customers sign in with a username, or “Log In” when your store says “Sign in” everywhere else, feels off-brand. Custom Login for WooCommerce lets you reword the main text on the login form, so the page sounds like your store.
This article covers the six text settings on the Design tab: the page heading, the email and password labels, the Remember Me label, the login button, and the lost password link. Your logo, colours, and the promo panel have their own settings. For colours, see how to change your login page colours. For the promo panel, see how to set up the promo panel.
Prerequisites
| Requirement | Details |
|---|---|
| Plugin | Custom Login for WooCommerce installed and active |
| WooCommerce | Installed and active |
| Access | An account that can manage WooCommerce settings |
The login page text settings
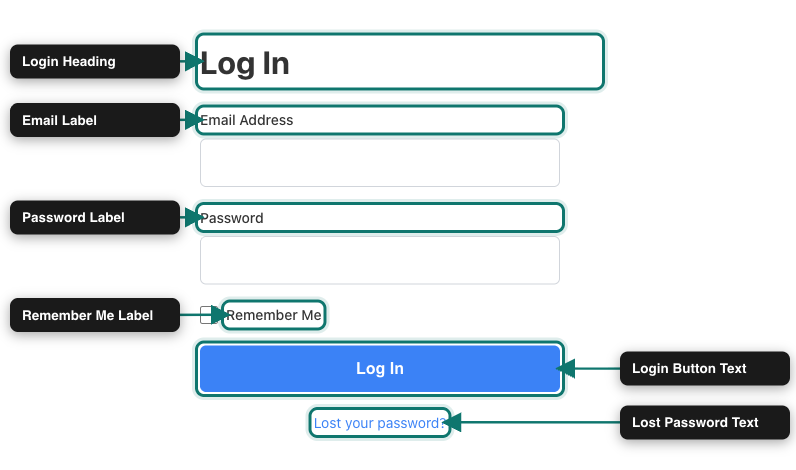
Here’s what each setting changes and what the login page shows until you change it. The settings are listed in the order they appear on the Design tab.
| Setting | Where it appears | Default text |
|---|---|---|
| Login Heading | The large heading above the form. It also starts the browser tab title, before your site name. | Log In |
| Email Label | The label above the first field. | Email Address |
| Password Label | The label above the password field. | Password |
| Remember Me Label | The text next to the checkbox that keeps customers signed in. | Remember Me |
| Login Button Text | The text on the button that submits the form. | Log In |
| Lost Password Text | The link under the button that takes customers to the lost password page. | Lost your password? |
Step 1: Open the Design tab
- Go to WooCommerce → Custom Login in your WordPress admin.
- Click the Design tab.
The tab opens with the Logo & Heading section at the top. The Form Labels section sits further down, below the colour settings.
Step 2: Change the login heading
- Find the Login Heading field under Logo & Heading.
- Replace the text with your own heading, for example
Welcome back.

Step 3: Change the form labels
- Scroll down to the Form Labels section.
- Replace the text in any of the five fields you want to change.
The table above shows what each field changes and what it shows by default. Fields you leave alone keep their current text. If you clear a field and save, the login page uses that setting’s default text.

Step 4: Save your changes
Click Save Settings at the top right of the page. The button stays visible on the Template, Design, and Content tabs, so you can save from any of them.
Step 5: Check your login page
- Log out, or open a private browser window.
- Visit
yourstore.com/loginto see your new text. - Check the browser tab title. It starts with your Login Heading.
Troubleshooting
yourstore.com/login in a private browser window. If you use a caching plugin or a site-wide cache, clear that cache too.Frequently asked questions
Need help?
Custom Login for WooCommerce is a premium plugin, so if you run into trouble, open a support ticket and our team can help.