
Exporting your WooCommerce data by hand every day or every week eats into time you could spend running your store. Store Exporter Deluxe lets you set up a Scheduled Export once, then it runs on its own after that, on the interval and delivery method you choose.
You can create as many Scheduled Exports as you need. Each one keeps its own filters, export fields, and delivery settings, so a daily order export and a weekly product backup can run side by side without interfering with each other.
Prerequisites
| Requirement | Details |
|---|---|
| Plugin | Store Exporter Deluxe is active and licensed |
| WooCommerce | Active, since Scheduled Exports pull their data from your WooCommerce store |
| Delivery destination | If you plan to deliver by FTP/SFTP or email, have those connection details ready before you start |
Where to find Scheduled Exports
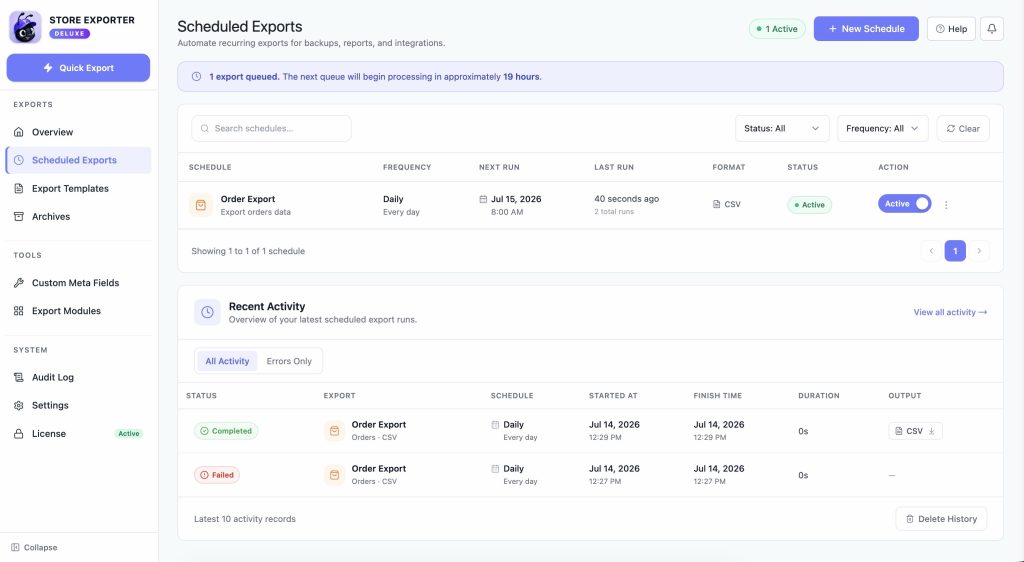
Open WooCommerce → Store Export from the WordPress admin menu. This opens the Store Exporter Deluxe dashboard, which uses a sidebar instead of the old tab bar. Select Scheduled Exports from the EXPORTS section of the sidebar to see your existing schedules.
Creating a scheduled export
- From the Scheduled Exports screen, click New Schedule.
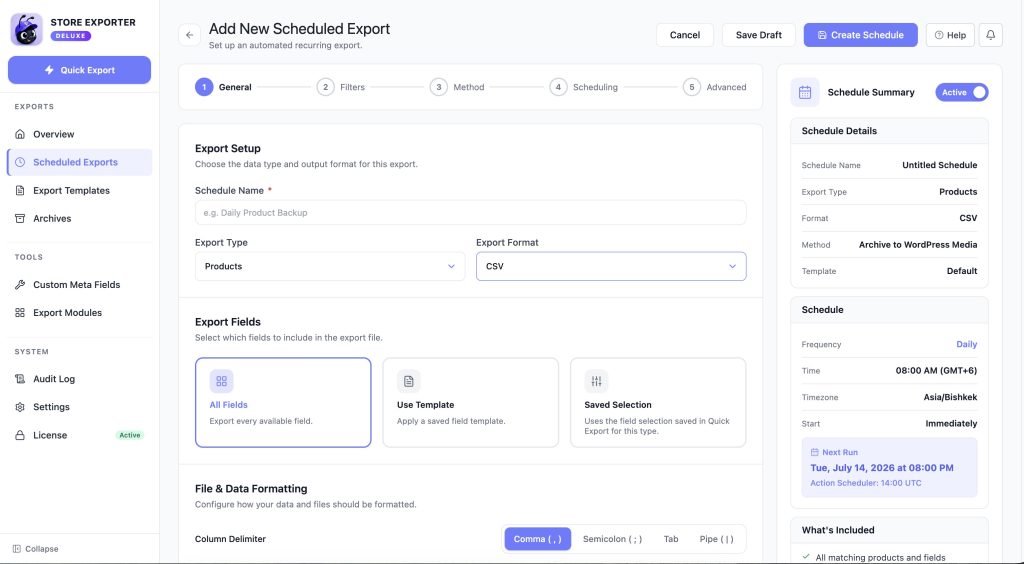
- On the General step, enter a name in the Schedule Name field. This name only appears within your WordPress admin, so use something you’ll recognize later, like “Daily Product Backup.”
- Choose what to export from the Export Type dropdown.
- Choose a file format from the Export Format dropdown.
- Under Export Fields, choose All Fields, Use Template to apply a saved export template, or Saved Selection to reuse the fields you last picked in Quick Export.
- Click Filters to set any conditions that narrow down what gets exported. Skip this step to export everything of the chosen type.
- Click Method to choose how the export is delivered. See Delivery methods below for what each option does.
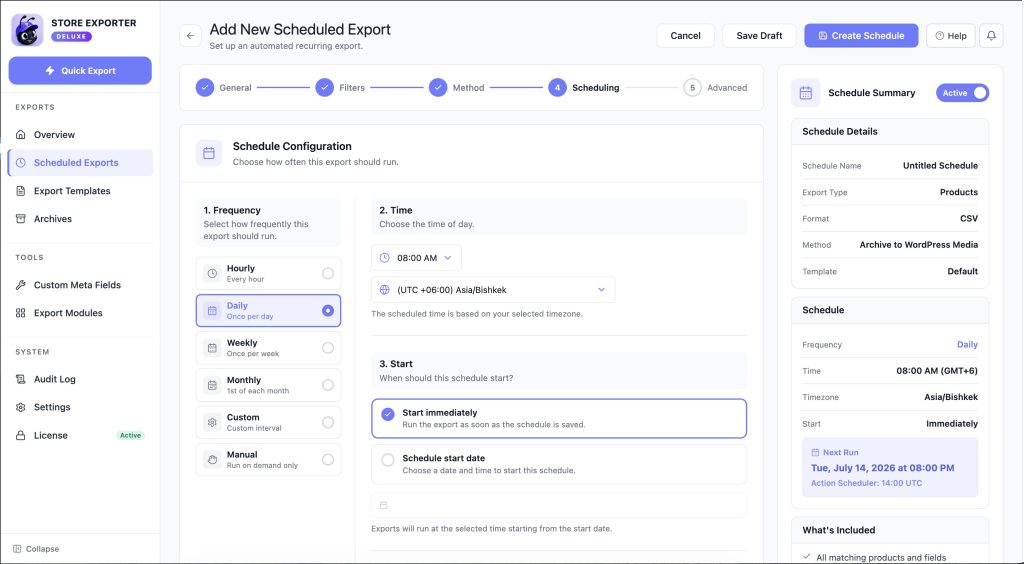
- Click Scheduling to set how often the export runs. See Cron interval options below for the available frequencies.
- (Optional) Click Advanced to set the log level and other per-schedule advanced options.
- Click Create Schedule to save.
Once saved, open the schedule again and click Execute Now to run it immediately and confirm it works.
File and data formatting
Further down the General step, the File & Data Formatting section controls how the exported file itself is put together:
- Column Delimiter (CSV exports only): choose Comma, Semicolon, Tab, or Pipe as the character that separates columns. Use Semicolon or Tab if your target system expects one of those instead of a comma, for example, in a region where commas are used as decimal separators.
- Excel Formulas: choose to Allow Excel formulas or do not allow Excel formulas in the exported file. Leave formulas disallowed unless you specifically need calculated values, since allowing them can expose the file to formula injection if someone else opens it later.
- Header Formatting: choose whether to include export field column headers or leave them out. Only turn headers off if the system receiving the file expects raw data with no header row.
- Grouped Product Formatting: choose how a grouped product’s child products are represented, as Export as Product ID, Export as Product SKU, or Export as Product Name.
- Product Image Formatting: choose how the main product image is represented, as an Attachment ID, an Image URL, or an Image Filepath.
- Product Gallery Formatting: choose how gallery images are represented, using the same three options as Product Image Formatting.
Filtering what gets exported
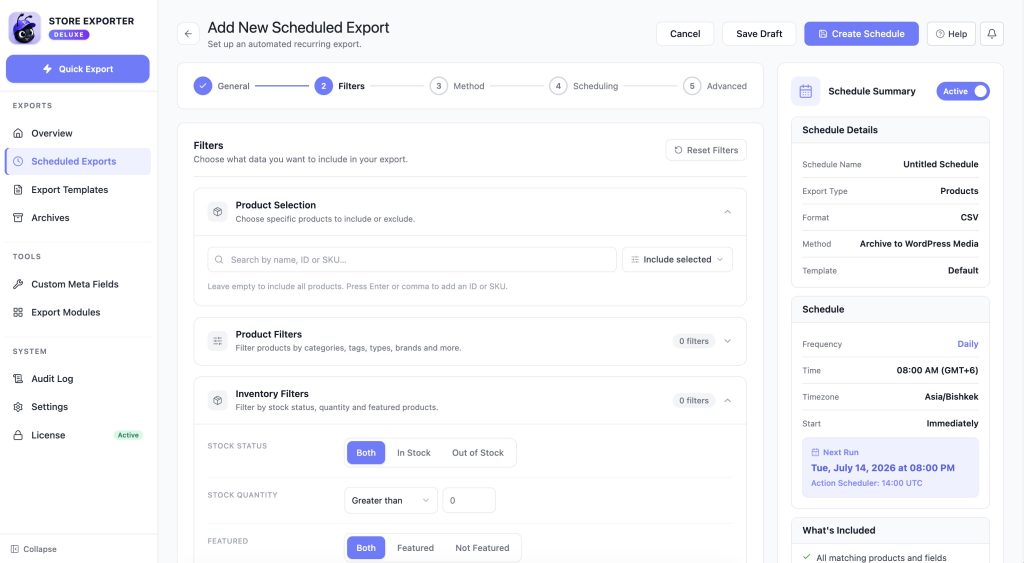
The Filters step controls exactly which records the export includes. What you see here depends on the Export Type you chose on the General step. Choosing Products, for example, shows product-specific groups like Product Filters and Inventory Filters, while choosing Orders shows Order Filters instead.
If your export type is Products or Product Variations, a Product Selection section appears at the top of the Filters step. Search for products by name, ID, or SKU, then choose Include selected or Exclude selected from the mode button next to the search field. Leave the search empty to export every matching product.
Below Product Selection, filters are grouped into collapsible sections, each with a badge showing how many filters inside it are currently active. Depending on the individual filter, its control can be a dropdown, a set of pill-style options, a number field, a multi-select list, a comparison (for example, stock quantity greater than a number you enter), a date range with quick presets (Any Time, Last 7 Days, Last 30 Days, Yesterday, Today, or a Custom Range), or a plain text field.
At the bottom of the Filters step, the Sorting section lets you sort the export by one or more fields, each with its own Ascending or Descending direction. Click Add Another Sort Rule to sort by more than one field, for example, by category first and then by name within each category.
Delivery methods
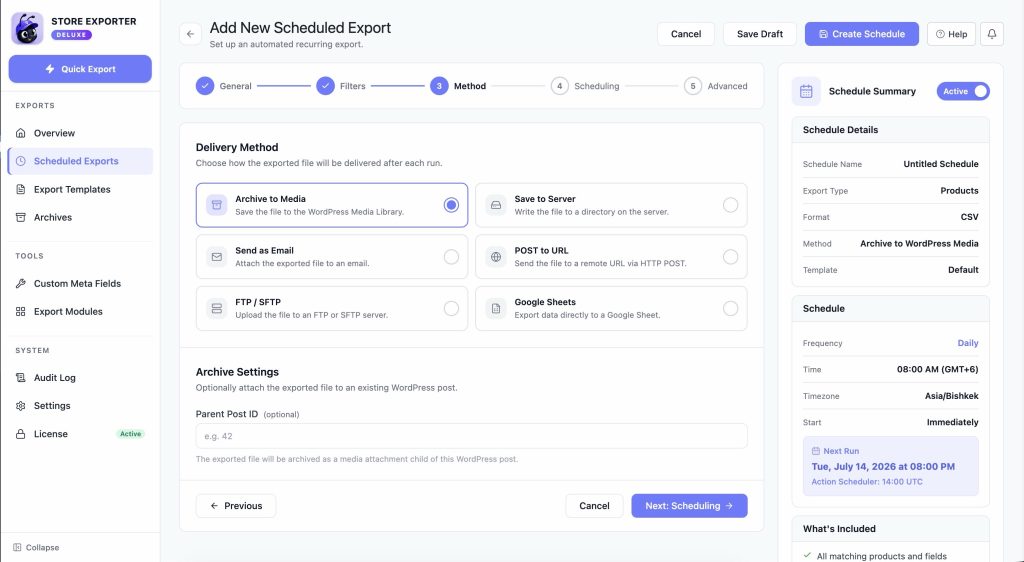
The Method step lets you choose where the exported file goes:
- Archive to Media: saves the file to your WordPress Media Library.
- Save to Server: writes the file to a directory on your server.
- Send as Email: attaches the exported file to an email and sends it to one or more recipients.
- POST to URL: sends the file to a remote URL using an HTTP POST request. This suits suppliers or accounting systems that accept incoming file uploads.
- FTP / SFTP: uploads the file to an external FTP or SFTP server. You’ll need the server’s host, port, protocol, username, and password, plus an optional remote directory path and filename.
- Google Sheets: exports data directly to a Google Sheet. This method needs API credentials configured first. If you haven’t set those up yet, the plugin shows a prompt to configure them before this option will work.
Cron interval options and timezone
On the Scheduling step, choose how often the export should run from these frequencies:
- Hourly: runs every hour.
- Daily: runs once per day.
- Weekly: runs once per week.
- Monthly: runs on the 1st of each month.
- Custom: runs every set number of minutes that you specify.
- Manual: doesn’t run on a schedule at all. Use this when you only want to trigger the export yourself, either with the Execute Now button or the manual CRON export engine described below.
For Hourly and Daily frequencies, you can also limit the export to specific days of the week using the day pills under the Days section.
Below the frequency, the Timezone dropdown lets you pick the timezone the schedule runs on, from a full list of time zones with their UTC offset (for example, (UTC +10:00) Australia/Sydney). It defaults to your site’s own timezone, so in most cases you won’t need to change it. The scheduled time you set is based on whichever timezone you select here, not the server’s raw UTC time.
Triggering a scheduled export manually
If you need a scheduled export to run at an exact time, independently of WordPress loading a page, you can trigger it with a direct URL using the manual CRON export engine included with Store Exporter Deluxe.
Find the scheduled export’s ID
- Open WooCommerce → Store Export → Scheduled Exports.
- Note the ID of the scheduled export you want to run. You’ll need this for the trigger URL below.
Turn on CRON access
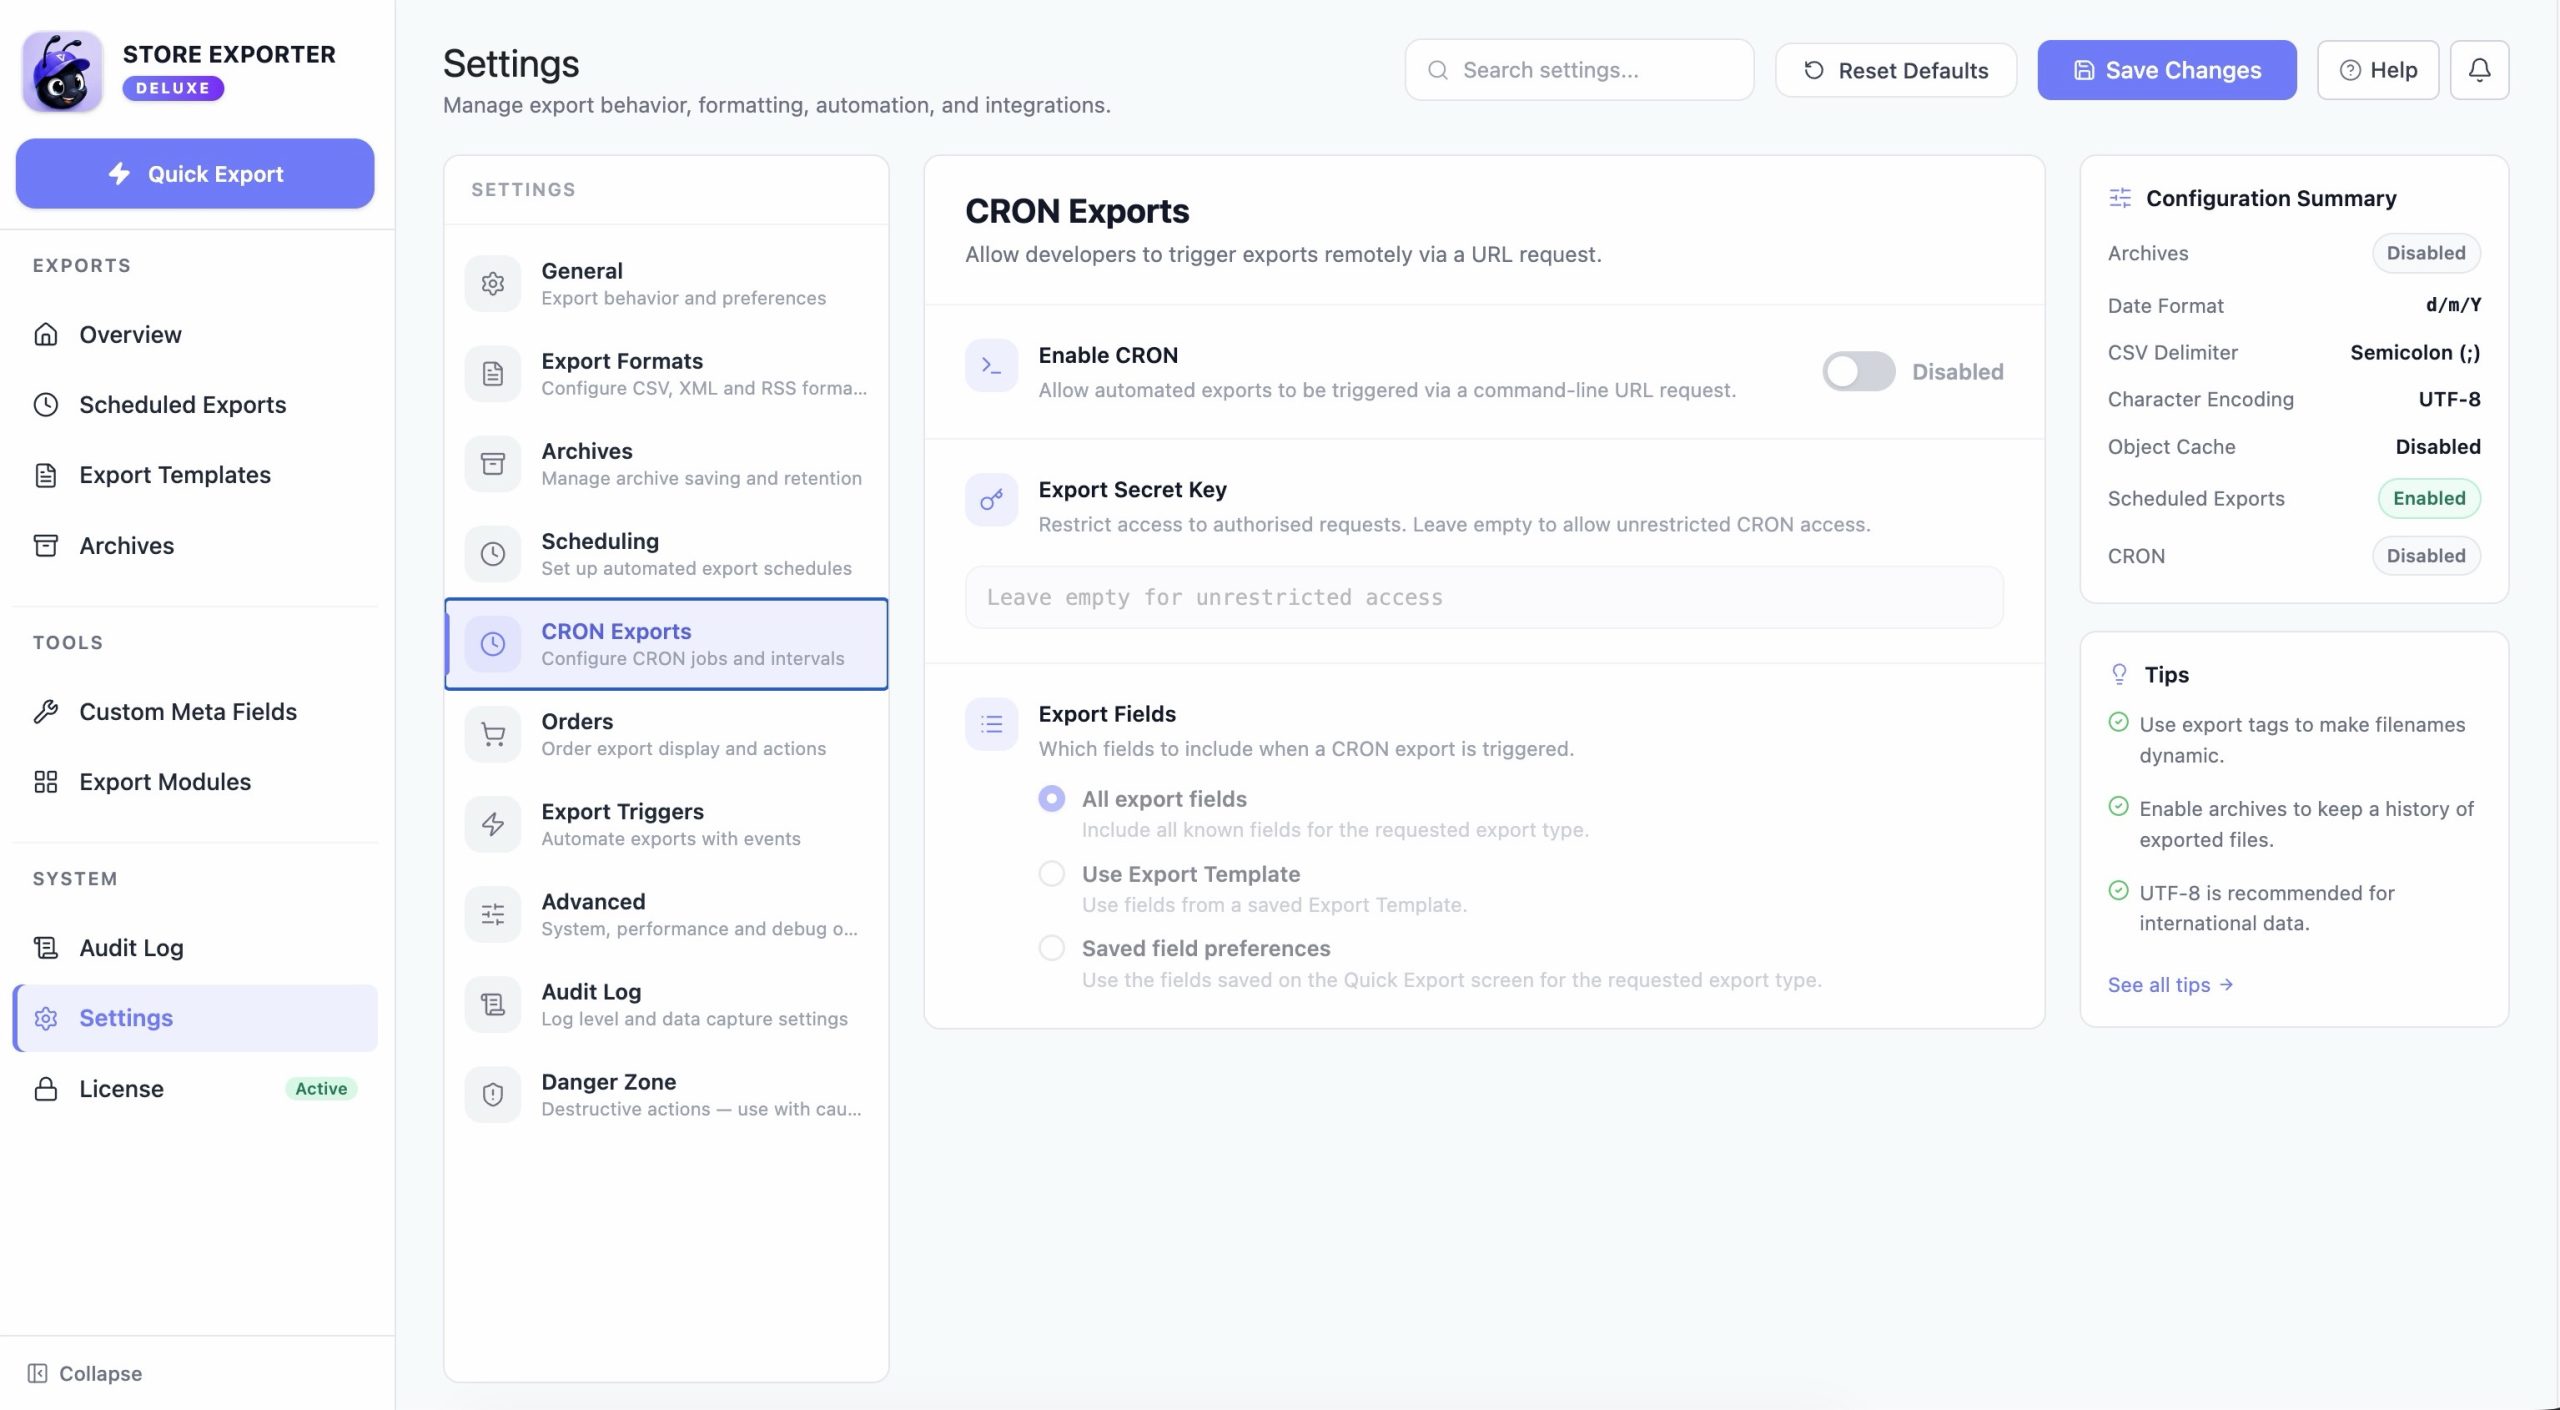
- Open WooCommerce → Store Export → Settings and select the CRON Exports tab.
- Turn on the Enable CRON toggle.
- Enter a value in the Export Secret Key field. Leaving it empty allows unrestricted access to the trigger URL, so setting a key is recommended for any live store.
Build and trigger the URL
- Build a trigger URL in this format, replacing each placeholder with your own values:
https://your-site.com/?action=woo_ce-cron&key=YOUR_SECRET_KEY&type=product&response=download&scheduled_export=100- Visit this URL (for example, from a real server-level cron job) to trigger the export immediately. Check the Scheduled Exports screen afterward. A completed run shows up under Recent Schedules.
For more details on this trigger and command-line alternatives, see How to export via manual CRON.
Managing scheduled exports with WP-CLI
If you have command-line access to your server, the wp store-export command lets you list and trigger exports without opening wp-admin:
wp store-export listwp store-export scheduled_export --scheduled_id=100Replace 100 with the ID of the scheduled export you want to run. There’s also a wp store-export quick_export --export_type=product command for running a one-off export outside of any saved schedule.
Troubleshooting
Check the Scheduled Exports screen first. It shows the status of each schedule, including whether a run is pending, in progress, or complete. The Recent Schedules panel and the Recent Scheduled Exports dashboard widget both show whether the most recent run succeeded or failed, along with the reason for any failure.
- Incorrect host, port, username, or password. Confirm these directly with your hosting or FTP provider.
- The receiving server is blocking the connection. Ask your hosting provider to unblock the ports your FTP protocol needs, or try switching between FTP and SFTP on the Method step if both are available to you.
- Check your spam or junk folder first.
- Add a second recipient at a different email provider (for example, a Gmail or Outlook address) to check whether the issue is specific to your usual provider’s spam filtering.
- If your email and WordPress hosting run on the same server, ask your hosting provider about self-hosted email deliverability. This setup is a common source of delivery issues that have nothing to do with the plugin.
FAQ
Related articles
- How to export via manual CRON
- How to schedule exports by your local time: for converting your local time to server time when triggering exports through a manual cron job outside the plugin’s own Scheduling step
- How to export users
- Exporting custom product, order, and order item meta
Need more help?
If you’re using Store Exporter Deluxe and run into an issue this article doesn’t cover, open a support ticket and our team will help you get your Scheduled Export running.
If you’re using the free Store Exporter plugin, ask on the WordPress.org support forum and our team will get back to you there.
