
Your email platform wants a list of everyone who’s bought from you. Your loyalty tool wants names, emails, and how much each person has spent. Your accountant wants the billing addresses behind last quarter’s revenue. WooCommerce already holds all of it, but there’s no download button on the Customers report.
Store Exporter Deluxe gives you one. You pick the columns you want, choose a file format, and download a customer list you can open in a spreadsheet or hand straight to another system.
This article covers a one-off Quick Export of your customers first, then how to run the same export automatically on a schedule.
Customers or Users: which one do you want?
Store Exporter Deluxe ships both, and they pull from different places. Getting this right first saves you a confusing export.
| Export type | What it gives you |
|---|---|
| Customers | One row per person who has placed an order, built from WooCommerce’s customer records joined to your orders. Guest checkouts are included, even though those shoppers never created an account. Fields lean towards billing details, shipping details, and order history. |
| Users | One row per WordPress user account, whether or not that person has ever bought anything. Fields lean towards account and profile data, such as username, role, and registration date. |
So if you want buyers, use Customers. If you want account holders, use Users and see How to export users instead.
Prerequisites
| Requirement | Details |
|---|---|
| Plugin | Store Exporter Deluxe is installed and active |
| WooCommerce | Active, with at least one order. Customers are derived from orders, so a store with no orders has no customers to export. |
| Order storage | High-Performance Order Storage (HPOS) needs to be on. See the note below if your store still uses the older post-based order tables. |
| Admin access | An account that can view WooCommerce reports. Administrators have this by default. |
Where to find Quick Export
Open WooCommerce → Store Export from the WordPress admin menu. That opens the Store Exporter Deluxe dashboard.
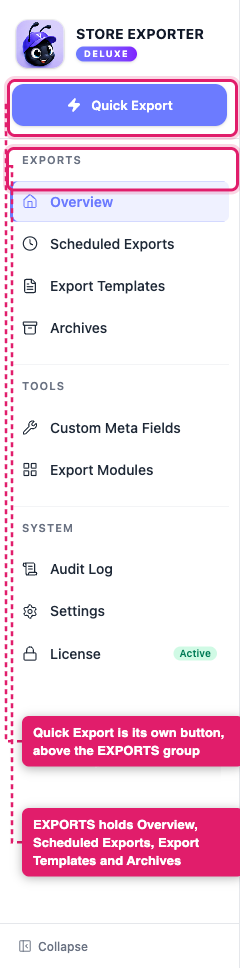
In the sidebar, Quick Export is its own button near the top, above the EXPORTS group. Click it to start a new export.
Step 1: Choose the Customers export type
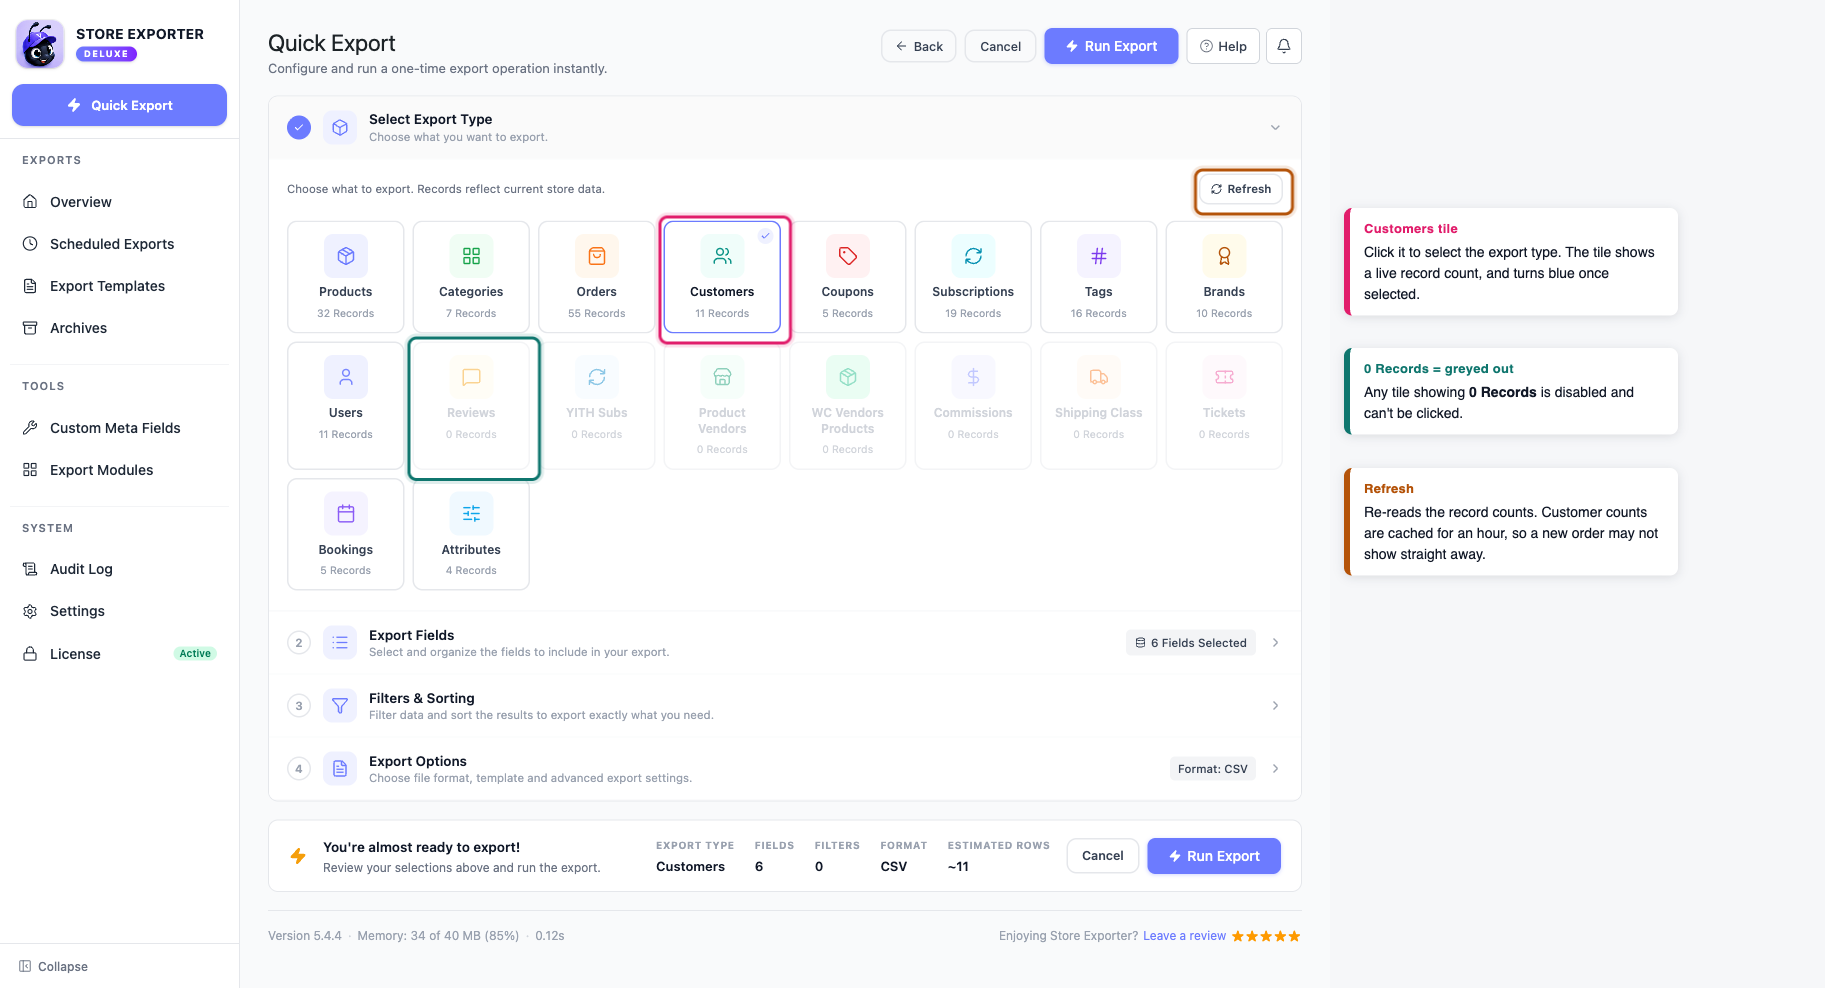
On the Select Export Type step, click the Customers tile. It sits under the Customers category heading.
Every tile shows a count of matching records, so you can confirm you’re pointed at the right data before going further.
If the Customers tile shows 0 Records, it’s greyed out and can’t be selected. That means WooCommerce has no orders stored yet, so there’s nobody to export.
Step 2: Pick your customer fields
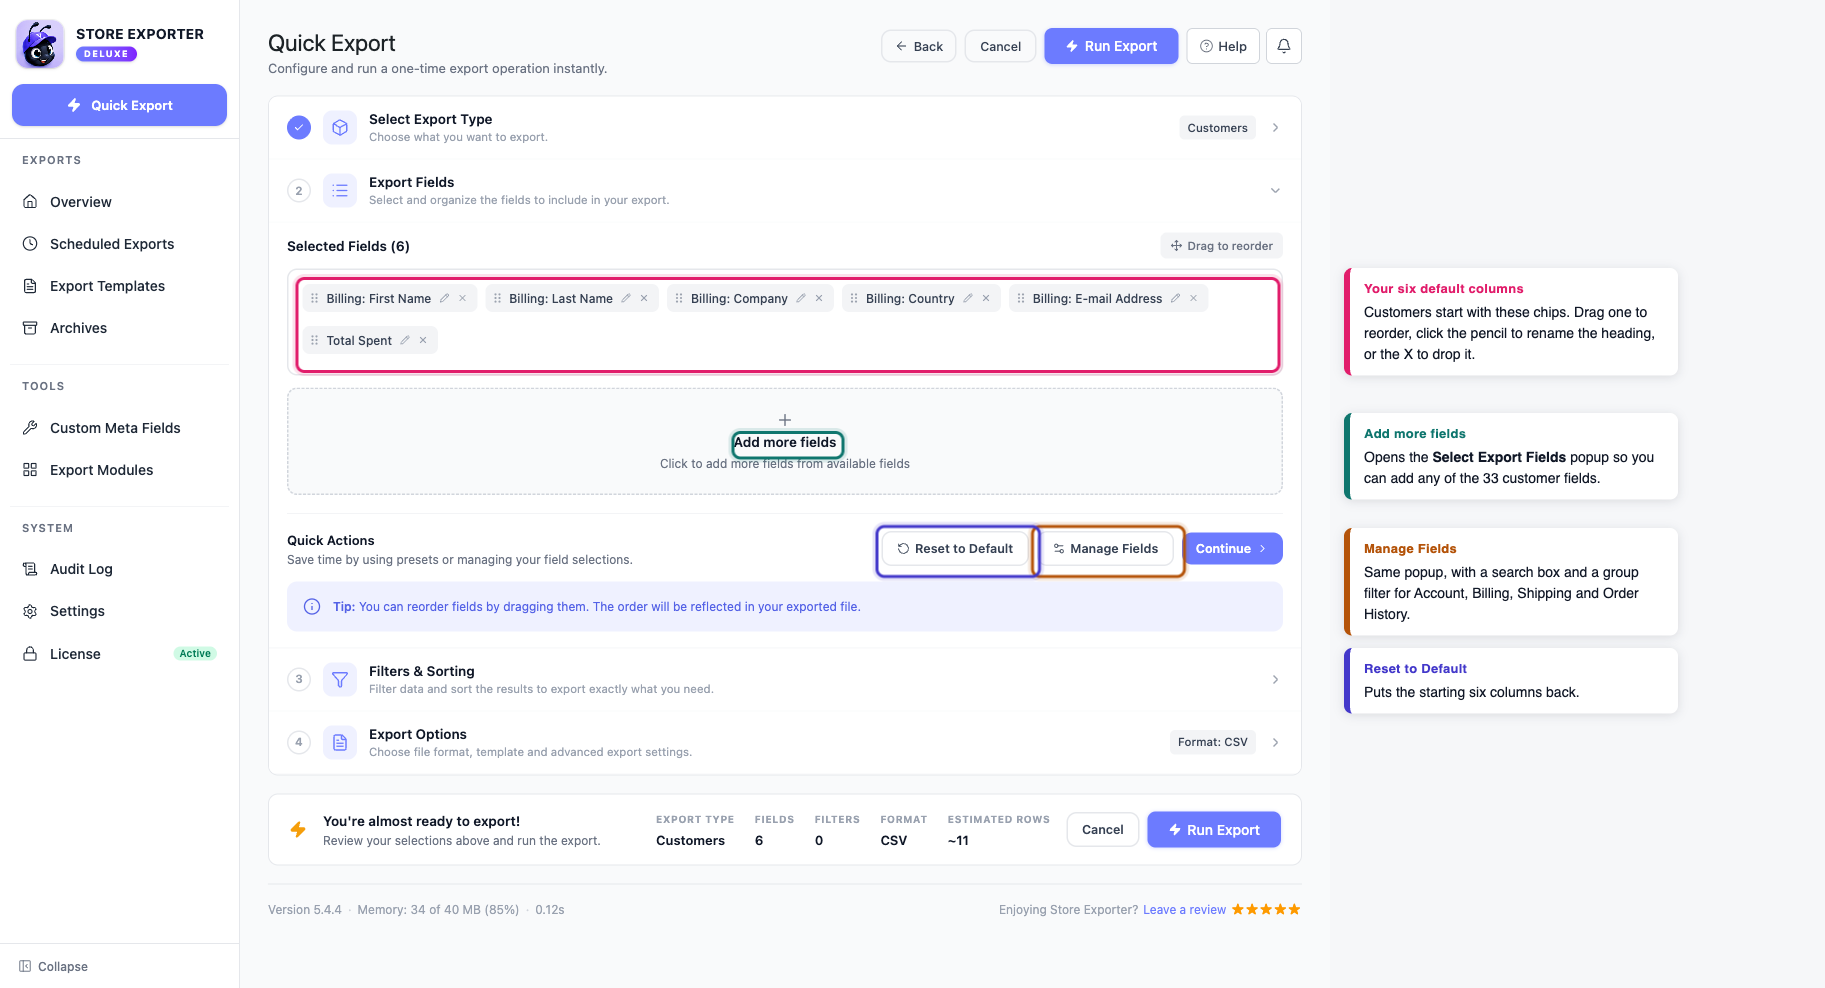
On the Export Fields step, the columns you’re about to export appear as chips under Selected Fields. Customers start with six of them:
- Billing: First Name
- Billing: Last Name
- Billing: Company
- Billing: Country
- Billing: E-mail Address
- Total Spent
From there you can shape the column list:
- Click Add more fields to open the Select Export Fields popup and add anything that isn’t already a chip.
- Click Manage Fields to open the same popup with the full list, a search box, and a group filter.
- Drag a chip to change the column order in your file.
- Click the pencil icon on a chip, or double-click it, to rename that column heading. The underlying data stays the same.
- Click the X on a chip to drop that column.
- Use Reset to Default to go back to the starting six, or Clear All in the popup to start from nothing.
Customers have 33 fields available in total, grouped like this:
| Group | Fields | What’s in it |
|---|---|---|
| Account | 3 | User ID, Username, User Role. These stay empty for guest customers, who have no account. |
| Billing Address | 14 | Name, company, street address, city, ZIP code, state, country, phone, and email |
| Shipping Address | 13 | The same address breakdown for shipping, plus separate full and prefix country fields |
| Order History | 3 | Total Spent, Completed Orders, Total Orders |
A couple of field pairs catch people out, and they’re not named the same way on both sides. On billing, Billing: State gives the full state name while Billing: State (prefix) gives the short code, and Billing: Country gives the country as stored. On shipping, it’s reversed: Shipping: Country (prefix) gives the short code and Shipping: Country gives the full name. Add whichever your destination system expects, and check the first few rows of your file before trusting a bulk import.
For the full list across every export type, see Supported export fields.
Adding your own customer meta
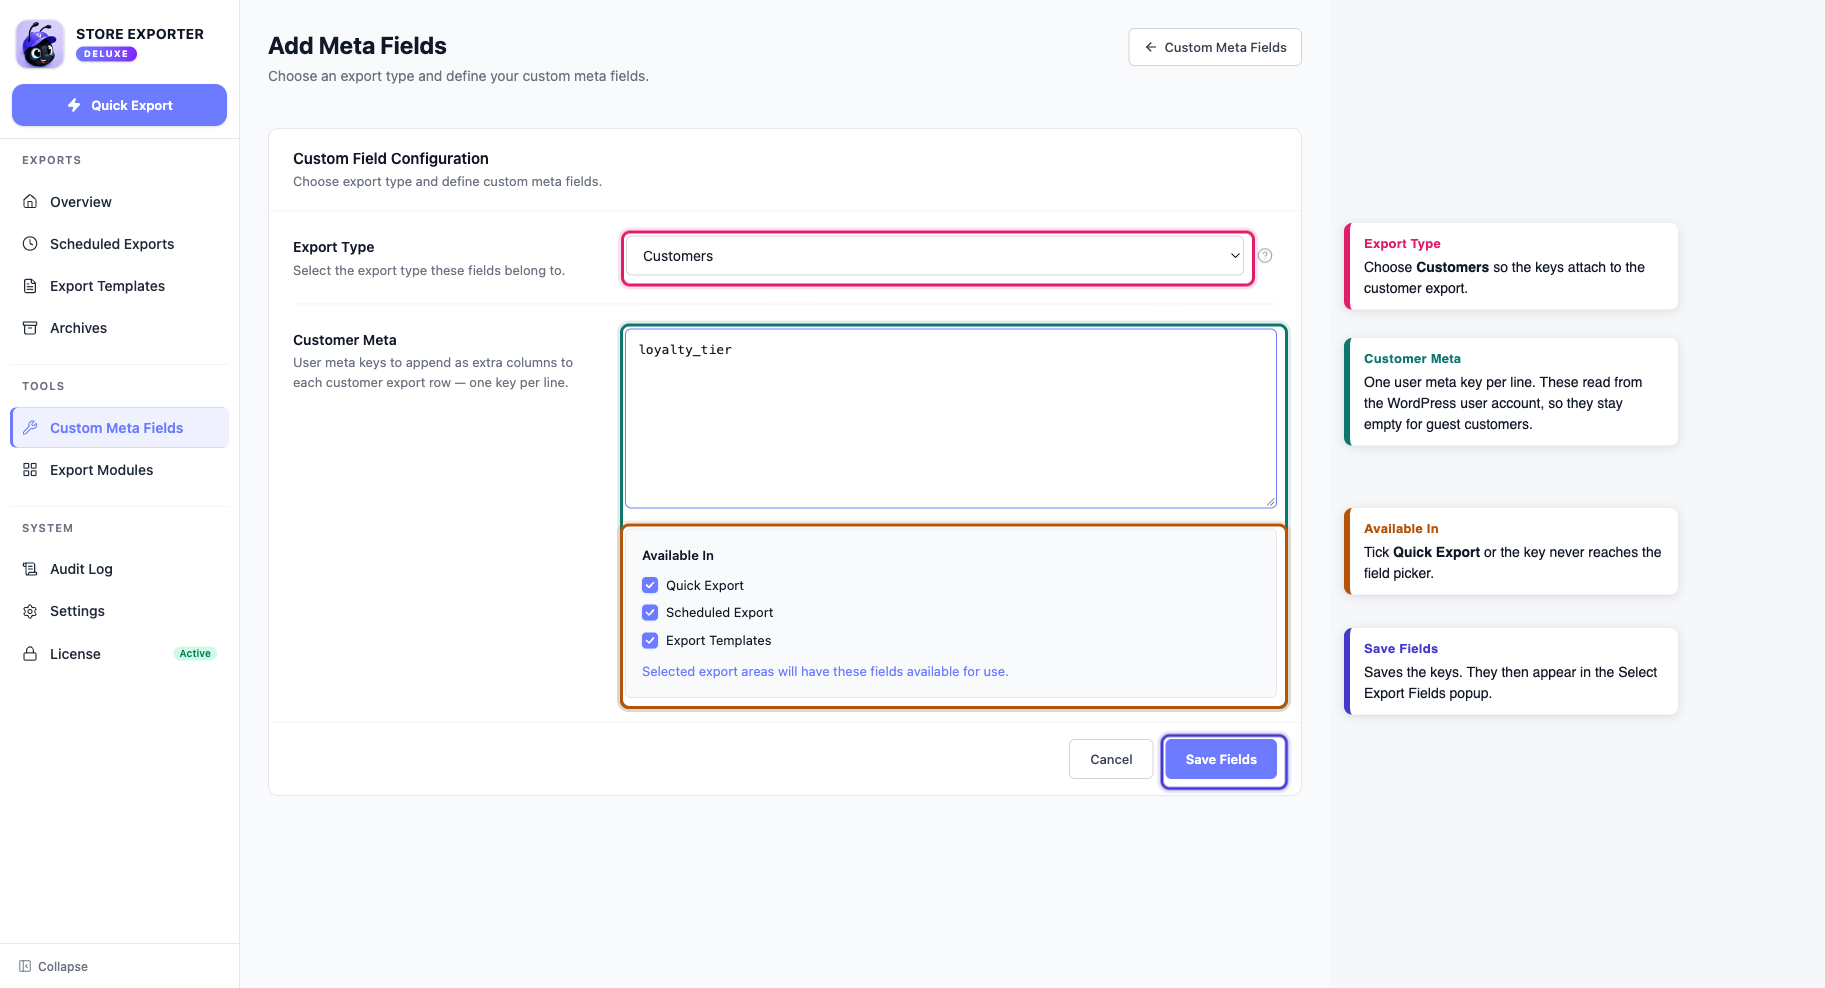
Store Exporter Deluxe doesn’t auto-detect custom meta, so you register the keys you want first. Go to Custom Meta Fields under the TOOLS group in the sidebar, then choose Customers. There’s one box, Customer Meta, which reads user meta keys and appends each one as an extra column.
Enter one key per line, tick Quick Export under Available In, then click Save Fields. Your keys then appear in the field popup on the Export Fields step.
Step 3: Sort your customers
Open the Filters & Sorting step and you’ll see “No filters available for this export type.” on the left. That’s expected in version 5.4.4: the Customers export type has no filter cards, so a Customers export always returns every customer in your store.
Sorting does work. In the Sorting panel on the right:
- Pick a field in Sort by. Your options are ID, Date Created, and Date Modified, or leave it on Default order.
- Under Order, click Ascending or Descending. Both buttons stay greyed out until you’ve chosen a Sort by value.
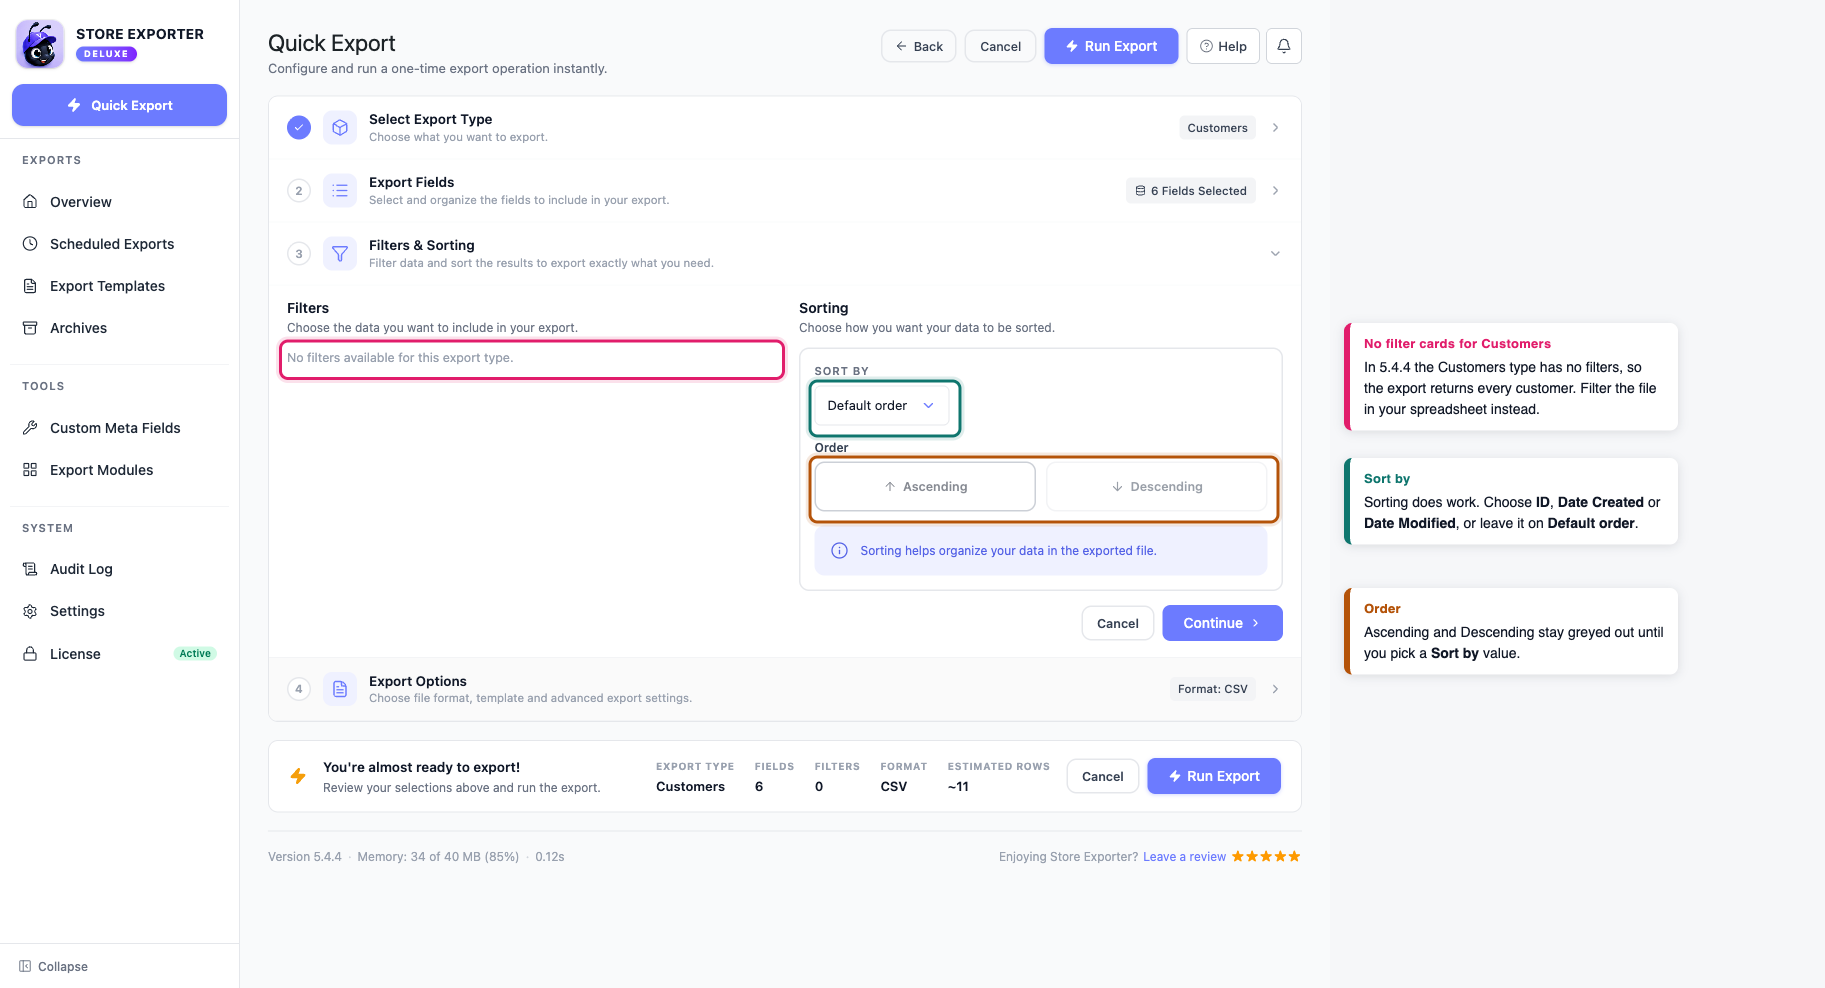
A Sort Preview panel appears underneath once a sort field is set, so you can see the order your rows will land in before you run anything.
Step 4: Set your format and batch options
On the Export Options step, pick one of five tiles under File Format:
| Format | Best for | Notes |
|---|---|---|
| CSV | General use, Google Sheets, email platforms | The most universal option. Opens anywhere. |
| TSV | Tab separated workflows | Handy when addresses contain commas |
| XLS | Excel 97-2003 compatibility | Legacy spreadsheet support |
| XLSX | Modern Excel workflows | Native Excel 2007 and later |
| XML | Data feeds and integrations | Structured output for other systems to read |
CSV suits most jobs, and it’s what nearly every email and CRM tool asks for on import. If you’ve already saved a setup on the Export Templates screen, apply it from the Export Template dropdown instead of rebuilding your field list by hand.
Under Batch Settings you get three controls. Limit caps how many customers are exported, and it defaults to All Records. Offset skips a number of customers from the start, which pairs with Limit to work through a large store in chunks. Batch Size sets how many records are processed per pass, and 100 is the default.
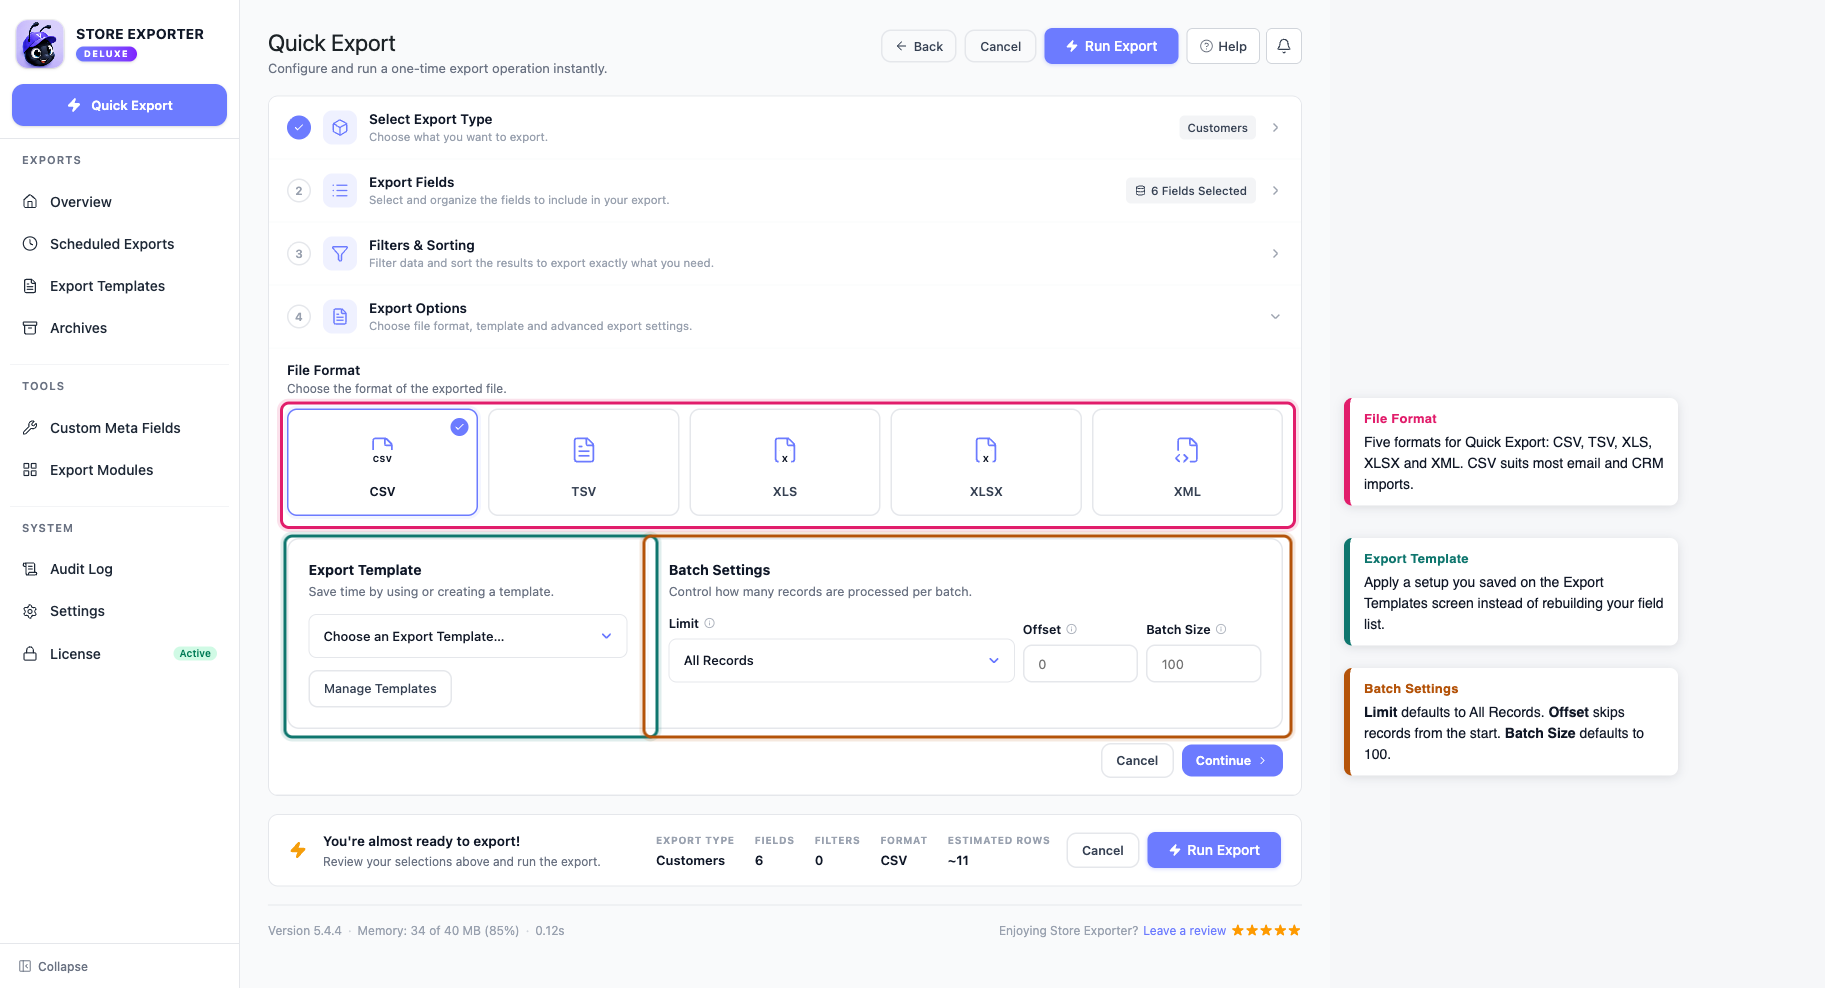
When you’re ready, click Run Export in the top right. The summary bar above it shows EXPORT TYPE, FIELDS, FILTERS, FORMAT, and ESTIMATED ROWS, so it’s worth a glance first. FILTERS always reads 0 on a Customers export, for the reason covered in Step 3. Your file downloads once the run finishes.
Exporting customers on a schedule
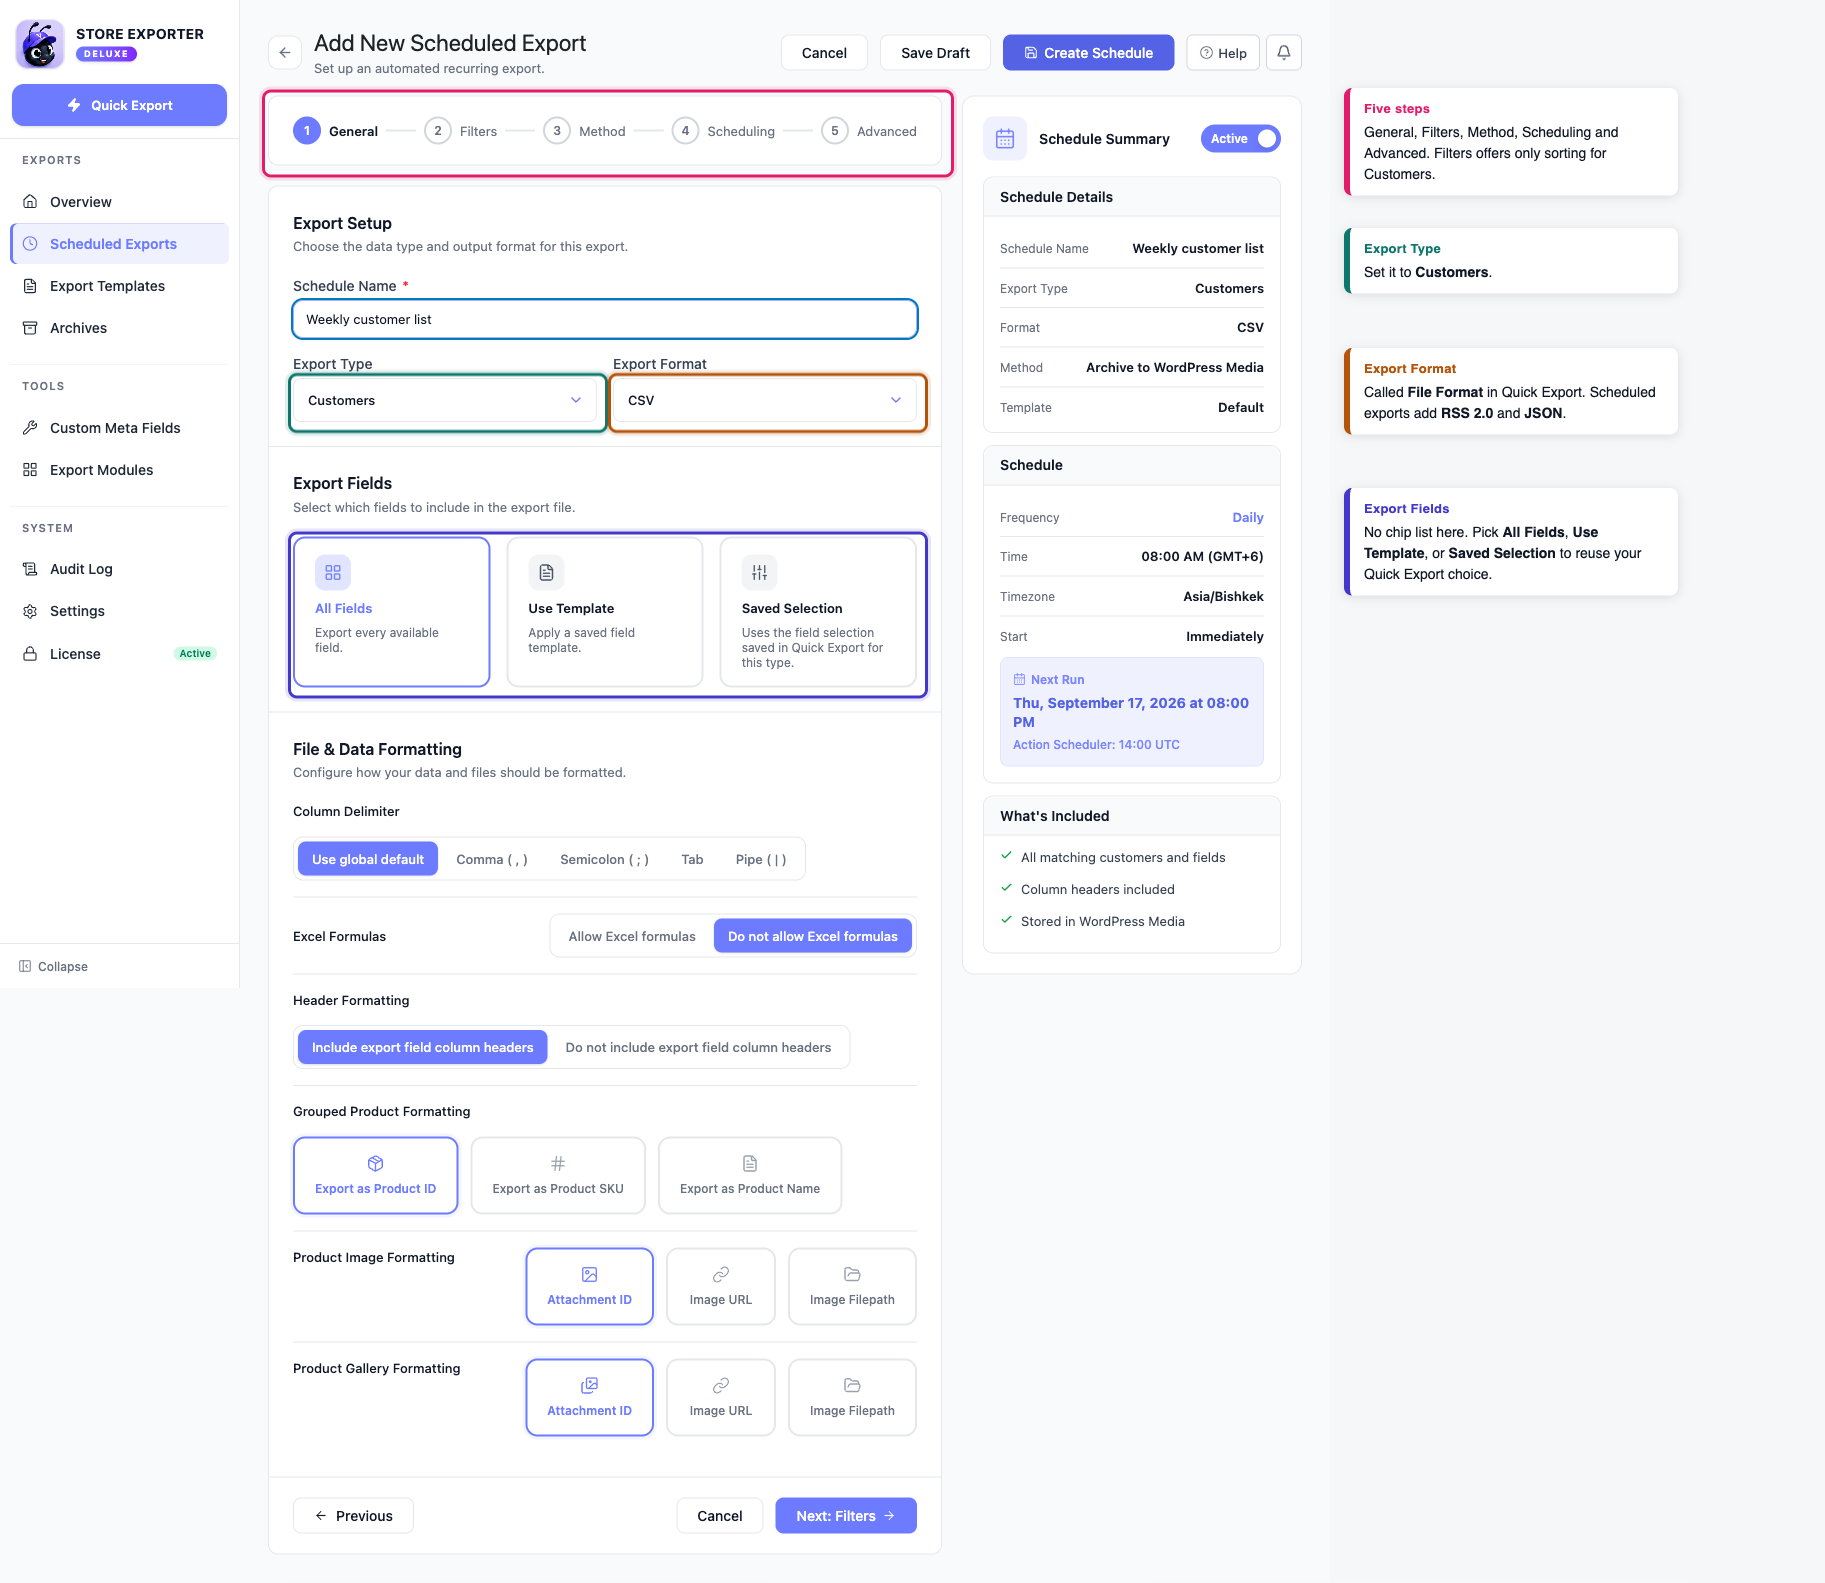
If the same customer list needs to reach your email platform every Monday, build it as a scheduled export. Go to Scheduled Exports in the EXPORTS group, then add a new one and set Export Type to Customers. The form runs across five steps.
General: pick your Export Format. The label differs from Quick Export’s File Format, and so does the list. Scheduled exports add RSS 2.0 and JSON, and the two Excel options read as Excel (XLS) and Excel (XLSX). Fields work differently here too: rather than a chip list, you choose All Fields, Use Template to apply a saved export template, or Saved Selection to reuse whatever you last set up in Quick Export for customers. This step also holds the formatting controls Quick Export doesn’t have, such as Column Delimiter and Header Formatting.
Filters: as in Quick Export, there are no filter cards for Customers, so this step only offers sorting.
Method: choose how the file reaches you under Delivery Method. The six tiles are Archive to Media, Save to Server, Send as Email, POST to URL, FTP / SFTP, and Google Sheets. Each one reveals its own settings, such as recipients and subject line for email. Two readouts spell the same choices out more fully, so don’t be thrown when the wording shifts: the Schedule Summary panel on the right and the Destination row on the Advanced step show Archive to WordPress Media, POST to Remote URL, and FTP / SFTP Upload.
Scheduling: pick Hourly, Daily, Weekly, Monthly, Custom, or Manual. Customer data changes as orders come in, so daily or weekly suits most stores. The Schedule Preview panel shows the next run before you save.
Advanced: set a Filename Pattern, add email Recipients for success or failure notices, control how many past files are kept, and configure retries.
For detailed instructions on building a schedule, see How to schedule exports.
Troubleshooting
FAQ
Related articles
- How to export users
- How to resolve customer export issue
- How to export WooCommerce products
- How to schedule exports
- Supported export fields
- Exporting custom product, order, and order item meta
Need more help?
If you’re using Store Exporter Deluxe and hit something this article doesn’t cover, open a support ticket and our team will help you get your customer export working.
If you’re using the free Store Exporter plugin, ask on the WordPress.org support forum and our team will get back to you there.
