
Working out your margins means putting cost data next to sales data in the same spreadsheet. So if you’ve gone hunting through Store Exporter Deluxe for a “COGS” option and come up empty, here’s the reason: cost of goods isn’t an export type of its own. It’s a set of fields you add to a normal Products or Orders export.
Store Exporter Deluxe reads cost of goods from two different sources, and the fields you’ll see depend on which one your store uses. Once a source is active, the matching fields show up in the field picker alongside every other column, ready to include in a Quick Export or a Scheduled Export.
Prerequisites
| Requirement | Details |
|---|---|
| Plugin | Store Exporter Deluxe 5.4.2 or later, active and licensed. Support for WooCommerce’s built-in Cost of Goods Sold feature was added in 5.4.2 |
| A COGS source | Either WooCommerce’s built-in Cost of Goods Sold feature turned on, or the Cost of Goods extension active. See below for both |
| Cost values saved | Your products need a cost stored against them. An export can only return data that already exists |
| Administrator access | You’ll need an account with access to the WordPress admin dashboard |
Where your COGS data comes from
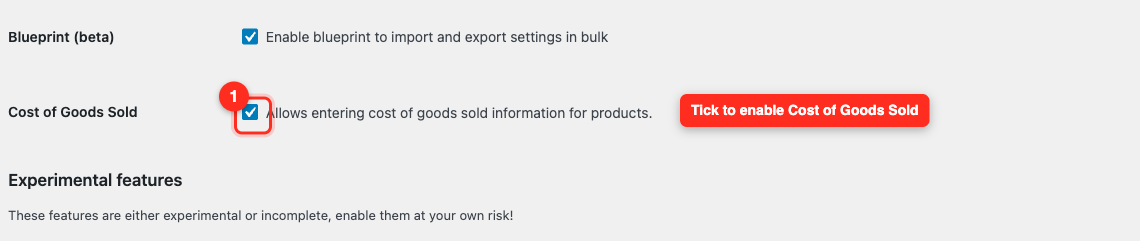
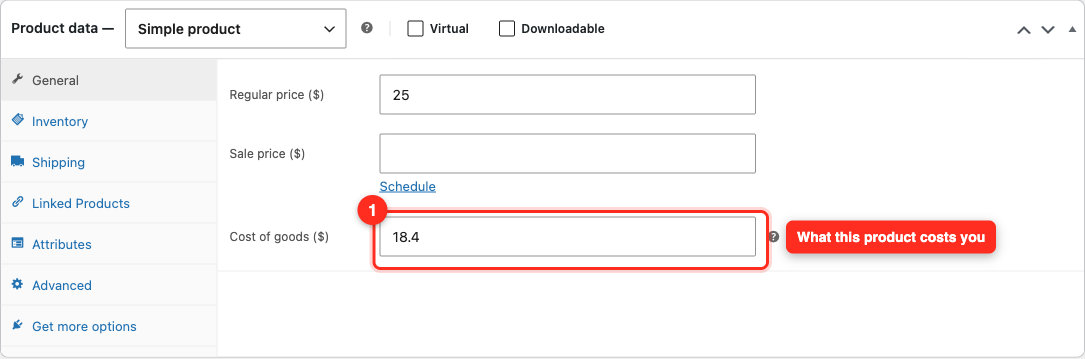
WooCommerce’s built-in Cost of Goods Sold feature: Turn it on at WooCommerce → Settings → Advanced → Features by enabling Cost of Goods Sold. Each product then gets a Cost of goods field on the General tab of the Product data box. On a variable product, each variation gets its own Cost field, and leaving that blank falls back to the parent product’s value. For more on the feature itself, see WooCommerce’s own Cost of Goods Sold documentation.
The Cost of Goods extension: This is the separate Cost of Goods extension, which adds its own cost field to simple and variable products. Store Exporter Deluxe detects it automatically and adds a different set of fields.
You can check what the plugin has detected at any time. Open WooCommerce → Store Export, then click Export Modules under the TOOLS group in the sidebar.
Which COGS fields you get
| Export type | Field | COGS source |
|---|---|---|
| Products | Cost of Goods Sold | WooCommerce built-in |
| Products | Cost of Goods Sold (Effective) | WooCommerce built-in |
| Products | Cost of Good | Cost of Goods extension |
| Orders | Order Total Cost of Goods Sold | WooCommerce built-in |
| Orders | Order Items: Cost of Goods Sold | WooCommerce built-in |
| Orders | Order Total Cost of Goods | Cost of Goods extension |
| Orders | Order Items: Cost of Goods | Cost of Goods extension |
| Orders | Order Items: Total Cost of Goods | Cost of Goods extension |
A few things worth knowing about these:
Cost of Goods Sold versus Cost of Goods Sold (Effective): The first returns the cost value saved on the product itself. The second returns the value WooCommerce actually applies to orders and analytics. For a variation with a blank Cost field, the effective value is the one inherited from the parent product, so the two columns can differ.
The extension’s product field is singular: It reads Cost of Good, not “Cost of Goods”. That’s the label the plugin uses, so search for it exactly that way.
Order Items fields follow the Items formatting setting: By default, Items formatting on the Order Items Formatting filter card is set to Combined, so the per-line-item costs for the whole order arrive together in a single cell. Switch it to Individual and each line item gets its own row instead, with that item’s cost in the column.
Add COGS fields to a Quick Export
COGS fields aren’t part of the default field selection, so you need to add them by hand each time you build a new export.
- Open WooCommerce → Store Export from the WordPress admin menu.
- Click Quick Export in the sidebar. It’s the standalone button above the EXPORTS group.
- On the Select Export Type step, click the Products tile. For order-level costs, click Orders instead.
- Expand the Export Fields step.
- Click Add more fields to open the Select Export Fields dialog.
- Type
costinto the Search fields… box to narrow the list down. - Tick the checkbox next to each COGS field you want.
- Click Save Fields to close the dialog.
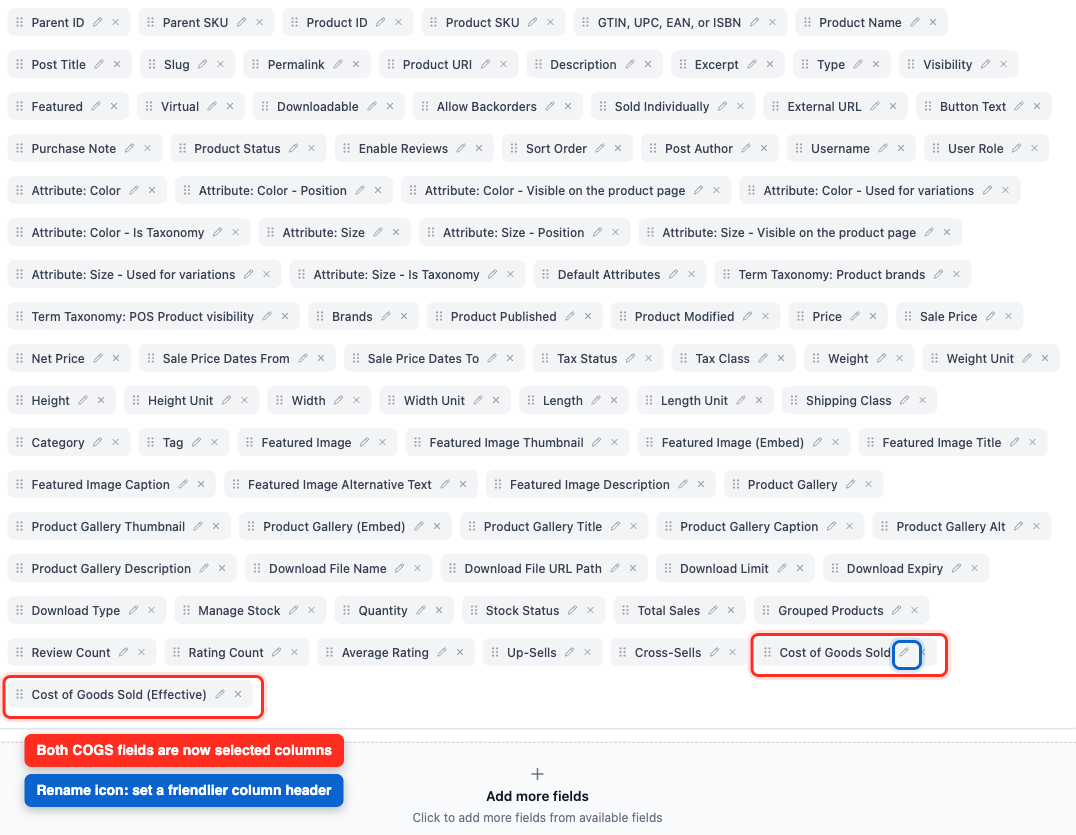
- Back on Export Fields, drag the new field into the position you want it to hold as a column.
- Expand Filters & Sorting to narrow down which records get included.
- Expand Export Options and pick a file format.
- Click Run Export.
- Click Download File once the export finishes.
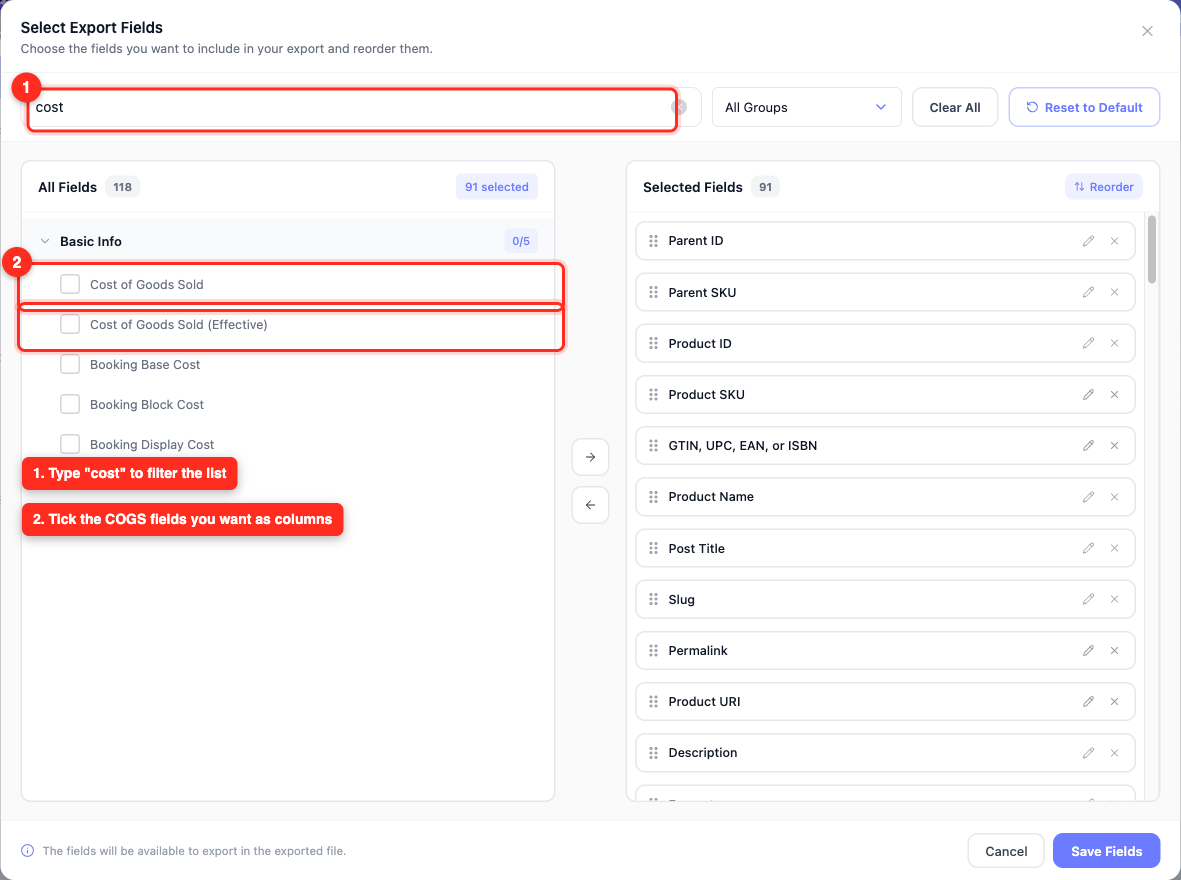
Each field in your selection also has a rename (pencil) icon. Click it if you’d rather the column header in your file read something other than the plugin’s default label.
For a full tour of the rest of the screen, see How to export WooCommerce products with Store Exporter Deluxe.
Filter which records get included
The Filters & Sorting step controls exactly which products or orders land in your file. What you see there depends on the export type you picked.
On a Products export, you can filter by Categories, Tags, Product Types, Product Status, Brands, Shipping Class, Stock Status, Stock Quantity, Featured, User Role, and two date ranges: Published Date and Modified Date.
On an Orders export, the most useful ones for cost reporting are Order Status, Order Date, and Date Modified. You can also filter by Payment Gateway, Billing Country, Shipping Country, Shipping Method, Customer, Coupon Code, Product, Product Category, Product Tag, and Product Brand, among others.
For a monthly margin report, set Order Status to your completed statuses and set Order Date to the range you’re reporting on. That keeps refunded and abandoned orders out of the totals.
At the bottom of the step, Sort by and Order control how the rows are ordered in the file.
Export COGS on a schedule
Scheduled Exports work differently from Quick Export in one way that matters here.
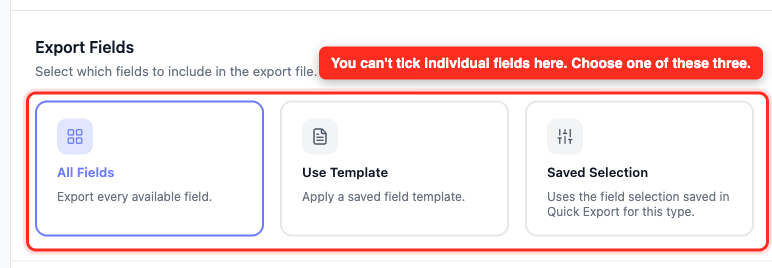
The General step offers three choices under Export Fields:
All Fields: Exports every available field for the type, COGS included. This is the fastest route, but it produces a wide file.
Use Template: Applies a saved export template. Build a template containing your COGS field first, then pick it here. This is the tidiest option for a recurring report.
Saved Selection: Reuses the field selection you last saved in Quick Export for that export type. So set your COGS fields up in Quick Export first, then choose this.
To create the schedule:
- Open WooCommerce → Store Export, then click Scheduled Exports under the EXPORTS group.
- Click New Schedule.
- On the General step, enter a name in the Schedule Name field.
- Choose Products or Orders from the Export Type dropdown.
- Choose a file format from the Export Format dropdown.
- Under Export Fields, pick All Fields, Use Template, or Saved Selection.
- Click Next: Filters and set any conditions that narrow down what gets exported.
- Click Next: Method to choose how the file is delivered.
- Click Next: Scheduling to set how often it runs.
- Click Next: Advanced to set the log level and other per-schedule options.
- Click Create Schedule to save.
Once it’s saved, open the schedule again and click Execute Now to run it immediately. Check the resulting file to confirm the COGS column is present before you rely on the schedule.
For everything else the wizard covers, see How to schedule exports in Store Exporter Deluxe.
If your cost data lives in a custom meta key
Some cost plugins aren’t detected by Store Exporter Deluxe. If yours isn’t, you can still export its data by registering the meta key it uses as a custom field.
- Open WooCommerce → Store Export, then click Custom Meta Fields under the TOOLS group.
- Click Add Custom Field.
- Choose Products or Orders from the Export Type dropdown.
- Enter the meta key in the Product Meta box, one key per line. On an Orders export, use the Order Meta box instead.
- Confirm Quick Export and Scheduled Export are ticked in the Available In group. All three options are ticked by default.
- Click Save Fields.
The key then appears in the Select Export Fields dialog under the Custom Meta Fields group.
For the full details, see Exporting custom product, order, and order item meta.
Troubleshooting
0.00 in the effective column as “no cost recorded”, not as a genuine zero cost.FAQ
Related articles
- How to export WooCommerce products with Store Exporter Deluxe
- How to schedule exports in Store Exporter Deluxe
- Exporting custom product, order, and order item meta
- Available export fields in Store Exporter Deluxe
Need more help?
If you’re using Store Exporter Deluxe and your COGS columns still aren’t exporting as expected, open a support ticket, and our team will take a look at your setup.
If you’re using the free Store Exporter plugin, ask on the WordPress.org support forum, and our team will get back to you there.
