
If you just want a Scheduled Export in Store Exporter Deluxe to run at a specific time in your own timezone, use the Timezone dropdown built into the Scheduling step. It’s covered in How to schedule exports in Store Exporter Deluxe, and it handles Daylight Saving Time changes for you automatically. You won’t need anything on this page for that case.
This article covers a different, more advanced case: triggering a scheduled export from a real server-level cron job (set up through cPanel or directly on a Linux server) instead of the plugin’s own scheduler. A server-level cron job always fires according to the server’s own clock, which is commonly set to UTC+0, regardless of the Timezone dropdown you’ve picked inside the plugin. So, to get that external cron job to fire at, say, 6 am your local time, you need to convert your local time to the server’s time yourself.
Prerequisites
| Requirement | Details |
|---|---|
| Plugin | Store Exporter Deluxe is active and licensed |
| Scheduled Export | Already created with the settings you want. See How to schedule exports in Store Exporter Deluxe if you haven’t set one up yet |
| Server-level cron access | Access to your hosting cPanel, or command-line access to your server, to add a cron job |
Converting your local time to the server’s time
To trigger a cron job at a specific local time, convert that local time to the offset your server’s cron uses, accounting for:
- Your current timezone offset from UTC.
- Daylight Saving Time (DST), if your region observes it.
Example: 6 am New Zealand time, three days a week
Say you want an export to run at 6:00 AM New Zealand time, every Monday, Wednesday, and Friday.
At the time of writing, New Zealand runs on UTC+12 (or UTC+13 during Daylight Saving Time). To schedule for 6:00 AM NZDT during Daylight Saving Time, subtract 13 hours to convert to UTC:
6:00 AM NZDT → 5:00 PM UTC (17:00) the previous day
Work out your own offset the same way, using your region’s current standard or daylight-saving offset from UTC.
Setting up the scheduled export in the plugin
Since the server-level cron job handles recurrence, don’t also set a recurring frequency in the plugin. Otherwise, you end up with duplicate export files.
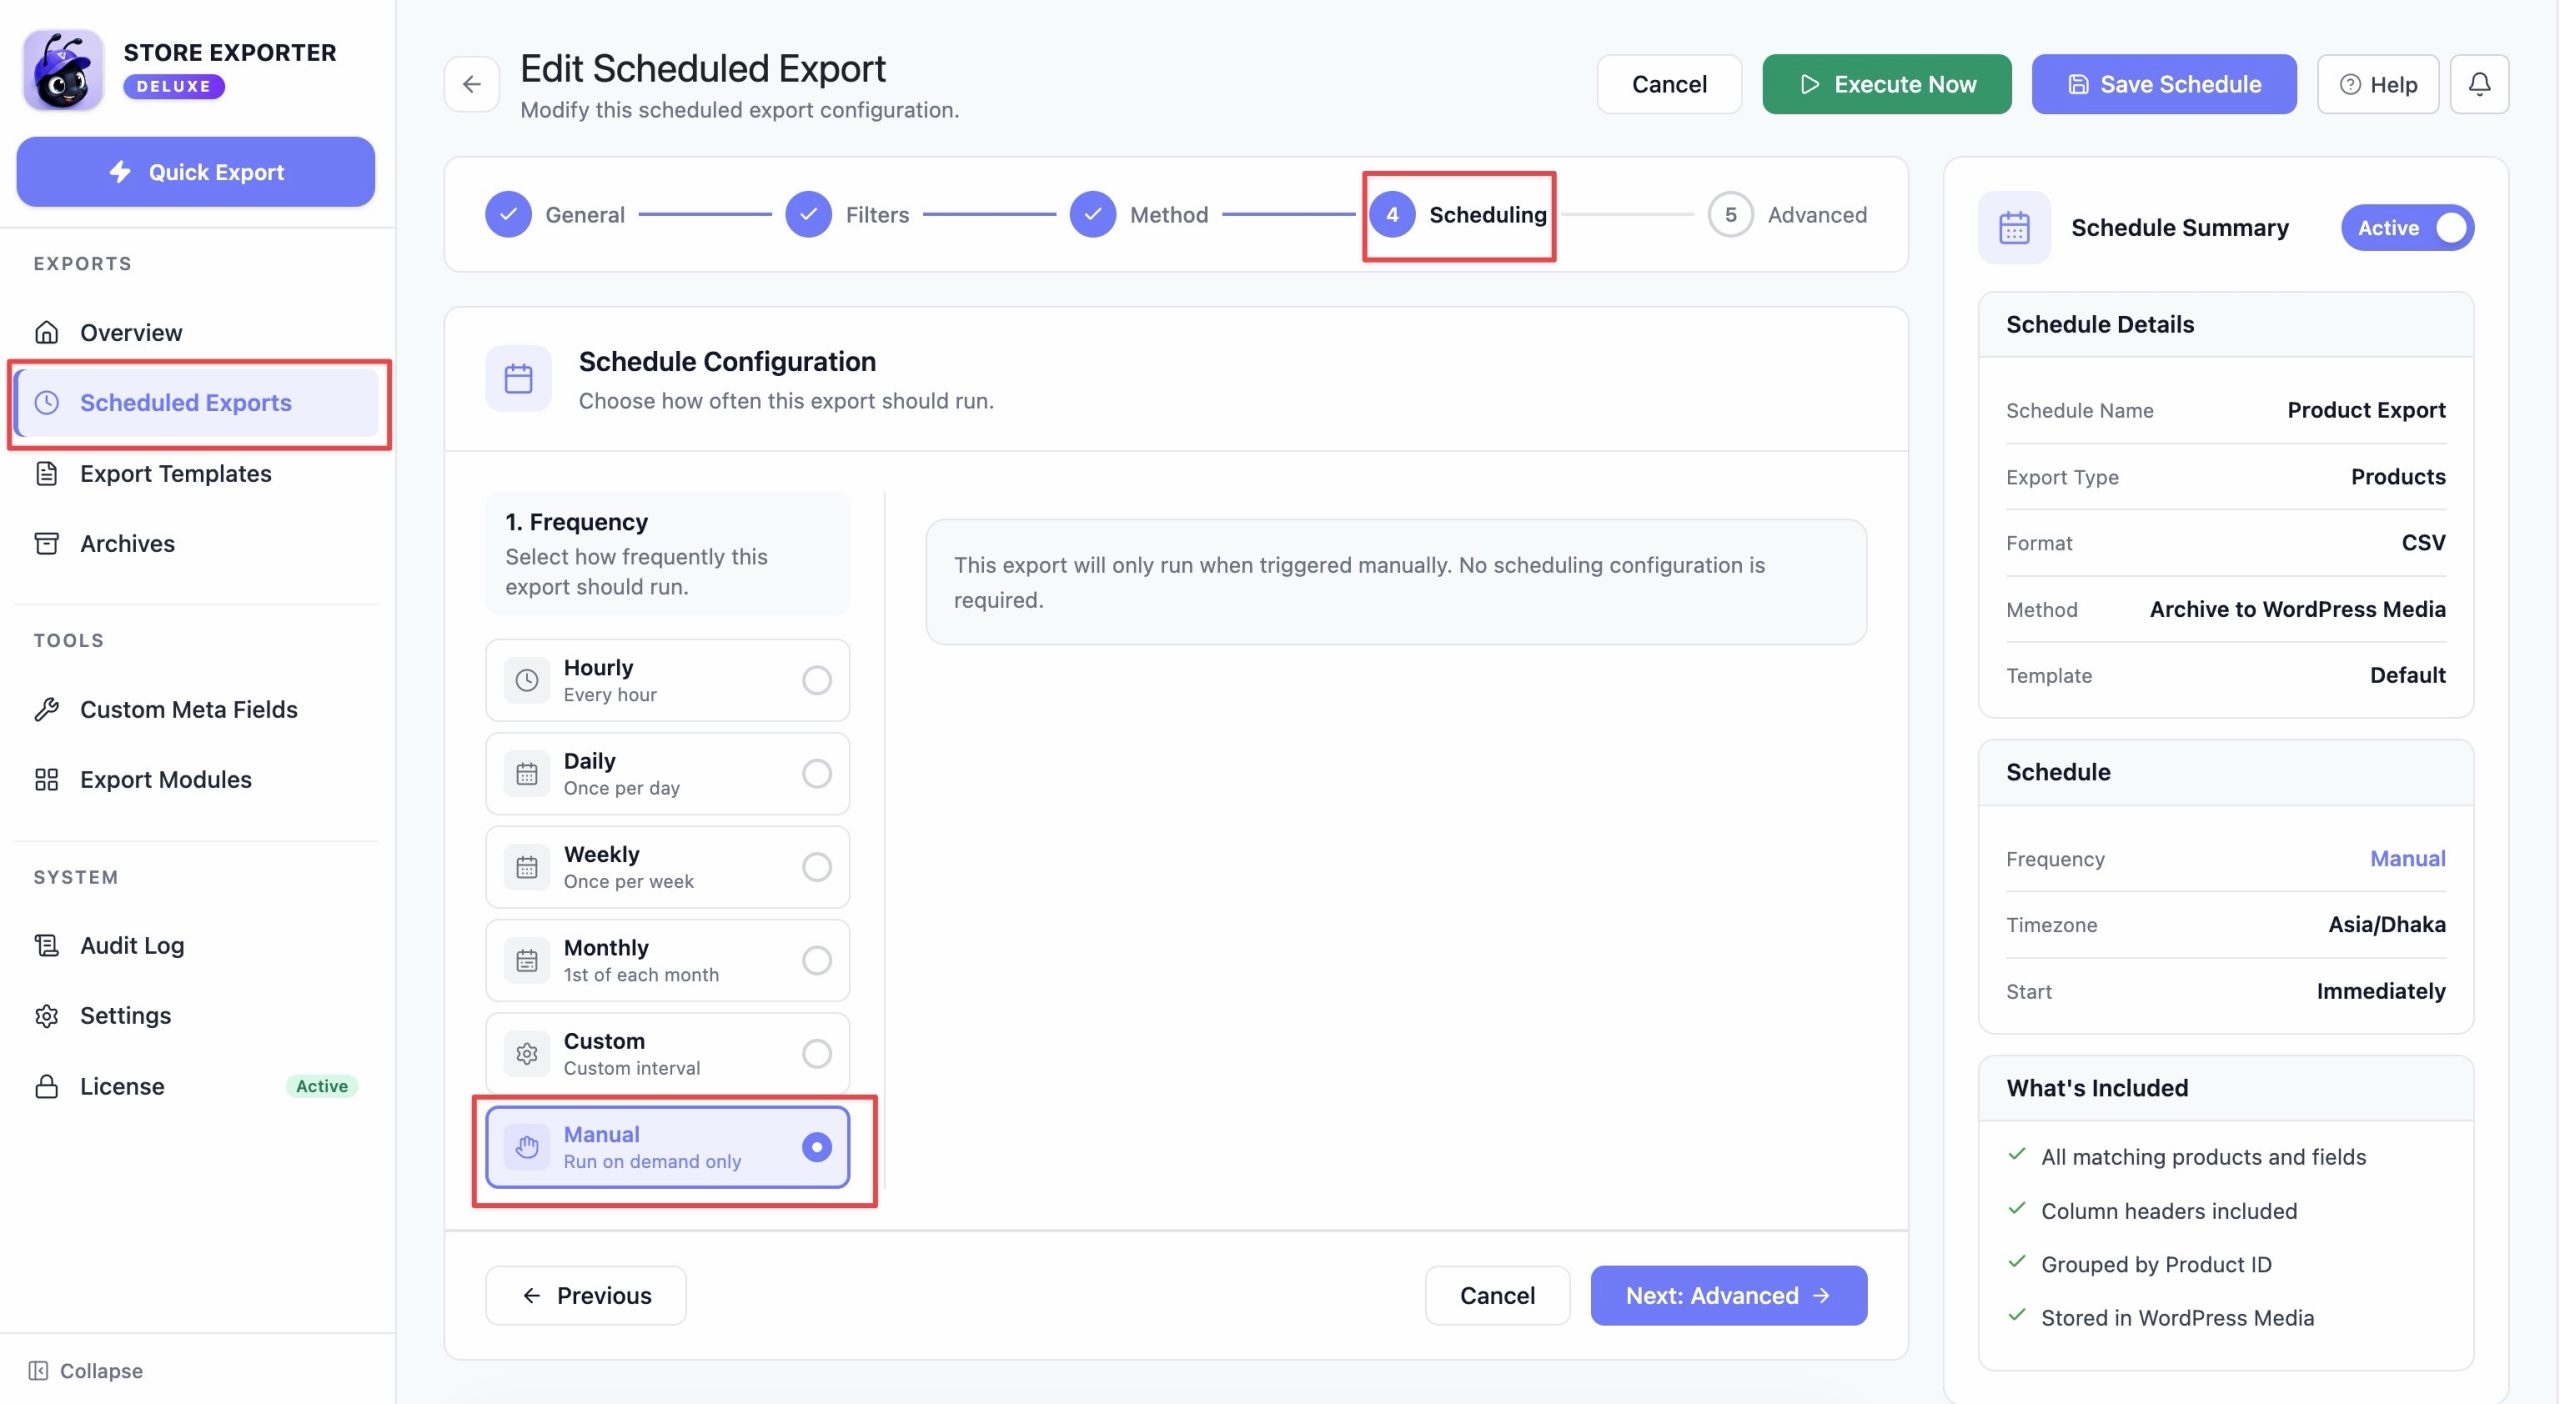
Open WooCommerce → Store Export from the WordPress admin menu, then select Scheduled Exports from the EXPORTS section of the sidebar.
- Open the schedule you want to trigger externally.
- On the Scheduling step, set Frequency to Manual.
- This removes the schedule’s own recurrence, timezone, and start-date settings.
- It only runs when you trigger it yourself, either with Execute Now or the cron job you’re about to set up.
Setting up the server-level cron job
To trigger the export at your converted time, add a cron job through your hosting’s cPanel or directly on your Linux server.
Build the cron expression
Using the example above (6:00 AM NZDT, converted to 5:00 PM UTC the previous day, on Monday, Wednesday, and Friday), the cron expression is:
Minute : 0
Hour   : 17
Day    : *
Month  : *
Weekday: 0,2,4Build the trigger command
The cron job needs to call the same manual CRON export URL described in How to export via manual CRON:
curl "https://your-site.com/?action=woo_ce-cron&key=YOUR_SECRET_KEY&type=order&scheduled_export=100" > /dev/null 2>&1Replace:
- your-site.com with your own store’s domain.
- YOUR_SECRET_KEY with the Export Secret Key you set in step 3 below.
- type with the export type you configured (for example,
orderorproduct). This must be a valid export type, or the export fails with an ‘invalid export type’ error. Its value is then overridden by the export type saved on the scheduled export itself, so the scheduled export’s own settings always win. - 100 with your Scheduled Export ID. You can find this by hovering over the Edit link for that schedule on the Scheduled Exports screen: the URL ends with
/scheduled-exports/edit/<ID>, where <ID> is the number you need.
For a full list of supported URL parameters, see How to export via manual CRON.
Turn on CRON access
- Open WooCommerce → Store Export → Settings and select the CRON Exports tab.
- Turn on the Enable CRON toggle.
- Enter a value in the Export Secret Key field. Leaving it empty allows unrestricted access to the trigger URL, so setting a key is recommended for any live store.
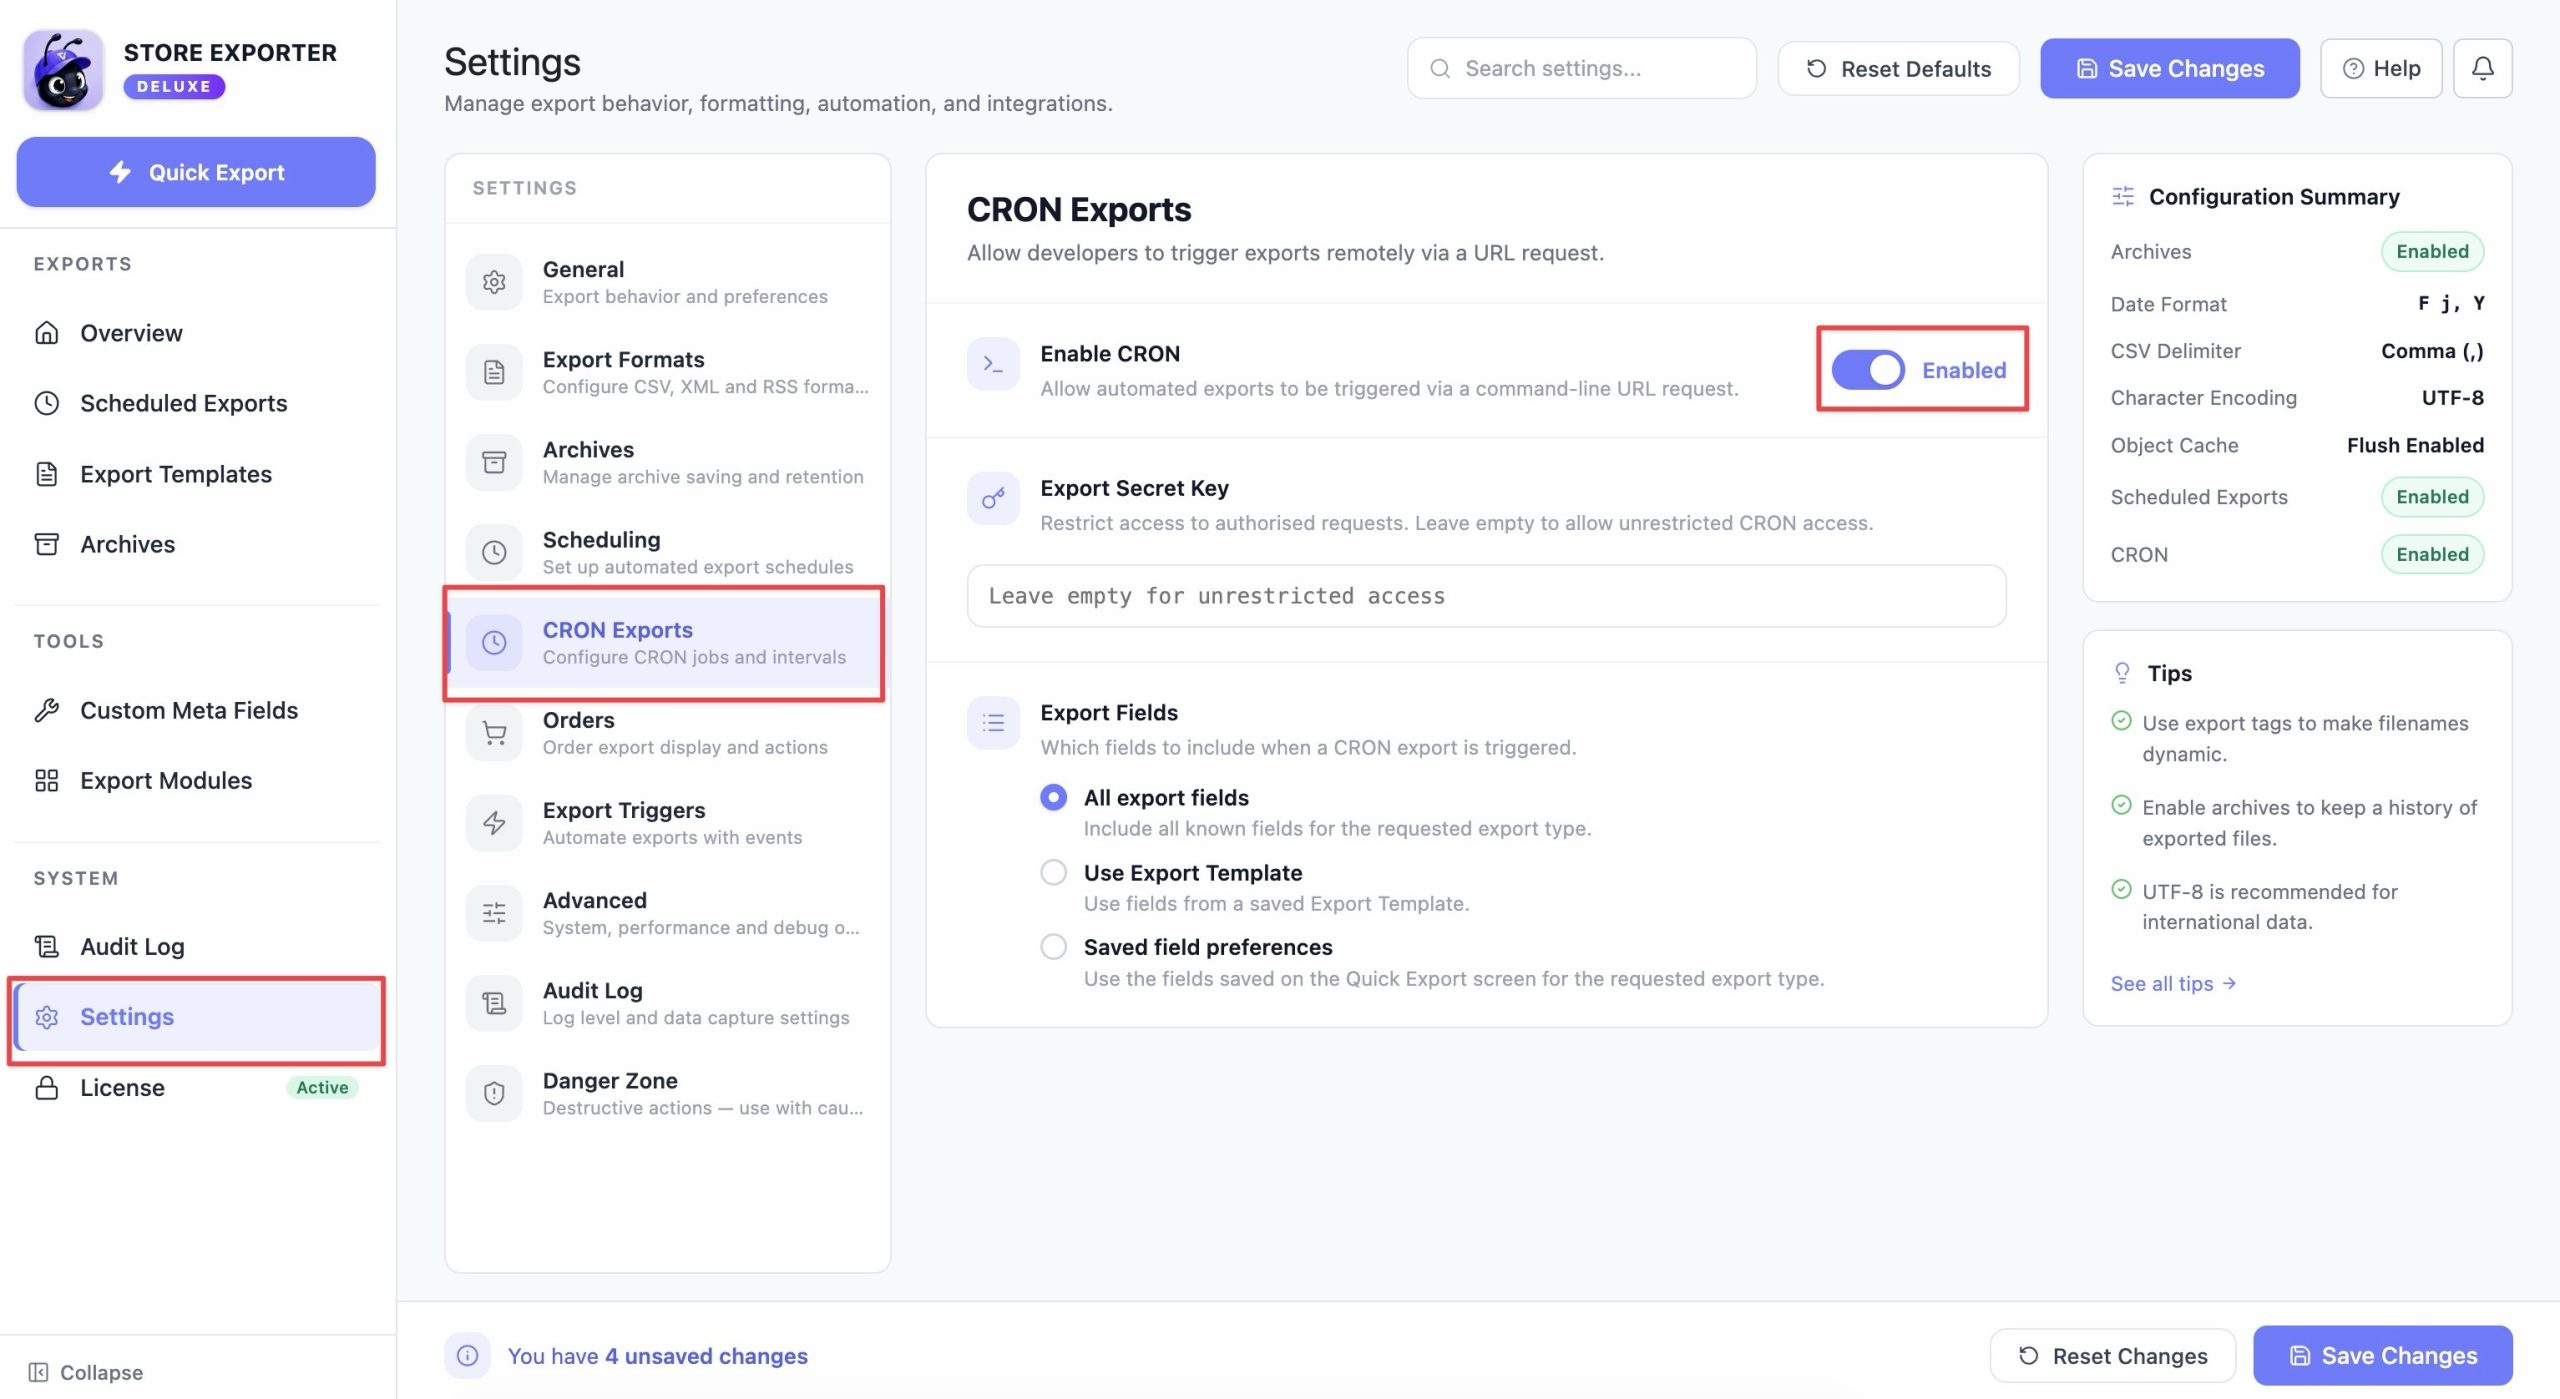
Once the toggle is on and the cron job is added to your server, the export runs at your converted time and shows up under Recent Schedules on the Scheduled Exports screen.
Troubleshooting
FAQ
Need more help?
If you’re using Store Exporter Deluxe and run into an issue this article doesn’t cover, open a support ticket and our team will help you get your export running at the right time.
If you’re using the free Store Exporter plugin, ask on the WordPress.org support forum and our team will get back to you there.
