If you’re an e-commerce store owner, then you must export WooCommerce customers from your online platform as part of your data management strategy.
The reason is simple: customer information can provide valuable insights and opportunities that can help you expand your business. For example, if you want to enhance your marketing efforts, it makes sense to base your tactics on what you’ve learned about your customers. In addition, this data can allow you to streamline customer relationship management, conduct in-depth analysis, and more.
Using Visser Labs’ Store Exporter Deluxe as our export tool, this guide provides a comprehensive walkthrough of the entire WooCommerce customer export process. This will help you learn how to easily extract and use your customer data to ensure your e-commerce success.
So let’s get cracking!
I. What Is The WooCommerce Customer Export Process?
The WooCommerce customer export process involves extracting customer data from your WooCommerce store into a format that store owners can easily access and use for various purposes. Typically, this task is accomplished using a data exporter.
For example, you can use Store Exporter Deluxe to extract customer information into any of the following formats:
- CSV (Comma Separated Values)
- TSV (Tab Separated Values)
- Excel (XLSX) (Excel 2007-2013)
- XML (EXtensible Markup Language)
- JSON (JSON data format)
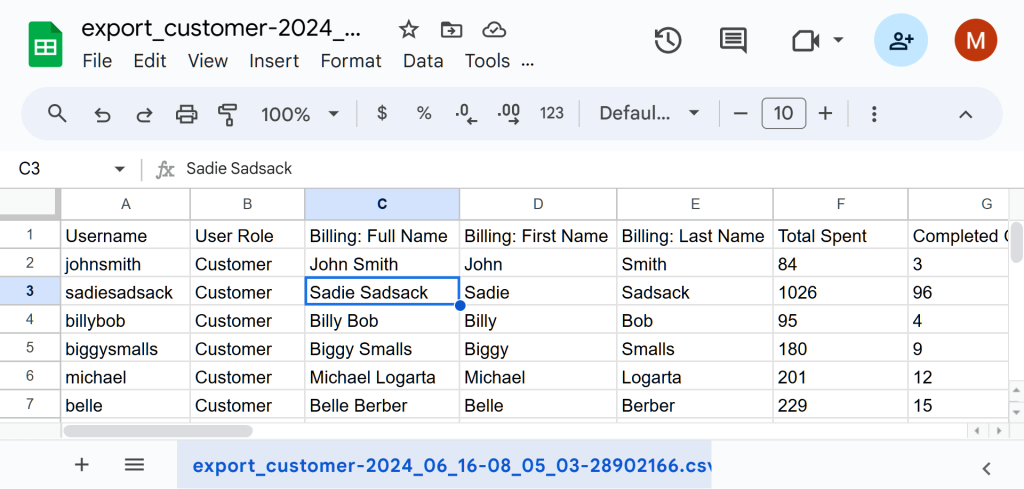
You can extract various types of customer data, including but not limited to:
- User ID
- Username
- First name
- Last name
- Company address
- Shipping address
- Total spent
- Completed orders
You can then leverage this data for various strategic initiatives. This brings us to…
II. Why Should You Export WooCommerce Customers?
Typically, exporting data is an excellent way to create a secure and accurate backup of valuable store information. However, WooCommerce customer export data can also serve multiple strategic purposes. Some of the most valuable ones include:
1. Marketing and promotions
Customer data from WooCommerce exports can significantly enhance your marketing efforts. After all, when you analyze purchase histories, browsing behavior, and customer preferences, you can create targeted marketing campaigns. Such campaigns can focus on promoting specific products or services to segments of your customer base, increasing the likelihood of conversion.
Two types of effective marketing campaigns include:
- Personalized email campaigns: WooCommerce customer export data lets you personalize your email marketing. For example, you can customize messages according to interests, browsing history, and previous purchases. Consequently, this improves engagement and can lead to higher open rates, click-through rates, and ultimately, higher sales.
- Targeted advertising: Basically, using customer data for targeted advertising optimizes the money you spend on ads. For example, when you target ads to specific demographics, interests, or behaviors, you can increase the relevance of your ads to potential customers. As a result, you improve your advertising campaign’s return on investment (ROI).
2. Analysis
You can use the WooCommerce customer export data to conduct a detailed examination of your customer base and their behaviors. This helps you identify trends, patterns, and anomalies that offer insights into customer preferences and market dynamics. In turn, such information informs strategic decisions across your business.
Three types of analyses you can perform include:
- Customer segmentation: Segmenting your customers based on shared characteristics allows for more precise targeting in marketing and customer service. For example, exported data enables segmentation by factors such as purchasing behavior, demographics, geographic location, or engagement level. Tailoring your approach to each segment enhances customer satisfaction and loyalty.
- Trend forecasting: Scrutinizing historical data helps you predict future trends in customer behavior and market demands. As a result of this forecasting, you can anticipate changes in consumer preferences, adapt your product offerings, and stay ahead of competitors.
- Performance reporting: WooCommerce customer export data makes it easier to create detailed performance reports. You can track vital information such as conversion rates, customer acquisition costs, lifetime value of customers, and ROI on marketing campaigns. Basically, these details help you see how well your plans are working, helping you make smarter decisions based on what the data shows.
3. Customer relationship management
The effective management of customer relationships is crucial for long-term success. With WooCommerce customer export data, you can maintain detailed customer profiles, track interactions, and personalize customer interactions. This fosters stronger relationships, improves customer satisfaction, and increases retention rates.
For example, you can implement the following customer relationship management strategy:
- Loyalty program management: WooCommerce customer export data helps you identify loyal customers and understand their preferences. As a result, you can optimize loyalty programs. For instance, you can tailor rewards and incentives based on purchase history and engagement levels, encouraging repeat business and fostering customer loyalty.
For the reasons described above, exporting customer data can help you grow your business.
Curious to know more about why it’s to your best benefit to export WooCommerce customers and other data types? Then check out the following articles:
- Data Export Tool: Why Your E-Commerce Business Needs One
- Combining Data Export And Import Processes: How To Enhance Data Management
III. How To Export WooCommerce Customers
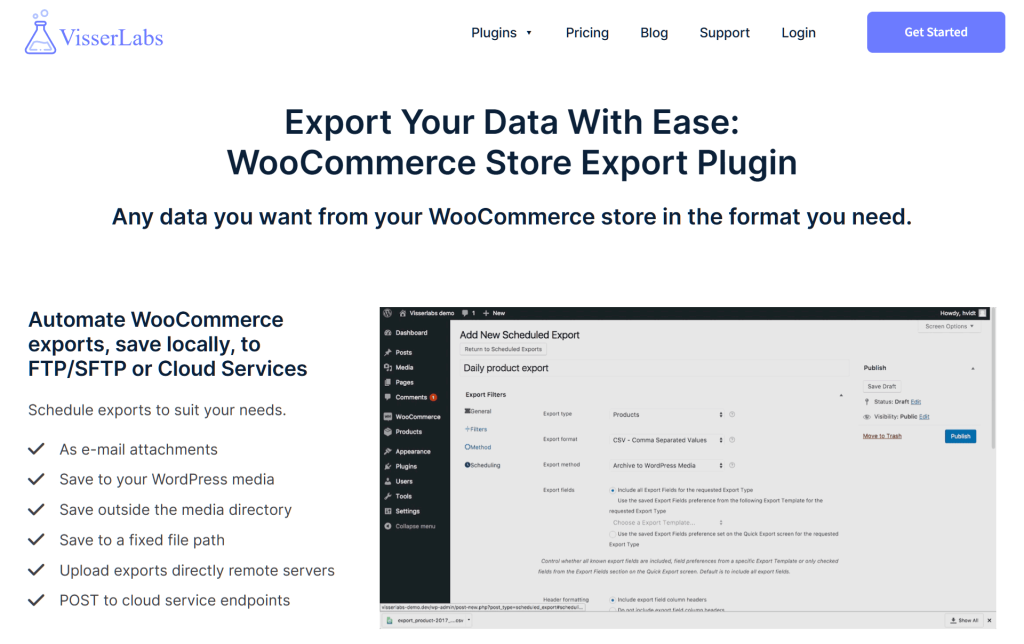
Eager to run your first WooCommerce customer export? Then use Visser Labs’ Store Exporter Deluxe, a top-notch WooCommerce exporter tool.
For this guide, we’ll assume you already have an online store powered by:
- WordPress
- WooCommerce
Furthermore, we’ll assume you’ve already downloaded, installed, and activated WooCommerce Store Exporter Deluxe.
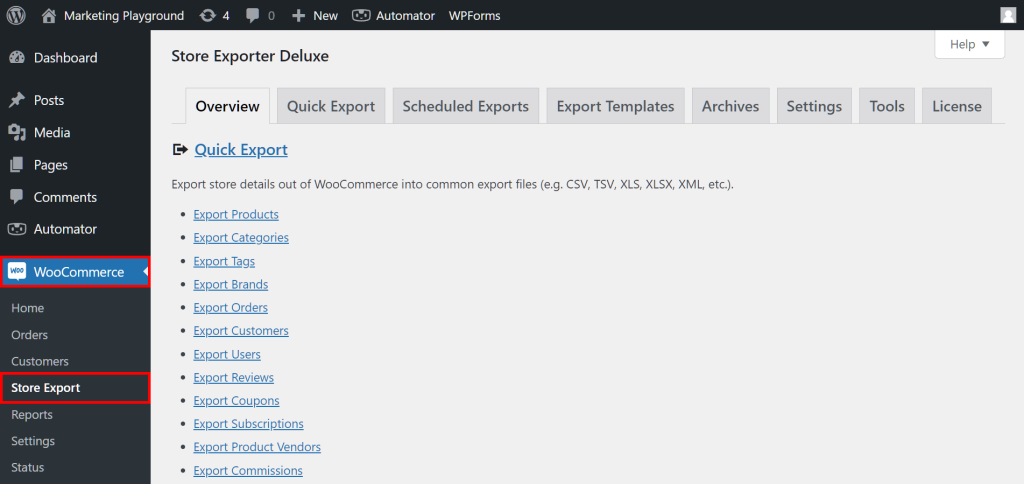
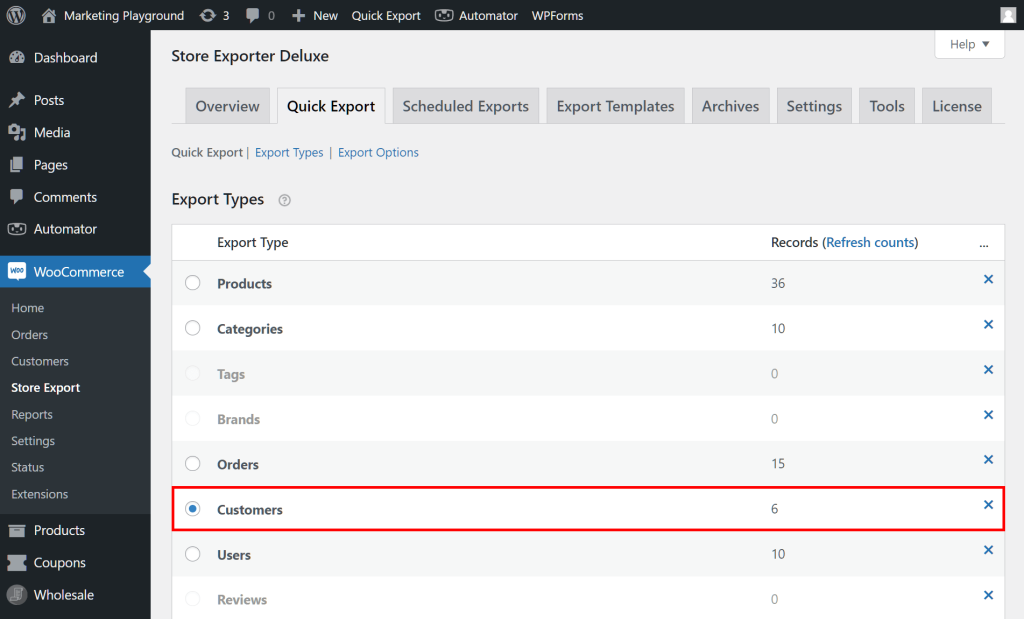
So, how do you find this exporter tool within your store’s backend? Basically, you must head to your WordPress dashboard and click WooCommerce > Store Export. This takes you to the Strore Exporter Deluxe page:
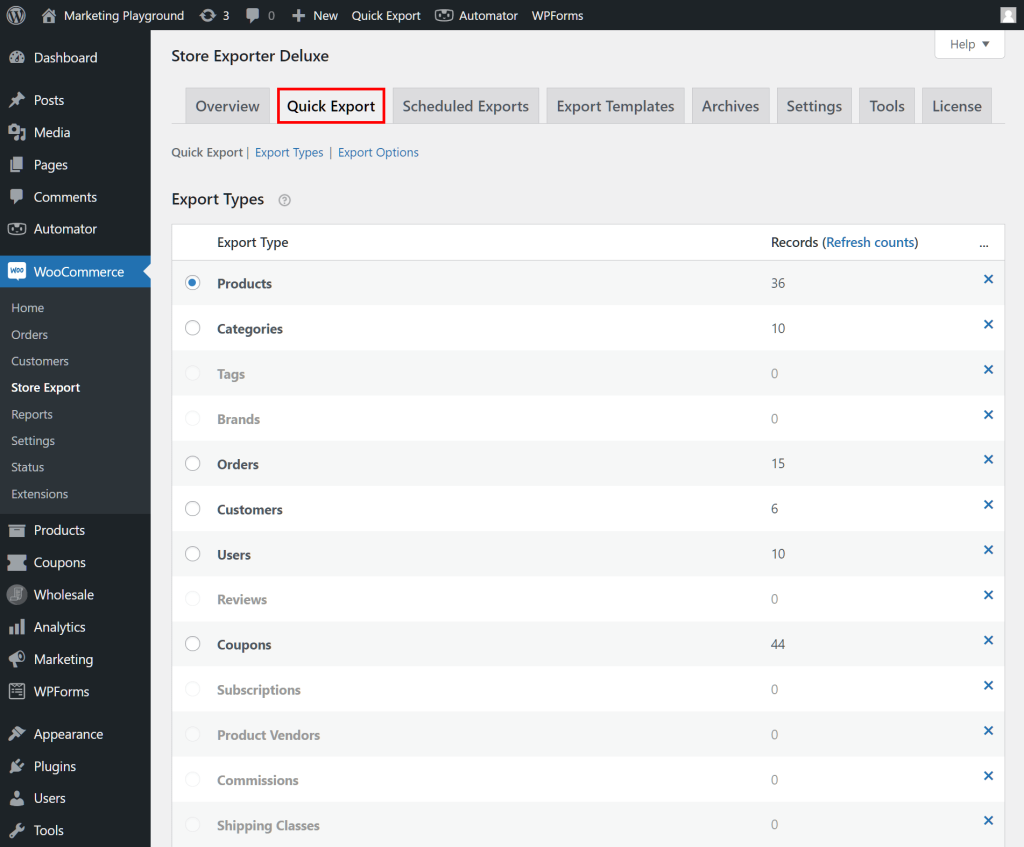
As you can see above, the page consists of eight main sections. However, for this guide, we’ll focus on Quick Export. So when you’re ready, click the Quick Export tab!
The Quick Export section allows you to transfer massive amounts of store data quickly and easily. For this tutorial, we’ll export WooCommerce customers.
To do so, we’ll need to implement the following steps:
Step 1: Select the Export Type
First, choose the type of data you want to export by clicking its circle. In our case, we’ll click “Customers.”
We can actually start the WooCommerce customer export process right here by clicking the Quick Export button below the Export Types box. However, because it’s a good idea to configure all your settings to ensure the export goes well, we’ll proceed to the next step.
Step 2: Choose the Customer Fields to export
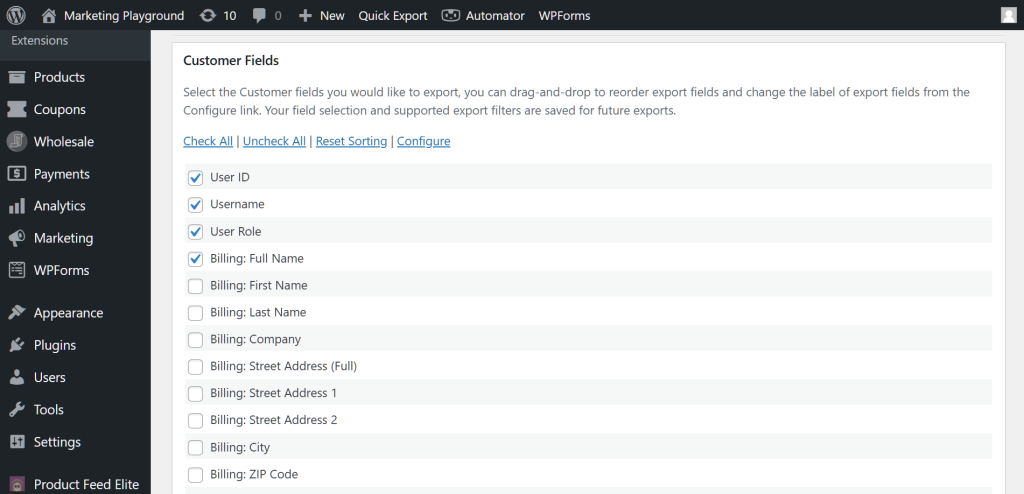
Scroll down to the Customer Fields box, which contains additional information associated with the “Customers” data type.
For instance, you’ll see fields such as “Username,” “User Role,” various billing and shipping fields, the total number of orders they’ve made, and more. Select your desired fields by ticking their checkboxes. There’s no limit to how many you can choose. Make use of the Check All and Uncheck All buttons if necessary.
Moreover, you can sort the fields by dragging and dropping them into the desired positions. Of course, this affects their order of appearance in your export file.
If there are fields you don’t like, hide them by clicking the Configure button and ticking the “Hide” checkboxes.
Again, you can already export WooCommerce customers at this stage by clicking the Export Customers button below the Customer Fields box. But let’s continue to explore your other export configuration options!
Step 3: Pick your Customer Filters
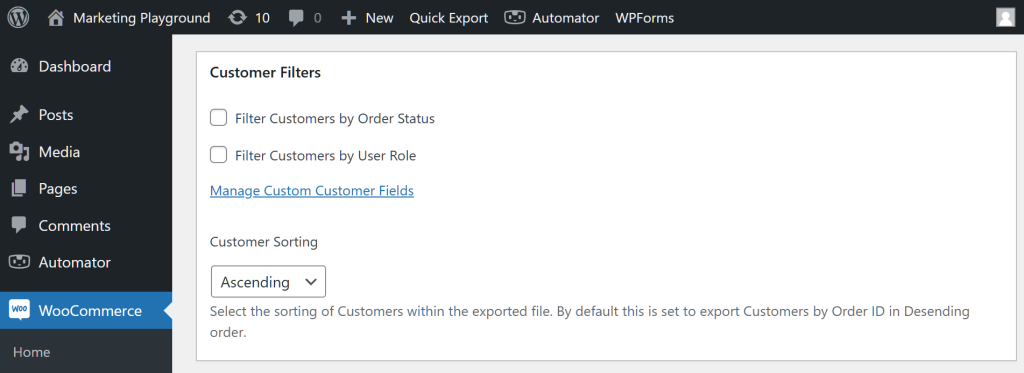
Scroll down to the Customer Filters box.
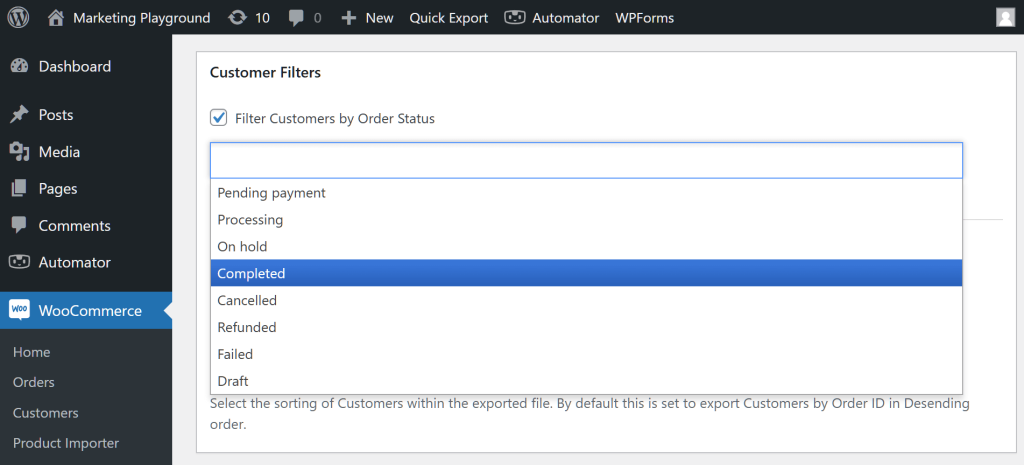
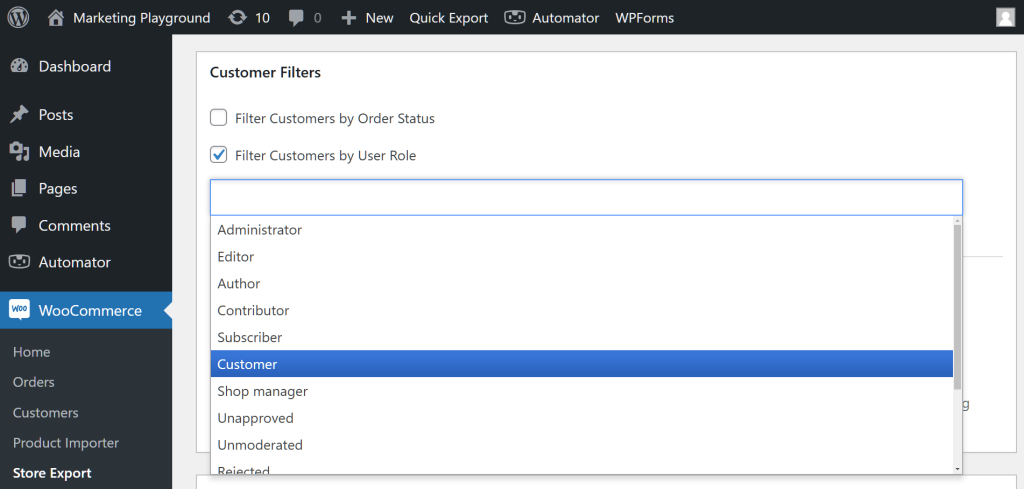
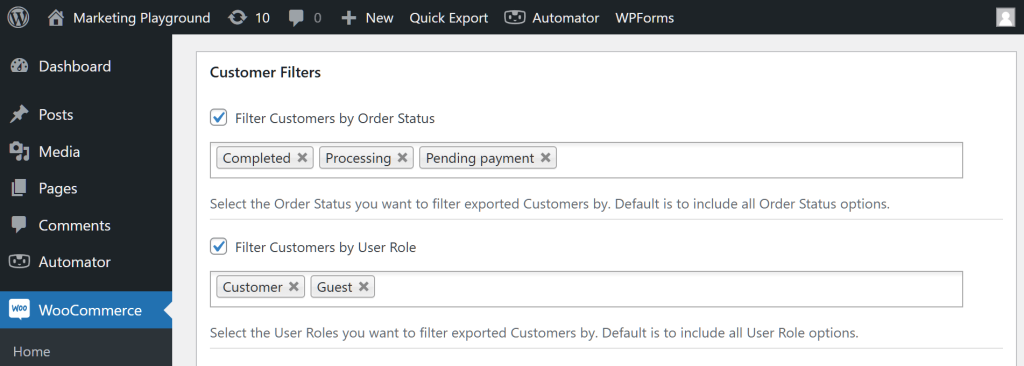
Filters allow you to selectively extract data based on certain groupings. For example, suppose you only want to export WooCommerce customers whose payments are already complete. To do this, tick the checkbox for “Filter Customers by Order Status.” Then, from the dropdown menu, pick “Completed.”
As you can see above, other statuses include “Processing,” “Cancelled,” “Refunded,” and more.
Moreover, you can choose “Filter Customers by User Role.” Examples of available roles include “Customer,” “Guest,” “Subscriber,” and more.
Notice that you can use several filters and even combine filters from the two filter groupings.
You can use the Customer Sorting option to sort customers in either ascending or descending order.
Lastly, there’s the Manage Custom Customer Fields button. However, we’ll skip Custom Fields for now and move on to the next step.
Step 4: Finalize your Export Options
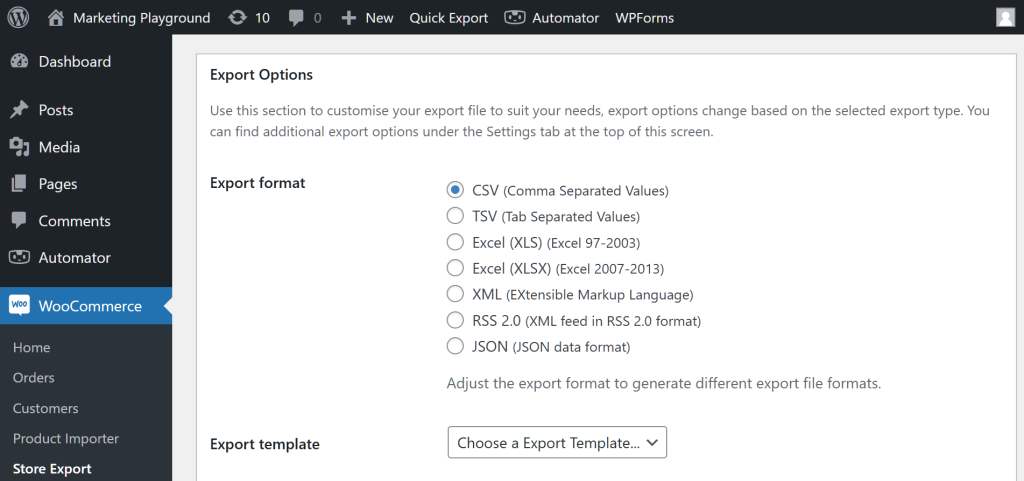
The Export Options area allows you to customize the format of your exported data.
For instance, the Export format option allows you to select the file format you wish to export WooCommerce customers into.
For this tutorial, don’t touch the Export Template option, as this can overwrite your settings.
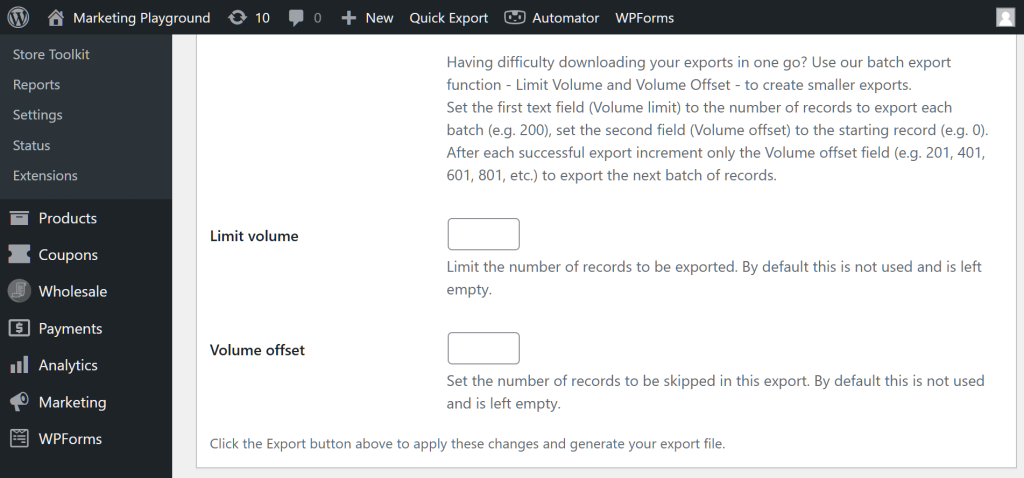
Additionally, you can export WooCommerce customers in batches, which can be useful if you have a large number of customers. By setting the Limit volume and Volume offset values, you can control the size of each batch.
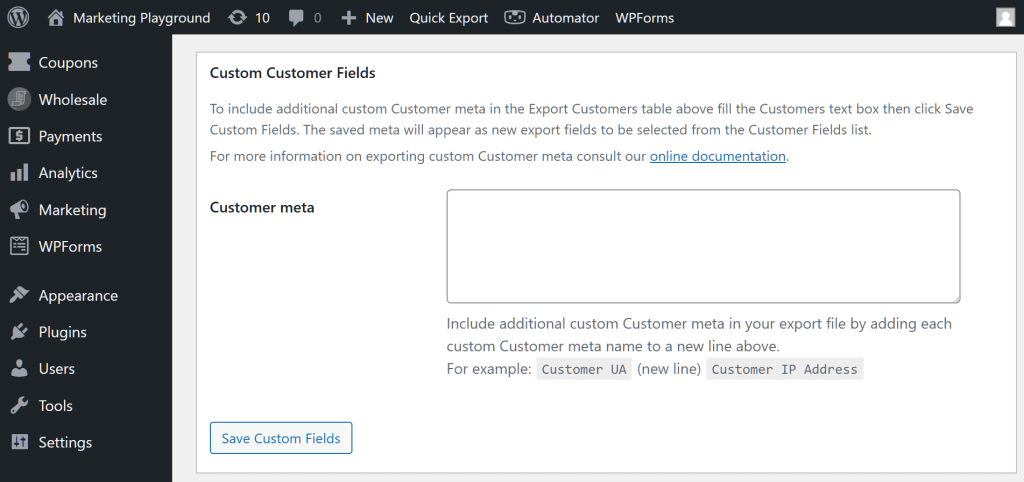
Step 5: Create Custom Fields (Optional)
If you’re unsatisfied with the default fields provided by WooCommerce, you can create your own using the Custom Customer Fields feature.
To get started, simply type the names of the new fields into the Customer meta box, making sure to place only one field per line.
When you’re done, click the Save Custom Fields button. Your unique fields will then appear in the Customer Fields area, allowing you to select them.
Step 6: Run your export!
Once you’re happy with your settings, scroll back up to either the Export Customers or Quick Export button. Then, simply click the button to initialize your WooCommerce customer export.
And that’s it! Store Exporter Deluxe will then export your valuable customer data into your chosen file format, a process that takes mere seconds to a couple of minutes. Once complete, you’ll find the export file on your computer.
Take note: the plugin automatically saves your Quick Export settings, so you can easily access them later.
Conclusion
When you export WooCommerce customers, you don’t just back up your data but also leverage said data to grow your business. By following the steps outlined in this guide, you can efficiently export your customer information and use it for a range of strategic purposes, from targeted marketing campaigns to enhanced customer relationship management.
In summary, to export WooCommerce customers, use Store Exporter Deluxe to implement the following steps:
- Select the Export Type
- Choose the Customer Fields to export
- Pick your Customer Filters
- Finalize your Export Options
- Create Custom Fields (Optional)
- Run your export!
Do you have any questions about the WooCommece customer export process? Let us know in the comments!
