Like any online store owner, you’re likely hoping to streamline your e-commerce operations. To make this happen, it’s an excellent idea to leverage one of the most powerful tools at your disposal: the ability to export WooCommerce data.
The WooCommerce export process involves transferring vital information from your online store to external destinations like files. Basically, this allows you to manage your data more effectively. So whether you’re exporting product details, customer information, or the like, the export process can offer valuable insights and flexibility in data management.
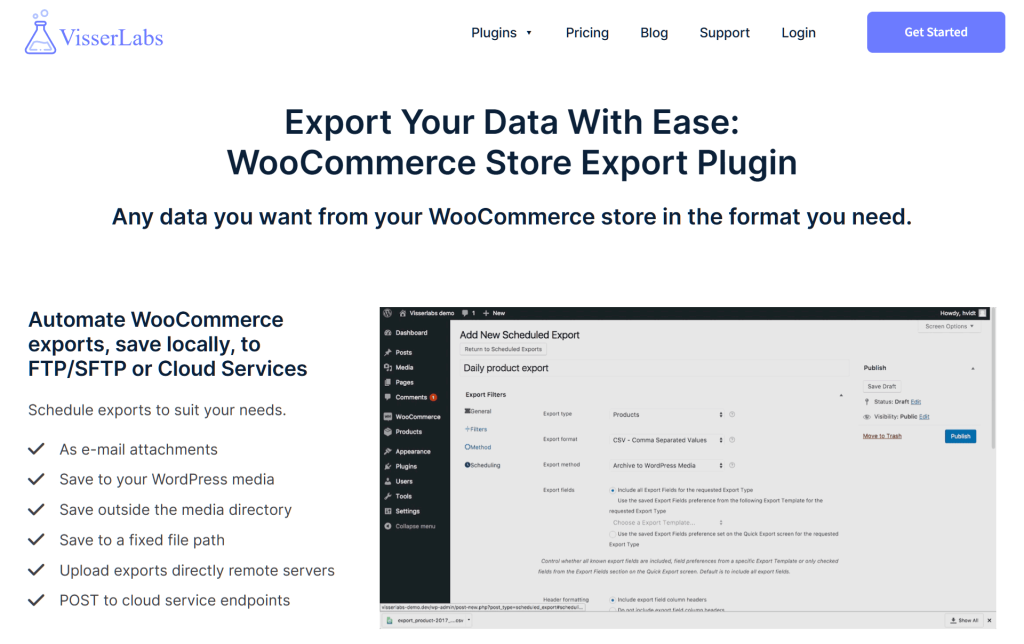
For these reasons, today’s guide will teach you how to export WooCommerce data using Visser Labs‘ powerful exporter tool, Store Exporter.
So let’s get started!
I. What Does It Mean To Export WooCommerce Data?
When you export data, you transfer information from one platform or system to another. In the context of e-commerce and specifically WooCommerce, this means relocating valuable WooCommerce store details to an external destination such as a file.
For example, you can export WooCommerce data such as your online store’s product details, inventory levels, and sales transactions to an Excel file. As a result, you can easily access and view these records in the form of a spreadsheet.
With an excellent exporter tool, you can transfer data without compromising its integrity or functionality.
Why export WooCommerce data?
There are many reasons your business can benefit from performing WooCommerce export tasks. For example, these exports can help with:
- Backup and recovery
- Inventory control
- Bulk edits
- Offline access
- Data migration
- Analysis and reporting
- Sharing and collaboration
- … and more!
Typically, exporting is combined with importing to optimize data management.
Would you like to know more about the benefits of exporting data? Then read our article, “Data Export Tool: Why Your E-Commerce Business Needs One.”
Are you interested in finding out why it’s a great idea to combine export with import tasks? Then check out our article, “Combining Data Export And Import Processes: How To Enhance Data Management“!
II. How To Export WooCommerce Data
Exporting valuable store data is crucial to data management. As such, it’s to your best benefit to choose the right plugin for your WooCommerce export tasks.
This is where Visser Labs’ Store Exporter, which boasts free and premium versions, comes in. Combined with its sister plugin, Product Importer, Store Exporter ensures efficient, secure, and convenient management of bulk data.
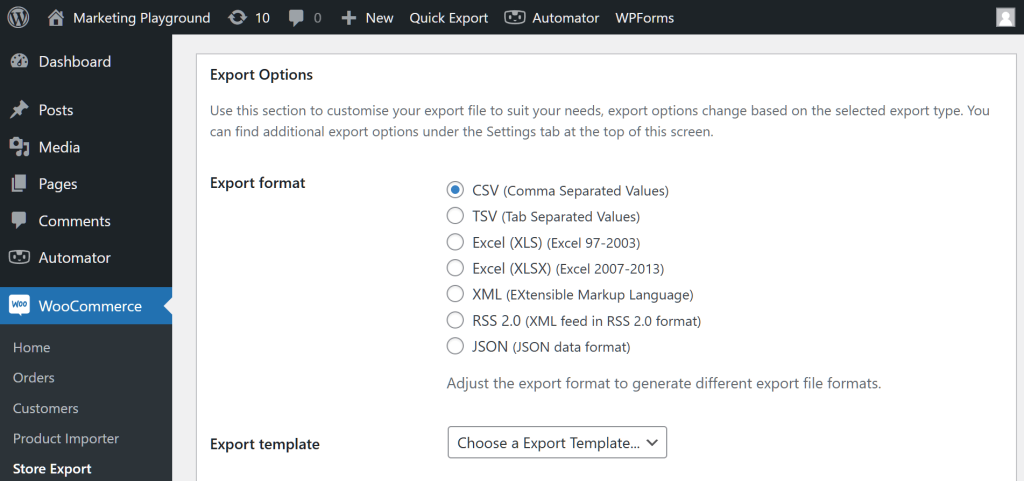
Store Exporter enables you to export WooCommerce data into popular file formats, namely:
- Excel (XLS) (Excel 97-2003)
- Excel (XLSX) (Excel 2007-2013)
- CSV (Comma-Separated Values)
- TSV (Tab Separated Values)
- RSS 2.0 (XML feed in RSS 2.0 format)
- XML (EXtensible Markup Language)
- JSON (JSON data format)
Furthermore, its versatile features offer highly specific export customization options, allowing you to extract precise details. Thus, you can tailor your exports to meet your unique requirements.
Accessing Store Exporter
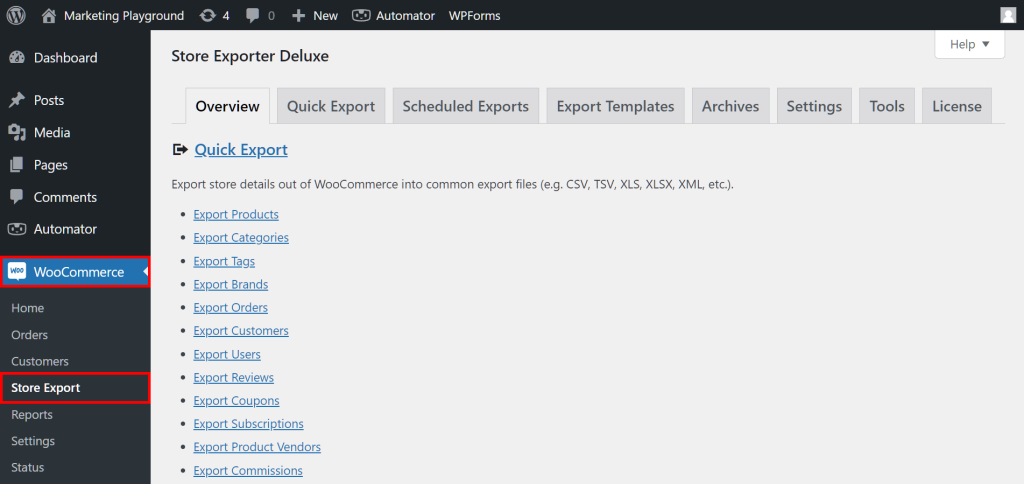
To access Store Exporter, navigate to your WordPress dashboard and click WooCommerce > Store Export. This takes you to the Store Exporter Deluxe page:
As the above image illustrates, the page comes with eight main sections. While this guide will focus on the Quick Export section, we’ll also touch on Scheduled Exports and Export Templates.
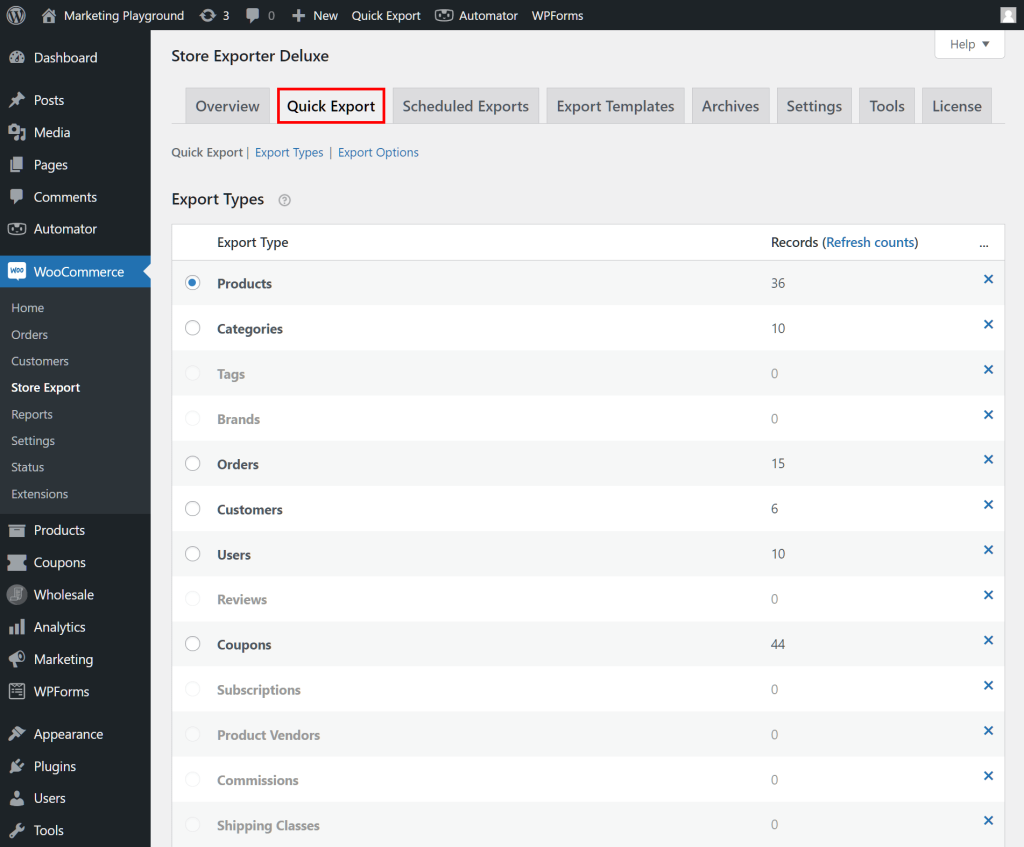
So, click the Quick Export tab to get started!
Step 1: Select the Export Type
When performing a WooCommerce export, your first order of business is to choose the type of data you wish to extract. This takes us to the Quick Export page’s first area: Export Types.
Export Types lets you pick any of the following data types:
- Products
- Categories
- Tags
- Brands
- Orders
- Customers
- Users
- Reviews
- Coupons
- Subscriptions
- Product Vendors
- Commissions
- Shipping Classes
- Tickets
- Bookings
- Attributes
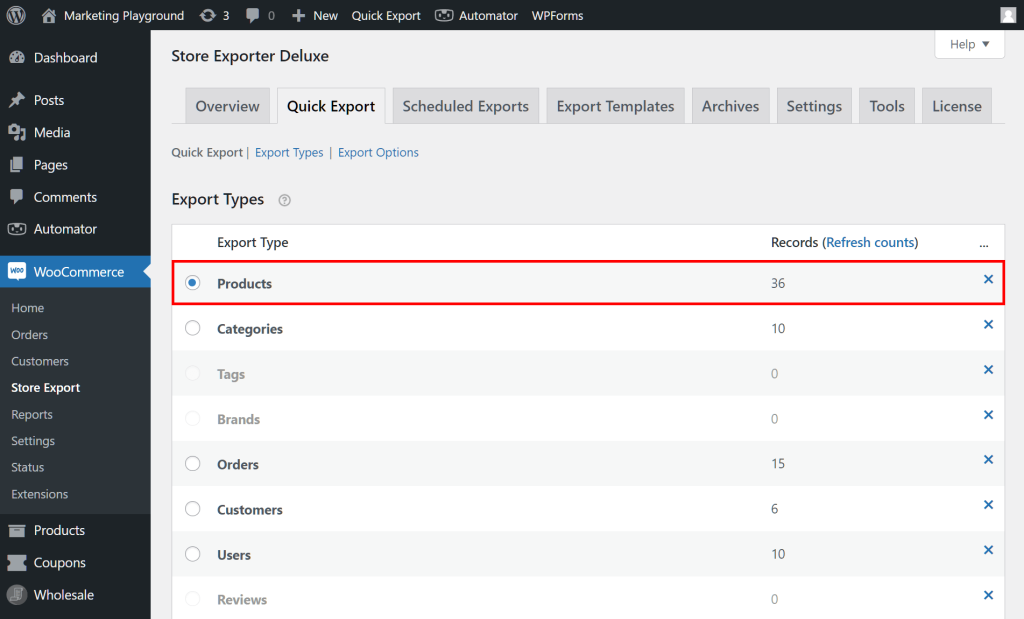
To select a data type to export, simply click its circle. For example, we can click “Products,” as shown below:
You can actually start the process immediately after picking a data type. All you must do is click the Quick Export button right below the Export Types box. Basically, this instructs Store Exporter to export all the information associated with the data type you picked.
But what if you want to retrieve only some of this information? Then you must configure your other export settings. After all, this can ensure the WooCommerce export goes exactly as you wish. Thus, let’s proceed to the next step…
Step 2: Choose the Fields to export
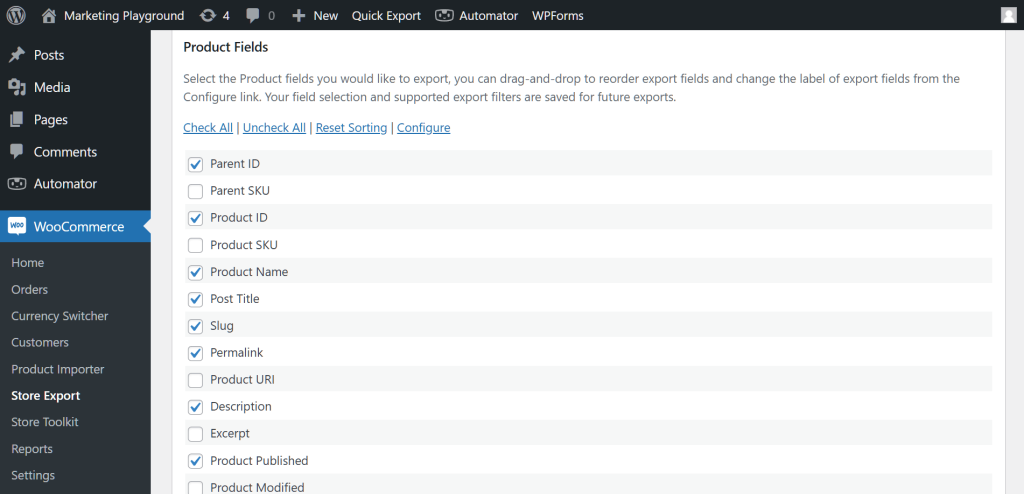
Scroll down to the Fields box, which contains loads of information associated with your preferred data type.
For example, choosing “Products” results in fields like “Product Name,” “Description,” various product measurements, and more.
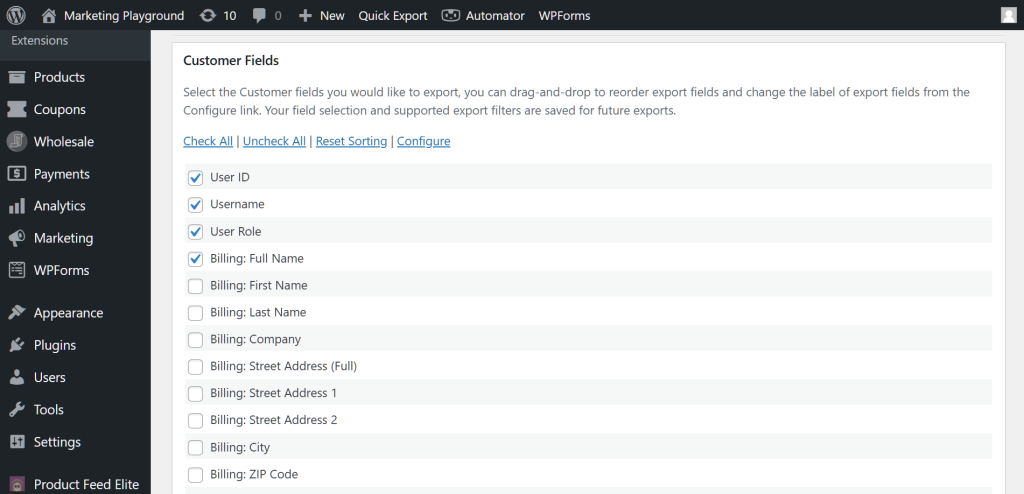
On the other hand, if you picked “Customers,” you’ll get fields such as “Username,” “User Role,” billing and shipping fields, the total number of orders they’ve made, and the like.
A particularly useful field to include is the user role. Understanding the different WooCommerce user roles is essential for effective customer management. Exporting this data allows you to segment users for targeted marketing, analyze the distribution of customer types (like VIPs or wholesale buyers), or simply manage permissions more effectively.
Basically, to pick the fields you wish to export, you must tick their checkboxes. You can click the Check All if you want to include all available fields in your WooCommerce export. Moreover, you can click Uncheck All to quickly uncheck any checkboxes you’ve ticked.
In addition, you can rearrange fields by dragging and dropping them wherever you like. This affects how the export file sorts your data. To undo your custom sorting, click Reset Sorting.
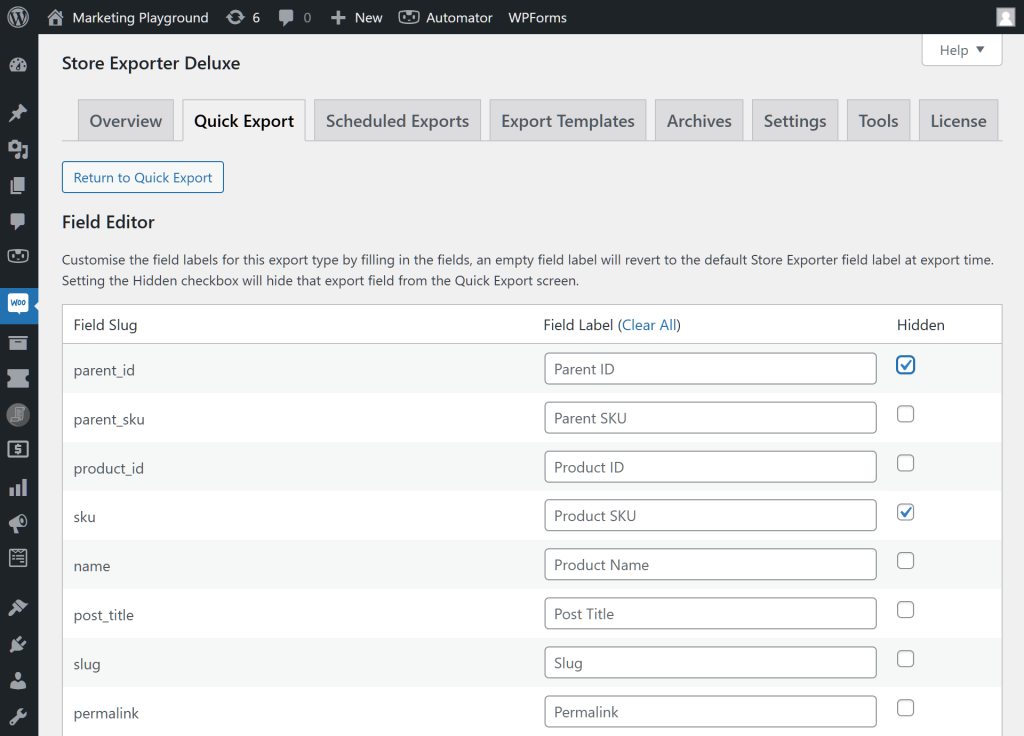
Lastly, you can remove unwanted fields from the list. To do this, click Configure, which takes you to the Field Editor. Then, to hide fields, tick their checkboxes, scroll down to the bottom of the page, and click the Save Changes button.
Once you’re done, click the Return to Quick Export button to return to the Quick Export page.
Again, you can initiate the export right here by clicking the Export button below the Fields box. Store Exporter will then export your selected data type’s fields into your chosen file format. This results in the export of more specific information compared to performing the process as early as Step 1.
However, let’s continue to explore your other WooCommerce export configuration options!
Step 3: Pick your Filters
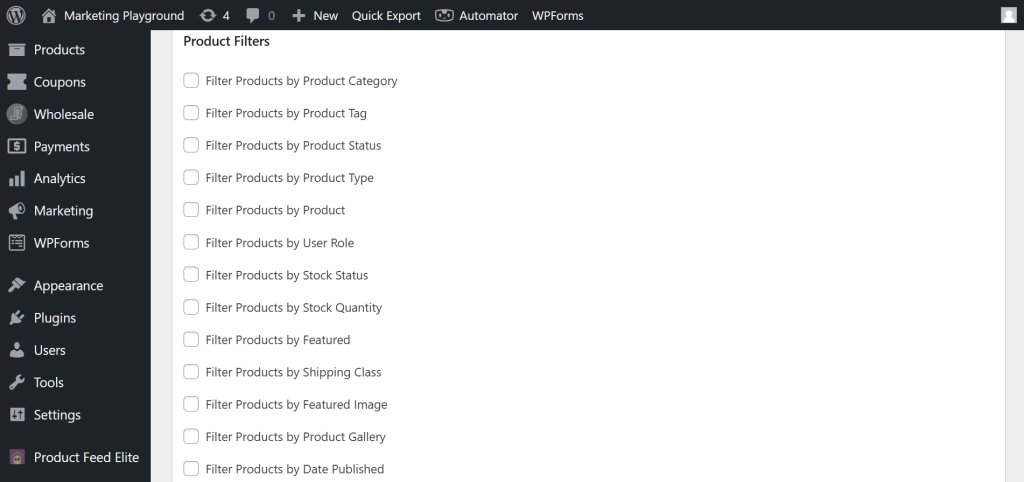
Another way to make defined exports is to use filters. Thus, head down to the Filters box.
Note that Filters is similar to Fields in that its list of options changes based on the data type.
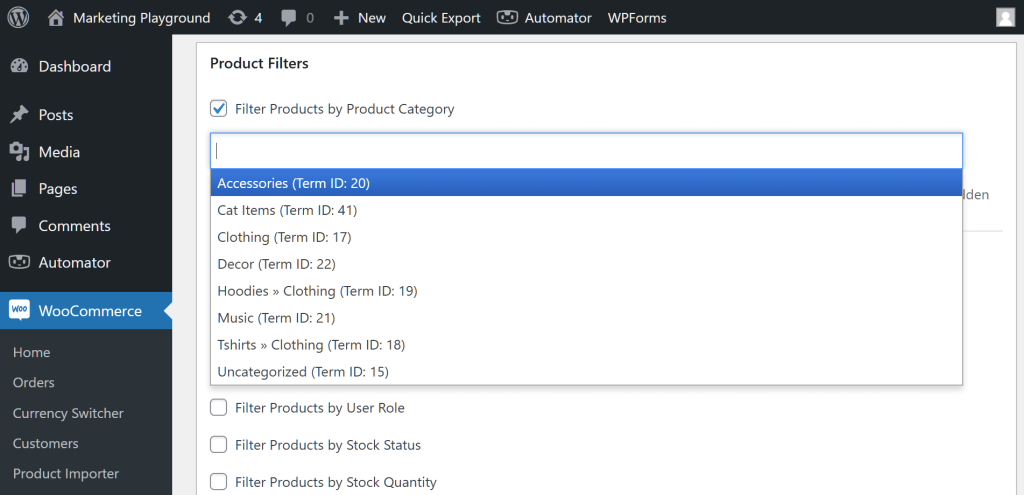
Basically, Filters lets you extract data based on certain groupings. For example, what if you only want to export products belonging to the category, “Accessories”? Then tick the checkbox for “Filter Products by Product Category” and choose “Accessories” from the dropdown menu:
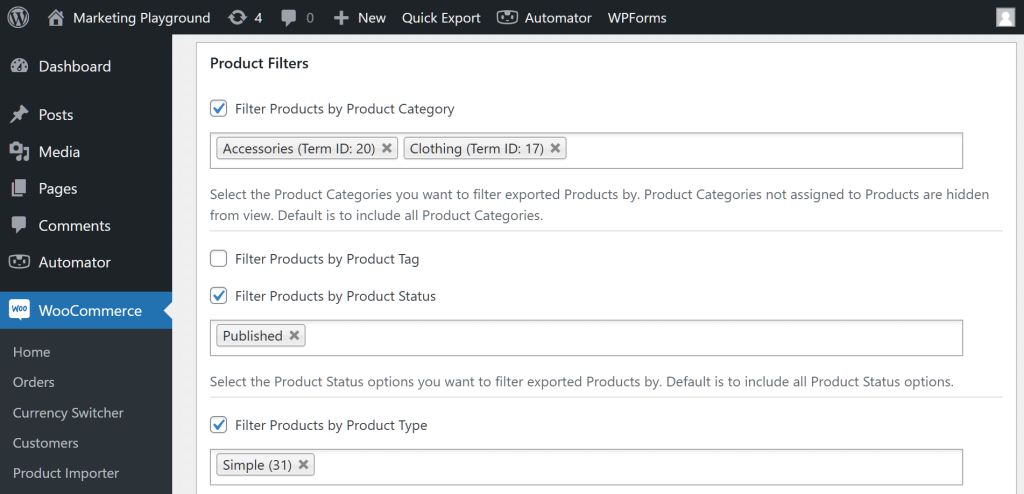
Moreover, you can choose multiple filters per category and can select filters from more than one grouping.
For example, in the image below, we combined filters from three groupings:
What if you want to remove an option from your selection? Simple: click the “x” next to its name.
Then there’s the Sorting option, which lets you arrange products in ascending or descending order. For more advanced sorting, use Custom Multi-Level Field Sorting.
Finally, there’s the Manage Custom Fields button. This brings us to…
Step 4: Create Custom Fields (Optional)
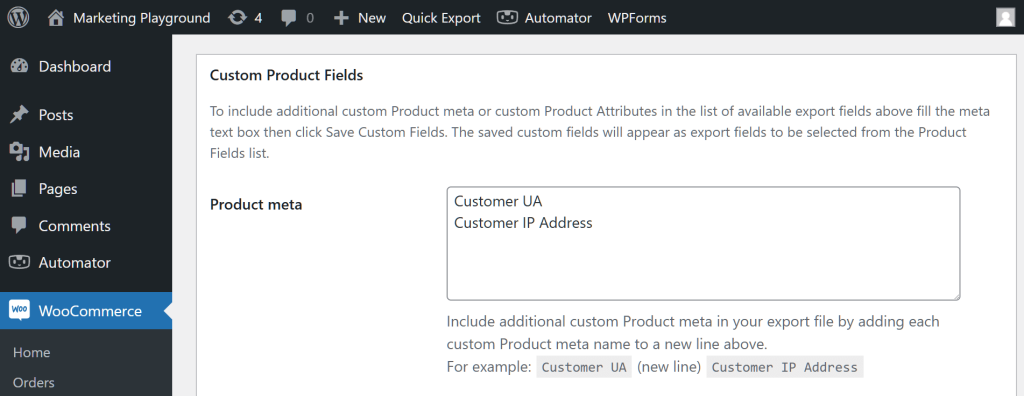
If you think the Fields area is missing important fields, don’t worry. After all, you can create your own unique fields in the Custom Fields area.
Simply type the names of your new fields into the Meta box, making sure to place only one field per line.
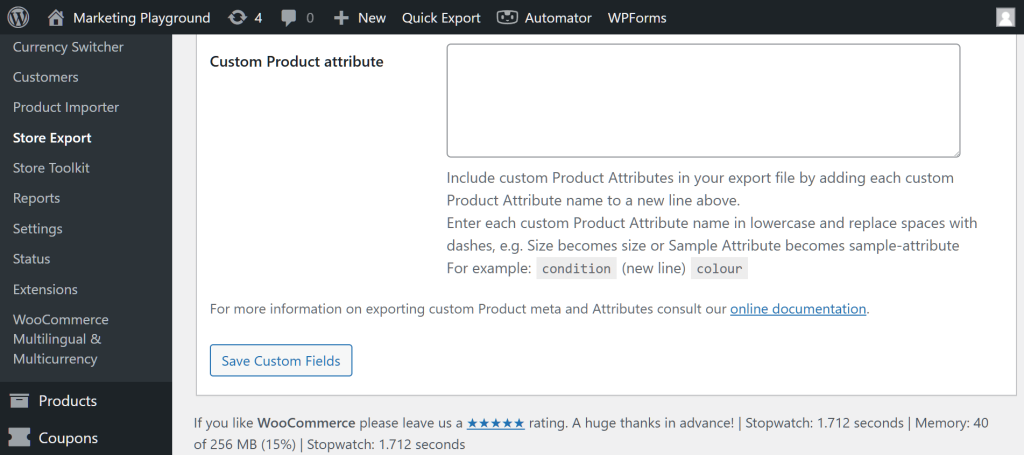
You can even create new attributes:
Once you’re done, click the Save Custom Fields button. Basically, this causes your newly created fields to appear in the Fields area, allowing you to select them for export.
Step 5: Finalize your Export Options
The Export Options area allows you to customize the format of your exported data.
Here, your most crucial task is to choose your Export format by clicking its circle. As previously mentioned, you can choose from several commonly used file formats, including CSV, XLS, and XML.
In addition, there’s the Export template option, which we’ll discuss in more detail further below.
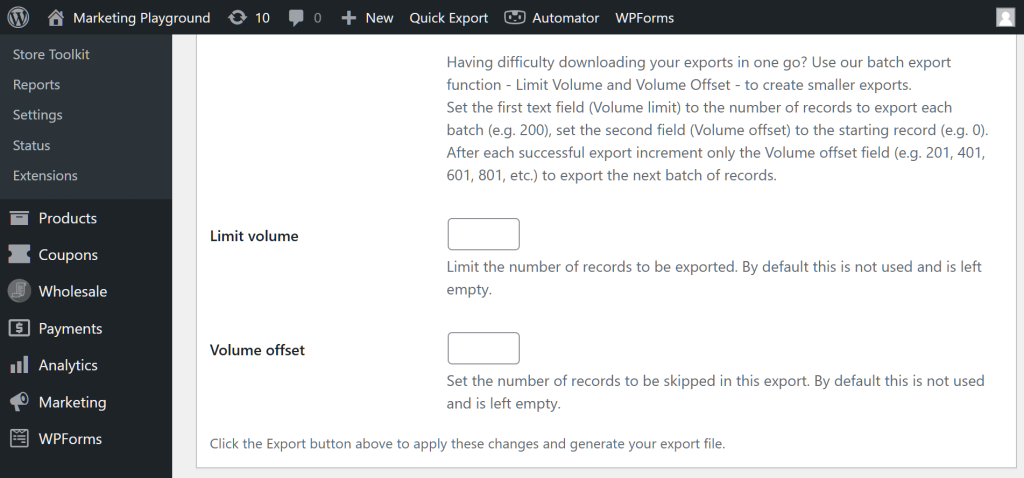
What if your store contains vast amounts of information? Won’t the resulting export file be so large that its contents will be a challenge to manage? Won’t it take forever to download?
Thankfully, by using the Limit volume and Volume offset options, you can split your export into several smaller batches. For example, instead of exporting 1,000 products into one huge file, you can export them into 5 smaller files, with each containing only 200 products.
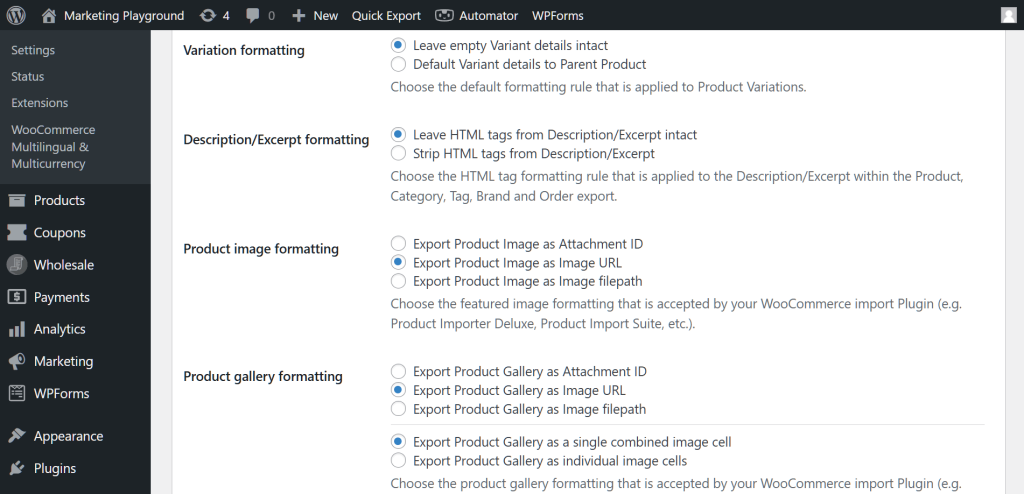
Lastly, depending on the data type you selected in Step 1, you may be granted access to even more options.
For instance, if you chose “Products,” you can control how product images, product galleries, and more are exported.
Step 6: Run your WooCommerce export!
When you’re satisfied with your settings, return to and click either the Export Products or Quick Export button. Basically, this instructs Store Exporter Deluxe to extract your specified store data and transfer it into your chosen file format.
Depending on how much data you’re extracting, running a WooCommerce export can take a few seconds to a couple of minutes. Once the plugin has finished the transition, you’ll find the export file on your computer.
Take note: Store Exporter automatically saves your Quick Export settings so that you can easily access them in the future.
III. How To Schedule Exports
Why export WooCommerce data manually when you can have Store Exporter do it for you?
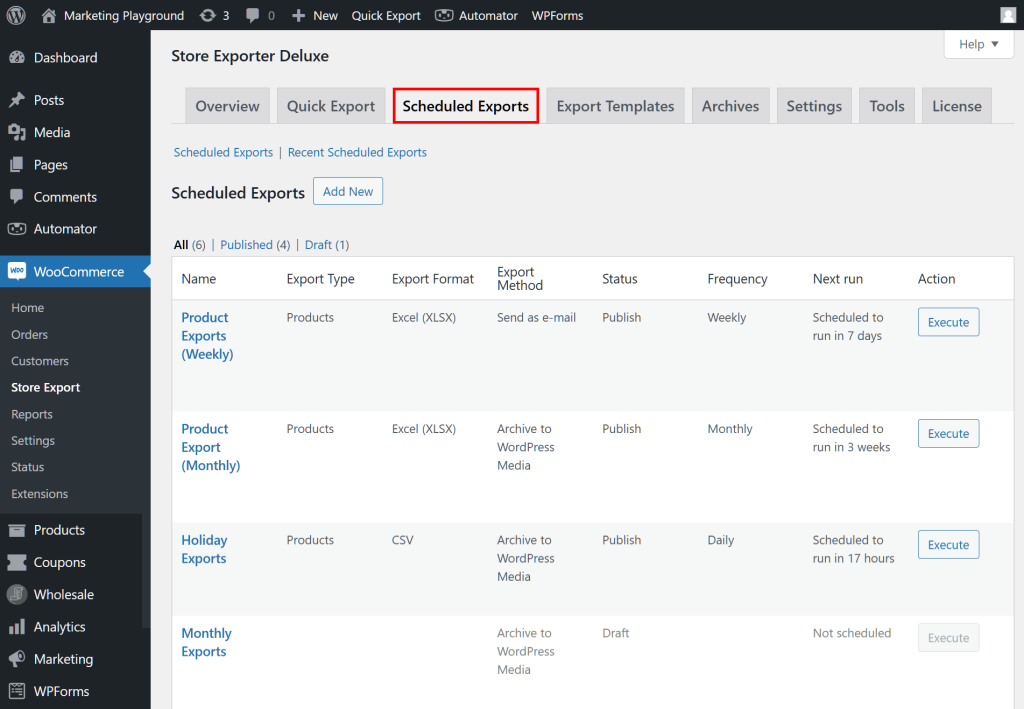
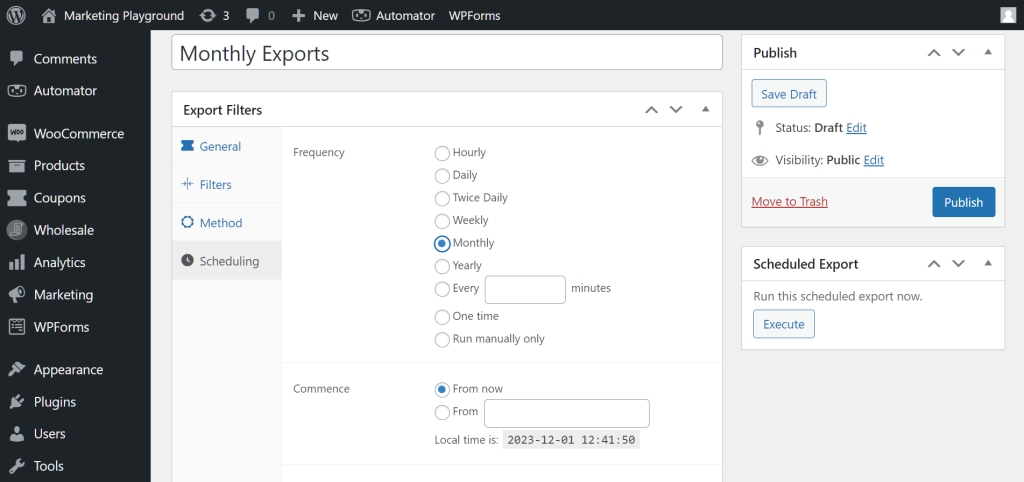
With Store Exporter’s Scheduled Exports feature, you can schedule your WooCommerce export tasks to occur automatically on designated dates.
To access the Scheduled Exports section, go to your WordPress dashboard and click WooCommerce > Store Export > Scheduled Exports:
Scheduling a WooCommerce export is easy. The first couple of steps are no different from configuring an ordinary export. To be precise, you must pick a data type and its fields, then choose filters to further define the information to export.
Next, you must determine when and how often you want Store Exporter to export WooCommerce data.
Furthermore, you can publish export tasks, which are then listed in a table. Any time you wish to edit, delete, or clone a published task, you can do so through said table.
Would you like more information on how to export WooCommerce data automatically? Then check out our article, “How To Set Up An Automated Export System In WooCommerce.”
IV. How To Create Export Templates
Adding another layer of convenience to your WooCommerce export tasks is Store Exporter’s Export Templates feature.
These templates allow you to save and reuse specific settings for exporting data, making the process efficient and straightforward.
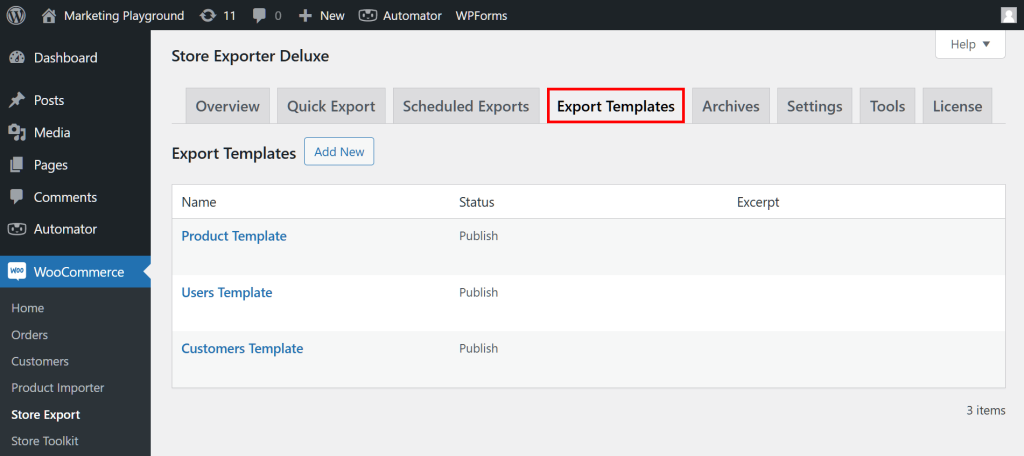
To access the Export Templates section, go to your WordPress dashboard and click WooCommerce > Store Export > Export Templates:
Creating an export template is simple. Basically, all you must do is pick a data type and its fields to export. Once saved and published, this template appears in a table, where you can edit or delete it any time you desire.
You can then use an export template to overwrite the Fields settings for your Quick Export or Scheduled Export. This means you don’t have to configure those Fields settings from scratch every time you wish to run a WooCommerce export.
Are you curious about using export templates? Then read our article, “How To Create Export Templates In WooCommerce (Ultimate Guide).”
Conclusion
Mastering data export tasks can significantly enhance your business efficiency. Whether your goal is to back up key information, analyze sales trends, or enable smooth data migration, the ability to export WooCommerce data empowers you with control and adaptability.
Thankfully, Store Exporter helps you manage and leverage your WooCommerce data through export processes. To export WooCommerce data, you simply have to implement the following steps:
- Select the Export Type
- Choose the Fields to export
- Pick your Filters
- Create Custom Fields (optional)
- Finalize your Export Options
- Run your WooCommerce export!
Don’t forget: Store Exporter also grants you extra convenience by allowing you to:
Do you have any questions on how to export WooCommerce data? Let us know in the comments!


