In today’s fast-paced business environment, an effective export schedule is crucial for managing your WooCommerce data.
The reason why is simple: Scheduling your data exports to occur at predetermined times can significantly streamline your operations. For one thing, this approach enhances consistency and reliability. For another, it frees up your time for more strategic tasks. And the benefits don’t end there!
In this article, we explore why setting up an automated export schedule is beneficial. Furthermore, we provide a step-by-step guide on using Visser Labs‘ Store Exporter Deluxe to create such an export schedule.
So let’s start!
I. Why You Should Set Up Your Data Exports To Occur At Predetermined Times
Setting up your data exports to take place at scheduled times can bring many benefits to your business. Here are some key advantages:
1. Consistency and reliability
When you schedule your exports, you ensure that your data is updated consistently and reliably. This can help you avoid missing important data updates. Moreover, it can prevent you from losing valuable information due to human error.
2. Time management
Automating data exports frees up your time. Thus, it allows you to focus on more strategic tasks. For example, instead of manually exporting data, you can dedicate your efforts to analyzing the data and making informed business decisions.
3. Accuracy
Scheduled exports minimize the likelihood of mistakes that can happen when you manually handle data. After all, automation is less susceptible to errors. Therefore, it guarantees that your data remains precise and current.
4. Efficiency
Automation increases efficiency by performing exports at times when it is most convenient for your business. For instance, you can schedule exports during off-peak hours to avoid disrupting your workflow.
5. Scalability
As your business grows, the amount of data you need to manage will increase. Scheduled exports can handle larger volumes of data seamlessly. Therefore, they make it easier to scale your operations without additional manual effort.
6. Integration with other systems
By scheduling exports, you can synchronize data updates with other systems and tools you use. This ensures that all your systems are working with the most current data. Ultimately, it improves overall business operations.
II. How To Create An Export Schedule For Designated Times (In 4 Easy Steps)
Ready to schedule your first automated export? Then use Visser Labs’ Store Exporter Deluxe, a top-notch WooCommerce exporter tool.
For this guide, we’ll assume you already have an online store powered by:
Moreover, we’ll assume you’ve already downloaded, activated, and installed WooCommerce Store Exporter Deluxe. Take note: Scheduling exports isn’t available in the free Store Exporter plugin. So if you wish to schedule your automated exports upgrade to the premium version!
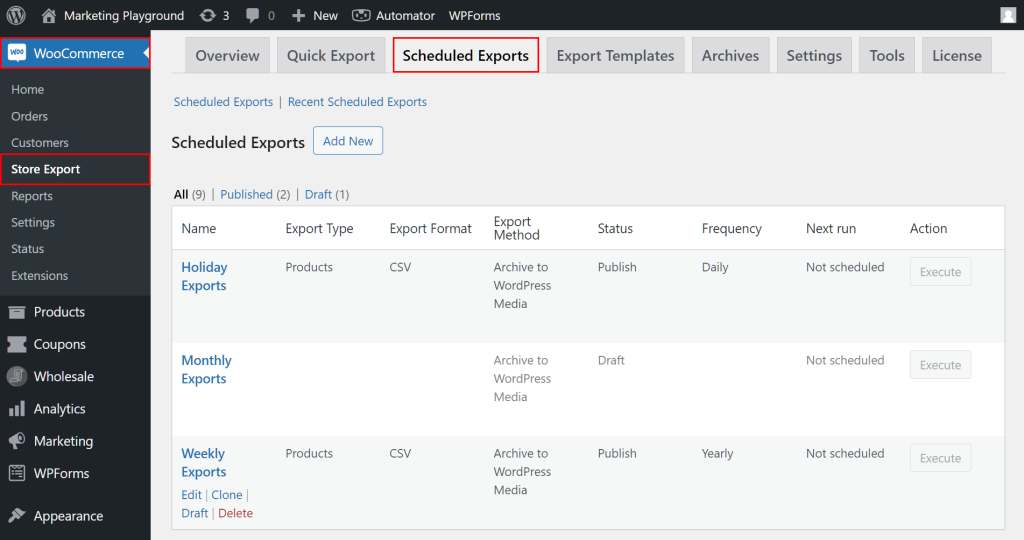
Now, it’s time to find this exporter tool’s Scheduled Exports feature within your store’s backend. Basically, just navigate to your WordPress dashboard and click WooCommerce > Store Export. Then, click the Scheduled Exports tab.
Now, we’re ready to create an export schedule!
Step 1: Create an export schedule
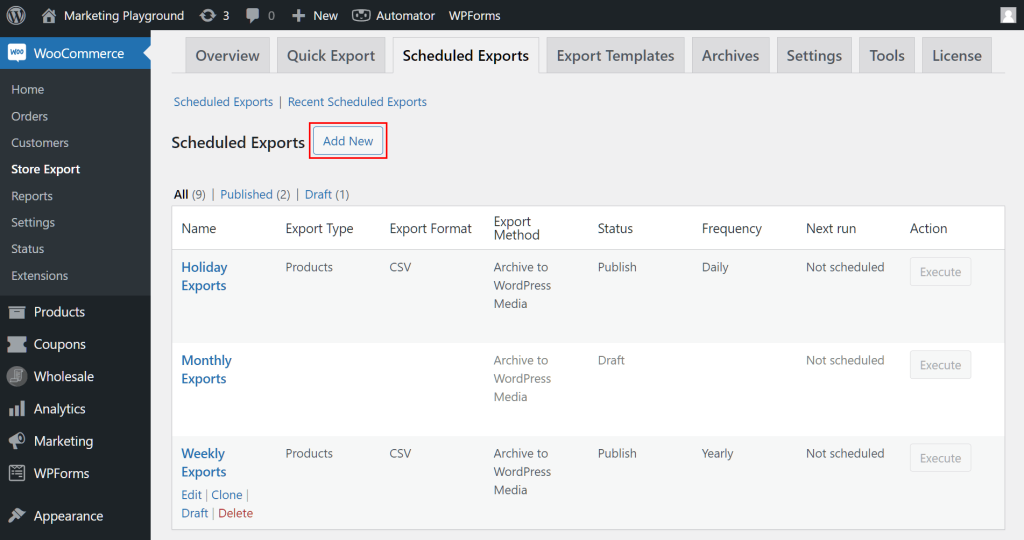
Create a new export schedule by clicking the Add New button above the table of existing export schedules.
This takes you to the Add New Scheduled Export page.
Step 2: Provide details about your export schedule
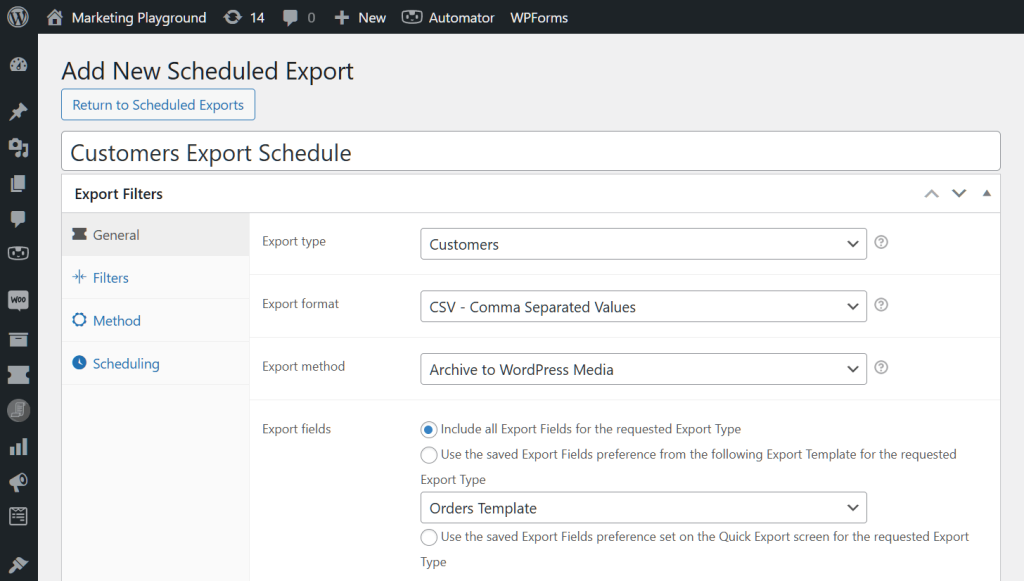
The Add New Scheduled Export page lets you provide the details necessary to create your export.
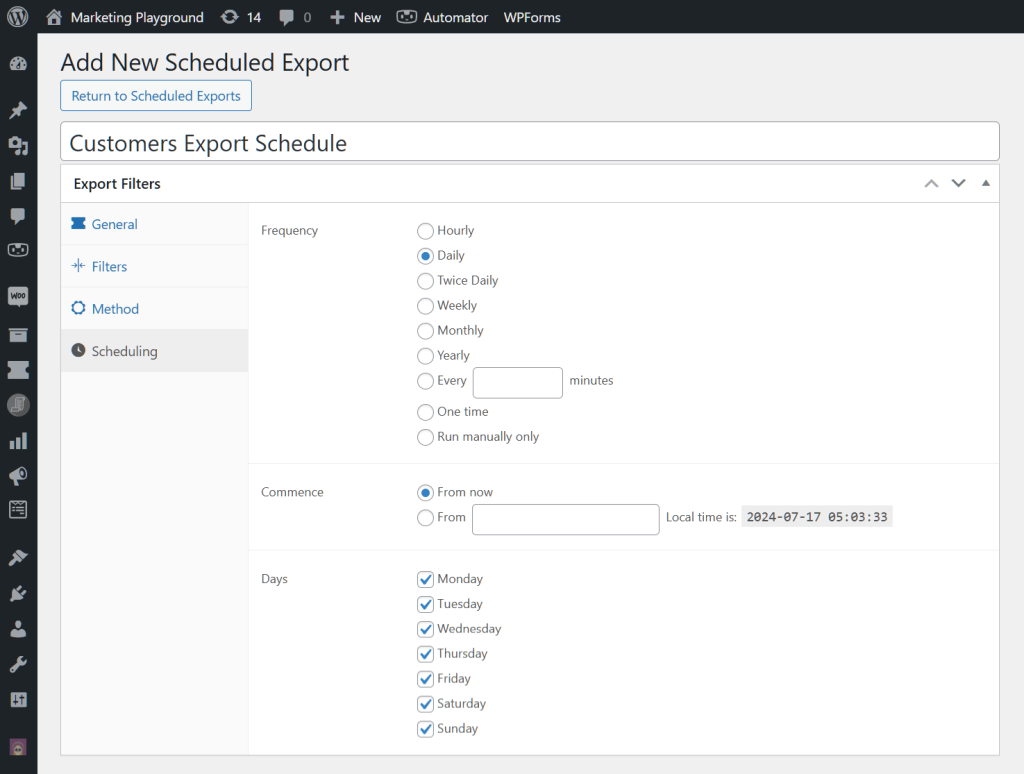
First, name your export schedule. Ideally, this should indicate what the export is about. For instance, in the image above, we wish to export customer data. Thus, we named our export schedule “Customers Export Schedule.”
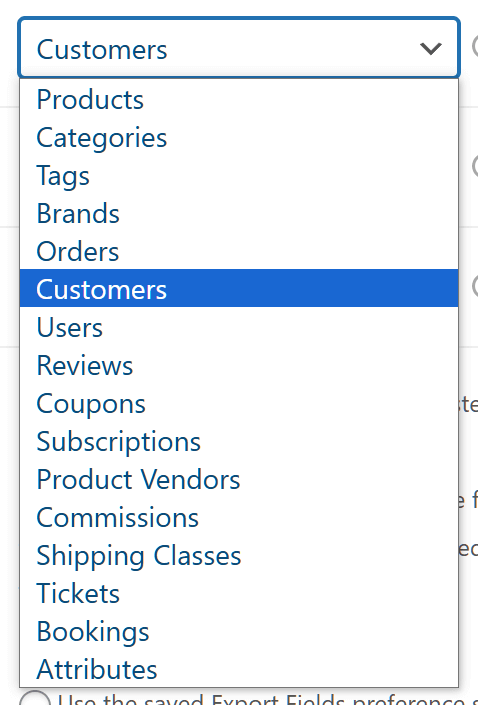
Next, choose the Export type, or the data type you wish to export. Click the dropdown and make your selection. For example, to extract information about your store’s products, click “Products.” In our case, we’ll pick “Customers.”
In addition, it’s crucial to choose the Export format. Available file formats to transfer your data into include:
- CSV (Comma-Separated Values)
- TSV (Tab Separated Values)
- Excel (XLS) (Excel 97-2003)
- Excel (XLSX) (Excel 2007-2013)
- XML (EXtensible Markup Language)
- RSS 2.0 (XML feed in RSS 2.0 format)
- JSON (JSON data format)
Similarly, you must pick your Export method. Basically, this option lets you:
- Archive the export to WordPress Media
- Save the export to your server
- Send the export as an email
- Post the export to a remote URL
- Upload the export to remote FTP/SFTP
Lastly, Export fields lets you:
- Export all the fields associated with your preferred export type
- Use your field settings from the Quick Export section
- Use an Export Template
Looking for more information on Quick Export? Then read our article, “How To Export WooCommerce Data: Ultimate Guide.”
Would you like more information on Export Templates? Then check out our article, “How To Create Export Templates In WooCommerce (Ultimate Guide).”
So, you’ve chosen what data to export from your store. Now, it’s time to export it at a specific time…
Step 3: Schedule your export
Click the Scheduling panel.
As shown above, the Scheduling panel boasts multiple options regarding when and how often to export data. Let’s explore each option.
Frequency
The Frequency option determines how often the plugin exports your data. Your options include:
- Hourly
- Daily
- Twice Daily
- Weekly
- Monthly
- Yearly
- Every X minutes
- One time
- Run manually
For example, do you want your data exported every hour? Then select “Hourly.” What if you want the export performed every day? Then select “Daily.” And so and so forth.
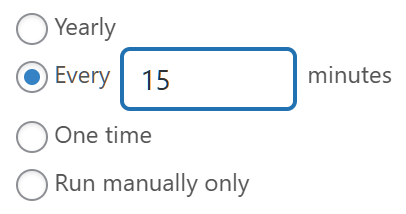
Furthermore, you can choose a specific interval in minutes. Simply enter the desired number of minutes in the entry field. For example, if you want the export to occur every 15 minutes, input “15.”
In addition, you can choose to export your data once or manually.
Commence
With the Commence option, you can choose when your automated export starts. You have two choices.
The first option lets you start exporting your data as soon as you publish the export schedule.
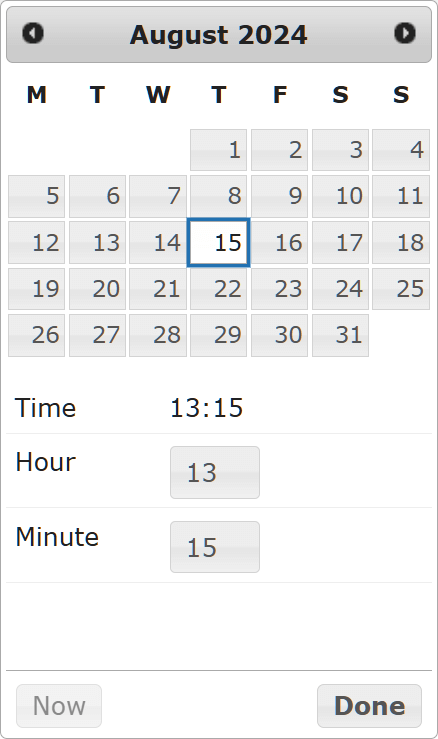
The second option lets you use a calendar to pick the specific hour, day, month, and year the export starts.
Days
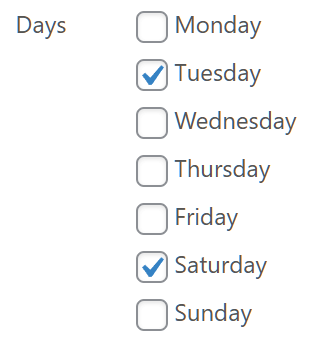
Basically, the Days option lets you select which day(s) of the week to automatically export your data. All you must do is tick the checkboxes of your preferred days.
For example, if you want your automatic exports to occur on Monday, tick the “Monday” checkbox. Do you want it to occur on Tuesdays and Saturdays, instead? Then tick the checkboxes for “Tuesday” and “Saturday.”
As you can imagine, combining the Frequency, Commence, and Day options enables you to be extremely specific about when your exports occur.
And that’s it! You’re now set to export your schedule at a designated time. We only have one step left…
Step 4: Execute or publish your export schedule
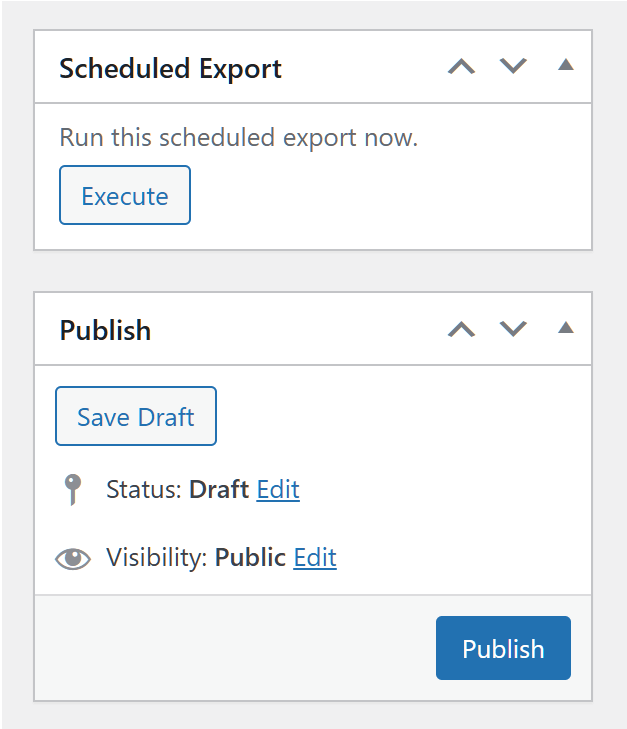
Scroll to the upper right corner of the page and look for the Scheduled Export and Publish boxes.
If you want to activate the scheduled export immediately, click the Scheduled Export box’s Execute button.
On the other hand, you can click the Publish box’s Publish button. But what does this do?
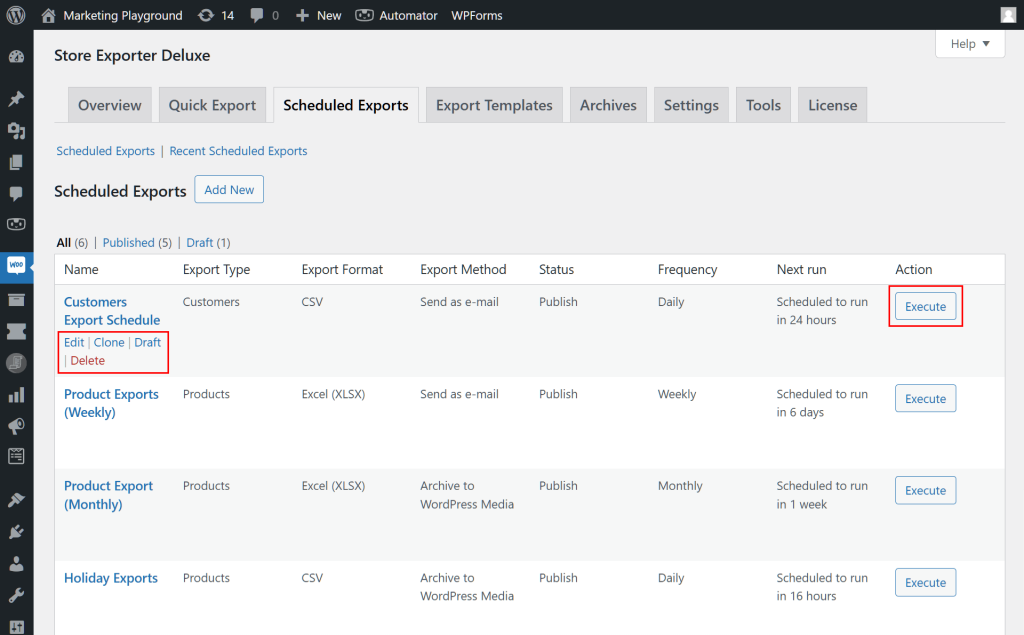
Remember the table of export schedules we saw earlier? Publishing a schedule places it on this table.
Basically, this table offers quick information about the export schedules you’ve created. In addition, it allows you to edit, clone, unpublish, delete, or execute any export schedule at any time. Just hover the mouse cursor over your preferred export schedule, then select an option!
This makes the table handy if you mean to reuse or modify specific export settings repeatedly!
Eager to learn more about scheduling automated exports? Then read our comprehensive guide, “How To Set Up An Automated Export System In WooCommerce!”
Conclusion
Setting up your data exports to occur at predetermined times offers consistency, saves time, and improves accuracy. In addition, it enhances efficiency, supports scalability, and ensures better integration with other systems. Thus, this practice helps streamline your data management process and boost your business’s overall productivity.
To summarize, you can use Visser Labs’ Store Exporter Deluxe to create export schedules for designated times. All you must do is observe the following steps:
- Create an export schedule
- Provide details about your export schedule
- Schedule your export
- Execute or publish your export schedule
Do you have any questions about export schedules? Let us know in the comments!
